Philips LC5231 User Guide - Page 19
Operation, Display and picture control
 |
UPC - 037849924327
View all Philips LC5231 manuals
Add to My Manuals
Save this manual to your list of manuals |
Page 19 highlights
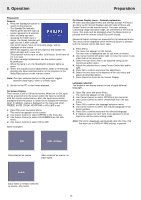
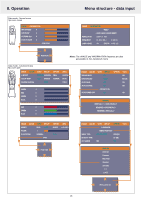
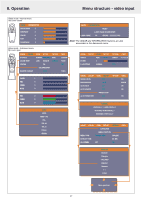
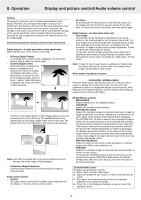
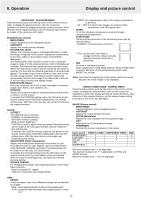
8. Operation Display and picture control DATA MODE - ADVANCED MENU Press the Menu button with the flip cover of the remote control open, to display the advanced menu. Use the cursor key (up/down) to select the display and picture control functions. After selection of the required function, set the required value setting by means of the cursor key (left /right). IMAGE (Picture control) - BRIGHTNESS Adjusts brightness of the displayed picture; - CONTRAST Adjusts the overall contrast intensity; - PICTURE ADJ. (Size) Adjusts the computer image in a horizontal direction to make the image completely fit the screen. Adjustment is performed in dot units. Adjust to the position where vertical flicker disappears. The HORIZONTAL SIZE function is used to size a computer image to make it fit the projected picture, both horizontally and vertically. The horizontal size parameter has permanent scope. When the OSD menu is active and the horizontal size option is selected, the level will be indicated graphically on a linear scale (gauge). The default output level conforms to the value set by the Auto image function. Switching to another data mode automatically restores Auto image if the data mode is not part of the ten most recently used display modes; - FINE PICTURE (Phase) Press the cursor key to the left or right and adjust to minimize image noise, flicker, color variations, etc.; - POSITION Adjusts the computer image in horizontal and vertical direction to centre it on the screen. To activate the POSITION setting, press the OK button on the remote control when POSITION is addressed in the IMAGE setting menu. With the cursor key you can move the picture in the required position. COLOR - V-EFFECT The following can be selected. - NORMAL is standard setting - NATURAL stresses coloring - REAL stresses brightness - CUSTOM is used to adjust freely as desired. Personal setting can be made of the color gamma index, and the respective R,G and B levels. To activate the CUSTOM setting, press the OK button on the remote control when CUSTOM is addressed in the COLOR setting menu. With the cursor key you can make your desired personal setting; - COLOR TEMP. (Color temperature) Adjusts the overall picture impression from warm to cool. Four different types of color balance can be set beforehand: LOW, MEDIUM, NORMAL and HIGH. Personal settings can be made to set the resp. R,G and B levels. To activate the personal setting, press the OK button on the remote control when the color balance setting is selected. With the cursor key (left/right) you can make your desired personal setting; - SOURCE CHANGE For changing the possible input signal acceptance via the Data input connector - Data for standard PC signals - YCbCr for component video signals (DVD) - DIRECT: the original aspect ratio of the image is maintained at all times; - 4:3 > 16:9: 4:3 aspect ratio images are projected after conversion to the 16:9 aspect ratio. - FILTER To set the sharpness during pixel conversion (image compression/enlargement); - D-KEYSTONE Corrects picture distortion of the vertical keystone type by internal scaling; - NORMAL: normal keystone correction - FULL: in this mode, the image is enlarged to fill the screen vertically and then keystone correction is performed. - PAN To move to the desired portion. Input a signal that is rated SXGA (XGA for S-lite) to RGB/YCbCr connector and then set the partial display position with ASPECT set to Real. Note: Less than the original size of the picture cannot be moved because the whole image is fully displayed. VIDEO/S-VIDEO MODE - NORMAL MENU Press the Menu button with the flip cover of the remote control closed, to display the normal menu, then use the cursor key (up/down) to select the display and picture control functions. After selection of the required function, set the required value setting by means of the cursor key (left/right). IMAGE (Picture control) - BRIGHTNESS Adjusts brightness of the displayed picture; - CONTRAST Adjusts the overall contrast intensity; - COLOR (Saturation) Adjusts the color saturation of the projected image; - TINT Adjusts the tint of the projected image; - SHARPNESS Controls the contour impression of the picture. Input source BRIGHTNESS CONTRAST COLOR TINT SHARPNESS VIDEO/S-VIDEO COMPONENT VIDEO • • • • • • o - • - RGB • • - Elements marked with '•' are adjustable. The element marked with 'o' is adjustable for NTSC and NTSC4.43 only. Elements marked with '-' are not adjustable VIEW - ASPECT To set the aspect ratio. Four different settings can be selected for images: - REAL: input signal projection without pixel replacement; - AUTO: projection after automatic input signal zoom-in / zoom- out; 19
-
 1
1 -
2
-
3
-
4
-
5
-
6
-
7
-
8
-
9
-
10
-
11
-
12
-
13
-
 14
14 -
 15
15 -
 16
16 -
 17
17 -
 18
18 -
 19
19 -
 20
20 -
 21
21 -
 22
22 -
 23
23 -
 24
24
 |
 |
