Philips LC5231 User Guide - Page 8
Set Up - ugo
 |
UPC - 037849924327
View all Philips LC5231 manuals
Add to My Manuals
Save this manual to your list of manuals |
Page 8 highlights
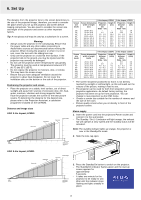
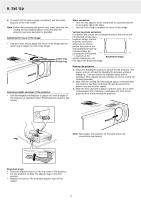
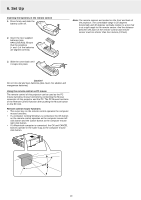
6. Set Up The distance from the projector lens to the screen determines to the size of the projected image, therefore, you need to consider the place where you set up the projector and screen before making connections. You also need to consider the screen size and height of the projector and screen as other important factors. Tip: A non-glossy wall may be used as a substitute for a screen. Warning: • Always carry the projector in the carrying bag. Ensure that the power cable and any other cables connecting to Audio/Video sources are disconnected before moving the projector. When moving the projector or when it is not in use, cover the lens with the sliding lens cap. • Only use the projector on a solid flat level surface. If the projector falls to the ground, you may be injured and the projector may severely be damaged. • Do not use the projector where temperatures vary greatly. The projector must be used at temperatures between 5°C (41°F) and 35°C (95°F). • Do not expose the projector to moisture, dust, or smoke. This may harm the screen image. • Ensure that you have adequate ventilation around the projector to allow heat dissipation. Do not cover the ventilation slots on the bottom or the side of the projector. Positioning the projector and screen • Place the projector on a stable, level surface, out of direct sunlight and away from sources of excessive dust, dirt, heat, water, moisture, vibration and strong magnetic fields. Face the projector towards the screen for the best picture results. To determine the distance for the desired size, please refer to the Projection Assistant, a calculation programme included on the CD-ROM. Distance and image sizes UGO X-lite Impact; LC5241 Wide (max) Tele (max) 200" Screen height 4m (13.1 feet) Screen size 120" 100" 80" 60" 40" 26" 150" Lens surface 1m (3.3feet) 2m (6.6 feet) 3m 4m 5m 6m 7m 8m 9m (9.8 feet) (13.1 feet) (16.4 feet) (19.7 feet) (23.0 feet) (26.2 feet) (29.5 feet) 3m (9.8 feet) 2m (6.6 feet) 1m (3.3feet) H Center of lens Distance from center of lens to lower edge of screen Screen size (inch) 25" 26" 40" 60" 80" 100" 120" 150" 200" X-lite Impact LC5241 S-lite Impact LC5231 Screen dimensions width x height (cm) 50.8 x 38.1 52.8 x 39.6 81.3 x 61.0 121.9 x 91.4 162.6 x 121.9 203.2 x 152.4 243.8 x 182.9 304.8 x 228.6 406.4 x 304.8 Projection distance (m) Wide - Tele - 1.2 1.5 - 1.9 2.3 - 2.8 3.1 - 3.7 3.9 - 4.7 4.7 - 5.6 5.9 - 7.1 7.9 - 9.4 Height H (cm) - 6.8 10.4 15.5 20.7 25.9 31.1 38.9 51.8 Projection distance (m) Wide -Tele 1.2 1.22 1.6 - 1.9 2.4 - 2.9 3.2 - 3.9 4.1 - 4.9 4.9 - 5.9 6.1 - 7.4 8.2 - 9.8 Height H (cm) 7.6 7.6 12.0 18.0 23.9 29.9 35.9 44.9 59.9 Screen size (inch) 25" 26" 40" 60" 80" 100" 120" 150" 200" X-lite Impact LC5241 S-lite Impact LC5231 Screen dimensions width x height (inch) 20.0 x 15.0 20.8 x 15.6 32.0 x 24.0 48.0 x 36.0 64.0 x 48.0 80.0 x 60.0 96.0 x 72.0 120.0 x 90.0 160.0 x 120.0 Projection distance (feet) Wide - Tele - 3.9 4.9 - 6.2 7.5 - 9.2 10.2 - 12.1 12.8 - 15.4 15.4 - 18.4 19.4 - 23.3 25.9 - 30.8 Height H (inch) - 2.7 4.1 6.1 8.1 10.2 12.2 15.3 20.4 Projection distance (feet) Wide -Tele 3.9 4.0 5.2 - 6.2 7.9 - 9.5 10.5 - 12.8 13.5 - 16.1 16.1 - 19.4 20.0 - 24.3 26.9 - 32.2 Height H (inch) 3.0 3.0 4.7 7.1 9.4 11.8 14.1 17.7 23.6 • The screen should be positioned so that it is not directly touched by sunlight or artificial light, as this will wash out the colours of the picture, making it hard to see. • The projector can be used for both front projection and rear projection applications. As default factory setting, the projector has been set up for front projection. You can change to rear projection via the OSD menu. • Choose a screen size suitable for the number of viewers and the size of the room. • Picture quality is best when you sit directly in front of the projector screen. Mains supply 1. Insert the power cord into the projectors Power socket and connect it to the wall socket. - The Standby / On (y I) indicator will light orange, the exhaust fan will operate at slow speed and the standby status will be activated. Note: The standby indicator lights up orange, the projector is now in the Standby/On mode. 2. Slide the lens cap open. UGO S-lite Impact; LC5231 Lens surface Screen size 120" 100" 80" 60" 40" 25" Wide (max) 150" Tele (max) 200" 1m (3.3feet) 2m (6.6 feet) 3m 4m 5m 6m 7m 8m 9m (9.8 feet) (13.1 feet) (16.4 feet) (19.7 feet) (23.0 feet) (26.2 feet) (29.5 feet) Screen height 4m (13.1 feet) 3m (9.8 feet) 2m (6.6 feet) 1m (3.3feet) H Center of lens Distance from center of lens to lower edge of screen 3. Press the Standby/On button to switch on the projector. - The Standby/On indicator flashes green and the start-up screen appears for approximately 5 seconds. - It takes one minute for the projector to be ready for use. Wait until the indicator stops flashing and lights steadily in green. 8
-
 1
1 -
2
-
 3
3 -
 4
4 -
 5
5 -
 6
6 -
 7
7 -
 8
8 -
 9
9 -
 10
10 -
 11
11 -
 12
12 -
 13
13 -
14
-
15
-
16
-
17
-
18
-
19
-
20
-
21
-
22
-
23
-
24
 |
 |
