Pioneer 504CMX Operating Instructions
Pioneer 504CMX - PDP - 50" Plasma Panel Manual
 |
UPC - 012562689784
View all Pioneer 504CMX manuals
Add to My Manuals
Save this manual to your list of manuals |
Pioneer 504CMX manual content summary:
- Pioneer 504CMX | Operating Instructions - Page 1
Plasma Display Écran à plasma PDP-504CMX PDP-504CMX-S PDP-434CMX Operating Instructions Mode d'emploi Contents related to system specifications, power requirements, accessories, and other information differ with respect to the country where this unit is purchased. For customers living in the - Pioneer 504CMX | Operating Instructions - Page 2
English This unit has been designed for use as a computer display monitor. The optional video card is required if you wish to view other video signals on the monitor. For details consult your local retail dealer. Français Cet appareil est conçu pour une utilisation comme moniteur d'affichage d' - Pioneer 504CMX | Operating Instructions - Page 3
Thank you very much for purchasing this PIONEER product. Before using your Plasma Display, please read the "Safety Precautions" and these "Operating Instructions" carefully so you will know how to operate the Plasma Display properly. Keep this manual in a safe place. You will find it useful - Pioneer 504CMX | Operating Instructions - Page 4
SERVICEABLE PARTS INSIDE. REFER SERVICING TO QUALIFIED SERVICE PERSONNEL. The exclamation point within an equilateral triangle is intended to alert the user to the presence of important operating and maintenance (servicing) instructions enclosed warranty card and keep or television reception, /TV - Pioneer 504CMX | Operating Instructions - Page 5
÷ When the power-supply cord or plug is damaged. ÷ If liquid has been spilled, or objects have fallen into the product. ÷ If the product has been exposed to rain or water. ÷ If the product does not operate normally by following the operating instructions. Adjust only those controls that are covered - Pioneer 504CMX | Operating Instructions - Page 6
operation. Product Name: Plasma Display with Video Card Model Number: PDP-504CMX / PDP-434CMX (Plasma Display) PDA-5003/PDA-5004 (Video Card) Product Category: Class B Personal Computers & Peripherals Responsible Party Name: PIONEER ELECTRONICS (USA) INC. Customer Support Division Address: P.O. BOX - Pioneer 504CMX | Operating Instructions - Page 7
3 How to use this manual 3 Checking supplied accessories 5 Part Names and Functions 6 Main unit 6 Remote control unit 7 Connection panel 8 Installation and Connections 10 Installation of the unit 10 Connection to a personal computer 12 Audio connections 13 Power cord connection 14 How to - Pioneer 504CMX | Operating Instructions - Page 8
the dealer where this unit was purchased.) 1 Table top stand: PDP-504CMX/PDP-434CMX display stand. 2 Wall installation unit: Wall installation bracket designed as a wall interface for securing the unit. 3 Speaker system designed specifically for plasma displays (width: 7.4 cm (2-29/32 in.)): 2-way - Pioneer 504CMX | Operating Instructions - Page 9
the plasma display picture to match the requirements of specific components and personal preferences. Regarding menu displays The example menu displays provided in this manual are those for the PDP-504CMX model. The PDP-434CMX display differs as shown: Example of PDP-504CMX Menu Display: MENU - Pioneer 504CMX | Operating Instructions - Page 10
manual Each operation is described in its proper operating order. These Operating Instructions will refer to the operating controls found on the remote control unit, with the exception of those buttons found only on the main plasma display itself. When the plasma display controls dark parts of the - Pioneer 504CMX | Operating Instructions - Page 11
accessories Check that the following accessories were supplied. 1 Power cord 2 Remote control unit 3 AA (R6) batteries (x 2) Before Proceeding 7 Display stands (x 2) 8 Washers (x 2) 9 Hex hole bolts (x 2) 0 Remote control unit holder 4 Cleaning cloth (for screen) 5 Speed clamps (x 2) Use as - Pioneer 504CMX | Operating Instructions - Page 12
Names and Functions Main unit Main unit PDP-504CMX Operation panel on the main unit PDP-434CMX 6 6 7 8 9 0 - = ~ ! Part Names and Functions 1 3 45 Main unit 1 Display stand 2 Remote control sensor Point the remote control toward the remote sensor to operate the unit (page 8). 3 Ambient - Pioneer 504CMX | Operating Instructions - Page 13
remote control unit's batteries begin to wear out, the operable distance will gradually become shorter. When this occurs, replace all batteries with new ones as soon as possible. Part in operation or standby mode (page 19). - DISPLAY button Press to view the unit's current input and setup mode - Pioneer 504CMX | Operating Instructions - Page 14
installation surroundings, this unit's remote control unit may be influenced by the infrared rays discharged from the plasma display, hampering reception of its video input terminals and one video output terminal. Audio input/ output and speaker output terminals are also provided. For instructions - Pioneer 504CMX | Operating Instructions - Page 15
PDP-504CMX model. Part Names and Functions POWER OFF ON AC IN 0 - SPEAKER 8+Ω ~16Ω- L = Part Names and Functions R SPEAKER Pioneer installation technician. This connector is used for plasma display This unit does not support the display of copyguard-protected video signals (page 12). - Pioneer 504CMX | Operating Instructions - Page 16
thread pitch) PDP-434CMX: 880 mm (31-7/16 in.) (Bolt hole thread pitch) Always install the supplied display stands according to the dimensions shown in the accompanying illustration. 110 mm (4-5/16 in.) 2 Set this unit in the stands. Installation using the optional PIONEER stand or installation - Pioneer 504CMX | Operating Instructions - Page 17
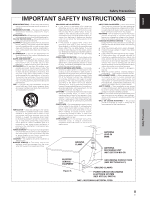
the plasma display, do not use the handles as means of hanging the display; also do not use them as devices to prevent tipping over (see illustration). Français Installation and Connections b hole b hole Air vents (fan) b hole a hole a hole b hole Center line b hole Rear view diagram (PDP - Pioneer 504CMX | Operating Instructions - Page 18
computer's instruction manual. Before making connections, be sure to make sure that the personal computer's power and this unit's main power is off. Connection to INPUT1 Connect the display's D-sub input connector to the D-sub output (analog RGB) from the computer. This connector also supports G ON - Pioneer 504CMX | Operating Instructions - Page 19
from the component connected to INPUT1, to the plasma display's AUDIO (INPUT1) stereo mini jack (L/R). Sound is output from both the AUDIO (OUTPUT) stereo mini jack (L/R) and the SPEAKER (L/R) terminals according to the video input selection. Audio connections for component (computer) connected - Pioneer 504CMX | Operating Instructions - Page 20
power cord to this unit. 2 Plug the power cord into a power outlet. CAUTION ÷ Use only the power cord provided. ÷ For the plasma display, a three-core power a power source converter plug, use an outlet with a ground terminal and screw down the ground line. NO! Do not use a power supply voltage other - Pioneer 504CMX | Operating Instructions - Page 21
stress to be placed on the ends of cables. Note Cables can be routed to the right or left. Illustration depicts PDP-504CMX model. * As viewed from the rear of the display. Installation and Connections To remove speed clamps Using pliers, twist the clamp 90° and pull it outward. In some cases the - Pioneer 504CMX | Operating Instructions - Page 22
operating panel Remote control unit 1 Set the rear panel MAIN POWER switch to ON. The STANDBY indicator on the front panel will light red. 2 Press the STANDBY/ON button to turn the power ON. The ON indicator on the front panel will light green. 3 Press the MENU button to display the menu screen - Pioneer 504CMX | Operating Instructions - Page 23
manual setup is necessary for signals with other refresh rates, since adjustments are performed automatically (the [SIGNAL FORMAT] item will not be displayed). MENU 5/∞ 2/3 SET MENU 2/3 SET 5/∞ Main unit operating panel Remote control SETUP OPTION POWER MANAGEMENT CLAMP setting supports - Pioneer 504CMX | Operating Instructions - Page 24
POWER MANAGEMENT CLAMP POSITION SIGNAL FORMAT : OFF : AUTO : VGA MENU 5/∞ 2/3 SET MENU 2/3 SET 5/∞ Main unit operating panel Remote control unit 1 Press the MENU button to display SCREEN SETUP OPTION POWER MANAGEMENT CLAMP POSITION SIGNAL POSITION] setting is supported only for INPUT1. - Pioneer 504CMX | Operating Instructions - Page 25
displayed: INPUT1 CAUTION UNSUPPORTED SIGNAL fH : 86. 7 kH z fV : 88. 5 Hz 115 2X864 STANDBY/ ON INPUT VOLUME [+/-] STANDBY/ ON INPUT CAUTION OUT OF RANGE fH : 75. 7 kH z fV :120. 0 Hz ---- FULL INPUT1 VOLUME [+/-] Main unit operating panel Remote control unit 1 Set the rear panel MAIN POWER - Pioneer 504CMX | Operating Instructions - Page 26
to respectively decrease and increase the volume of sound from the speakers. Main unit operating panel Remote control unit Press the DISPLAY button. The currently selected input, screen size and refresh rates will be displayed for about 3 seconds. INPUT1 VOLUME : 5 Muting the sound MUTING fH : 31 - Pioneer 504CMX | Operating Instructions - Page 27
Remote control unit SCREEN SIZE Main unit operating panel The screen size changes each time the SCREEN SIZE button is pressed as follows. [PDP-504CMX] 3 DOT BY DOT FULL 2 4:3 2 3 PARTIAL or FULL 2 4:3 2 [PDP-434CMX selected, the display position is moved slightly each time the power is turned - Pioneer 504CMX | Operating Instructions - Page 28
DISPLAY button is pressed. Use the 5/∞ buttons to adjust the vertical position of the video image on the screen. 5 ZOOM (*Supported only on PDP-434CMX direction. 22 En 1 Press the remote control unit's POINT ZOOM button. x be changed. ¶ When using the plasma display in a profit-making activity, or - Pioneer 504CMX | Operating Instructions - Page 29
canceled. Multiscreen display The plasma display's multiscreen function allows the simultaneous display of two inputs. The multiscreen display include three Press the remote control unit's SWAP button. ¶ When 2-SCREEN mode has been selected: The right and left sides of the display will switch - Pioneer 504CMX | Operating Instructions - Page 30
operates.) Note Always turn off the plasma display's main power switch when not using the display for extended periods of time. INPUT MENU INPUT 2/3 SET MENU 2/3 SET Main unit operating panel 24 En Remote control unit 1 Press the MENU button to display the menu screen. MENU INPUT1 PICTURE - Pioneer 504CMX | Operating Instructions - Page 31
MENU 2/3 SET 5/∞ Main unit operating panel Remote control unit 1 Press the MENU button to display the menu screen. MENU PICTURE SCREEN CONTRAST that the picture can be seen clearly. BRIGHTNESS Adjust so that the dark parts of the picture can be seen clearly. R. LEVEL Adjust the amount of red - Pioneer 504CMX | Operating Instructions - Page 32
SET UP button on either remote control unit or the plasma display's operating panel (or by selecting [AUTO SET UP MODE] from the menu), the unit will automatically set the screen position and clock to best match the current image input. Note This setting is supported only when INPUT1 is selected - Pioneer 504CMX | Operating Instructions - Page 33
>". PICTURE/SCREEN Adjustment Adjusting screen POSITION, CLOCK, and PHASE MENU 5/∞ 2/3 SET MENU 2/3 SET 5/∞ Main unit operating panel Remote control unit 1 Press the MENU button to display the menu screen. MENU INPUT1 PICTURE SCREEN CONTRAST : BRIGHTNESS : R.LEVEL - Pioneer 504CMX | Operating Instructions - Page 34
control movement in the Horizontal direction (H), and the 5/∞ buttons control the input video signal. PHASE [PHASE] adjustment items are supported only for INPUT1. ÷ If you wish to record a manually set adjustment value, set the value into the memory and returns the display to the step 3 screen. 6 - Pioneer 504CMX | Operating Instructions - Page 35
burnt with a lag image. ÷ This function is not supported when using the POINT ZOOM function, multiscreen function, or menu display. Note The [ORBITER] setting affects all input sources. MENU 5/∞ 2/3 SET MENU 2/3 SET 5/∞ Main unit operating panel Remote control unit 1 Press the MENU button to - Pioneer 504CMX | Operating Instructions - Page 36
in the screen, this plasma display is equipped with a screen management program that allows automatic switching of the display image at regular intervals. operating panel 30 En MENU 2/3 SET 5/∞ Remote control unit 1 Press the MENU button to display the menu screen. MENU PICTURE SCREEN CONTRAST - Pioneer 504CMX | Operating Instructions - Page 37
screen management program ends, this part of the display will change to the [ power control function allows screen brightness to be suppressed as a means of lowering power consumption and reducing display deterioration. MENU 5/∞ 2/3 SET MENU 2/3 SET 5/∞ Main unit operating panel Remote control - Pioneer 504CMX | Operating Instructions - Page 38
mode. ÷ MODE2 ......... Brightness is controlled in accordance with input signal, but power consumption is less than that used 2/3 SET MENU 2/3 SET 5/∞ Main unit operating panel Remote control unit 1 Press the MENU button to display the menu screen. MENU PICTURE SCREEN CONTRAST : BRIGHTNESS - Pioneer 504CMX | Operating Instructions - Page 39
but it can be enabled again by turning the power ON/OFF. 5 When finished with the setting, supported only when a separate SYNC or composite SYNC analog RGB signal is input. (When a G ON SYNC or component video SET 5/∞ Remote control unit Other Operations 1 Press the MENU button to display the menu - Pioneer 504CMX | Operating Instructions - Page 40
Cleaning Troubleshooting Regular cleaning will extend the life and performance of this unit. The recommended way to clean the display and related parts is described below. Before cleaning, be sure to unplug the power cord from the power outlet. Cleaning the display panel body and remote control Do - Pioneer 504CMX | Operating Instructions - Page 41
(simplified radios) etc., or a nearby personal computer, TV, or video/audio component. • A strong electromagnetic field may cause picture distortion and similar problems. • Normal sound of the cooling fan and internal sliding parts of the plasma display panel. Not a malfunction. • Fan is set to - Pioneer 504CMX | Operating Instructions - Page 42
of internal electronic parts, or other factors. If the power is automatically turned off for a reason other than the above reasons, there could be a malfunction. In this case, unplug the power cord from the power outlet and request repair from your nearest sales outlet. • The plasma display panel of - Pioneer 504CMX | Operating Instructions - Page 43
41.0 kg (90 lbs. 7 oz) (including display stand 41.6 kg (91 lbs. 12 oz) Operating temperature range 0 to 40 °C General (PDP-434CMX) Light emission panel 43-inch" AC Plasma Panel 95.2 (W) x 53.6 (H) x 109.3 (diagonal) cm Number of pixels 1024 x 768 Power supply AC 100 - 120 V, 50/60 Hz Rated - Pioneer 504CMX | Operating Instructions - Page 44
1: Computer signal compatibility table Appendix 1 -1/4: PDP-504CMX (INPUT1) Computer signal compatibility table (INPUT1 1Hz 60Hz 66.7Hz 72.8Hz 75Hz 85Hz 60Hz 31.5kHz 37.9kHz 31.5kHz 35.0kHz 37.9kHz 37.5kHz 43.3kHz 31.0kHz 640x480 ± ± ± ± 848x480 1024x768 ± ± ± ± 1280x768 ± 1280x768 ± ± ± - Pioneer 504CMX | Operating Instructions - Page 45
English Additional Information Appendix 1 -2/4: PDP-504CMX (INPUT2) Computer signal compatibility table (INPUT2) : Not available. Resolution (Dot x Line) 640x480 848x480 800x600 1024x768 1280x768 1152x864 1280x960 1280x1024 1400x1050 Refresh rate Vertical 60Hz - Pioneer 504CMX | Operating Instructions - Page 46
Additional Information English Appendix 1 -3/4: PDP-434CMX (INPUT1) Computer signal compatibility table (INPUT1) Resolution (Dot x Line) 640x400 60Hz 70Hz 75Hz (74.9Hz) 85Hz 60Hz 37.9kHz 31.5kHz 35.0kHz 37.9kHz 37.5kHz 43.3kHz 31.0kHz 35.2kHz 37.9kHz 48.1kHz 46.9kHz 53.7kHz 49.7kHz 48.4kHz 56. - Pioneer 504CMX | Operating Instructions - Page 47
English Additional Information Appendix 1 -4/4: PDP-434CMX (INPUT2) Computer signal compatibility table (INPUT2) : Not available. Resolution (Dot x Line) 640x480 848x480 800x600 1024x768 1280x768 1152x864 1280x960 1280x1024 1400x1050 Refresh rate Vertical 60Hz Horizontal - Pioneer 504CMX | Operating Instructions - Page 48
SDA 13 HD or Display Working Group (DDWG) for digital displays Video Electronics Standards Association. Power Management and Sun Microsystems are registered trademarks of Sun Microsystems, Inc. VGA and XGA are registered trademarks of International Business Machines Co., Inc. Published by Pioneer - Pioneer 504CMX | Operating Instructions - Page 49
Français Français Précautions de Sécurité Mode d'emploi Nous vous remercions vivement d'avoir fait l'acquisition de ce produit PIONEER. Avant d'utiliser votre écran à plasma, veuillez lire attentivement les "Précautions de Sécurité" ainsi que la présente "Mode d'emploi" de manière à utiliser l' - Pioneer 504CMX | Operating Instructions - Page 50
sidentielle. Cet appareil génère, utilise et peut émettre de l'énergie radiofréquence et, s'il n'est pas installé et utilisé selon les instructions, peut causer des interférences nuisibles aux communications radio. Cependant, il n'y a aucune garantie que de telles interférences ne se produisent pas - Pioneer 504CMX | Operating Instructions - Page 51
de fonctionnement doivent être lues avant la mise en service de l'appareil. CONSERVEZ LES INSTRUCTIONS - Les consignes de sécurité et de fonctionnement piscine, etc. ACCESSOIRES - Ne placez pas cet appareil sur un chariot, un support, un trépied ou une table instable. Il risque en effet de tomber et - Pioneer 504CMX | Operating Instructions - Page 52
du Canada pour obtenir le nom du Centre de Service Autorisé Pioneer le plus près de chez-vous. Vous pouvez aussi contacter le Service à la clientèle de Pioneer: Pioneer Électroniques du Canada, Inc. Service à la clientèle 300, Allstate Parkway, Markham, Ontario L3R OP2 (905)479-4411 1(877)283 - Pioneer 504CMX | Operating Instructions - Page 53
34 Nettoyage 34 Guide de dépannage 34 PDP-504CMX ¶ Découvrez le large panneau à plasma plasma à haute définition de Pioneer / hauteur et de taille d'écran supportés comprennent [POINT PAR POINT], [4:3], fonction [ÉCONOM. D'ÉNERGIE] est en service, la consommation électrique est réduite de - Pioneer 504CMX | Operating Instructions - Page 54
, consultez le revendeur.) 1 Support de bureau : Support pour écran PDP-504CMX/PDP- 434CMX. 2 Suspension murale : Applique d'installation murale, conçue comme support de fixation de l'appareil. 3 Enceintes acoustiques spécialement conçues pour les écrans à plasma (largeur: 7,4 cm) : Haut - Pioneer 504CMX | Operating Instructions - Page 55
vous familiariser avec les organes et les commandes de l'écran à plasma et de sa télécommande. La section "Installation et raccordements" OPTION RÉINIT. IMAGE SET ENTRÉE MENU SORTIE Exemple d'affichage de menu du PDP-434CMX: MENU IMAGE CONTRASTE LUMINOSITÉ NIV. ROUGE NIV. VERT NIV. BLEU AGRAND. - Pioneer 504CMX | Operating Instructions - Page 56
opération est décrite en suivant son ordre particulier. Les instructions de fonctionnement font référence aux commandes, présentes sur la télécommande, à l'exception des touches qui ne se trouvent que sur l'écran à plasma proprement dit. Lorsque des commandes équivalentes se trouvent à la fois - Pioneer 504CMX | Operating Instructions - Page 57
commande 9 2 boulons hexagonaux 3 2 piles AA (R6) 4 Chiffon de nettoyage (pour l'écran) 5 2 colliers rapides 0 Support pour télécommande Utilisez ce support pour y ranger la télécommande. Si vous fixez ce support à l'arrière de l'écran, veiller à ne pas obstruer les ouïes d'aération. ÷ Le présent - Pioneer 504CMX | Operating Instructions - Page 58
PDP-504CMX Panneau de commande de l'écran à plasma PDP-434CMX 6 6 7 8 9 0 - = ~ ! Les différents organes et leurs rôles 1 3 45 Appareil 1 Support service ou en veille (page 19). Fr 2 Remarque Lorsque les enceintes sont montées sur l'écran à plasma instructions SET/DISPLAY (validation - Pioneer 504CMX | Operating Instructions - Page 59
] et [PHASE] (horloge/phase) aux valeurs optimales (page 26). 0 Touche STANDBY/ON Appuyez sur cette touche pour mettre l'écran en service ou en veille (page 19). - Touche DISPLAY Appuyez sur cette touche pour afficher le nom de l'entrée et de mode de fonctionnement actuels (page 20). = Touche POINT - Pioneer 504CMX | Operating Instructions - Page 60
mètres à un angle de 30˚ maximum de part et d'autre de l'axe du capteur. Mise en 'elles sont usées. ¶ L'écran à plasma émet des rayons infrarouges. Si une platine vid entre parenthèses. 1 Borne SPEAKER (R) Pour le raccordement à l' Pioneer. Ces prises sont utilisées pour les réglages de - Pioneer 504CMX | Operating Instructions - Page 61
sente le modèle PDP-504CMX. POWER OFF ON AC IN 0 - SPEAKER 8+Ω ~16Ω- L = Français Les différents organes et leurs rôles R SPEAKER 8+Ω ~16Ω- préalable le technicien d'installation Pioneer. Cette prise est utilisée pour les réglages de configuration de l'écran à plasma. 4 ANALOG RGB IN ( - Pioneer 504CMX | Operating Instructions - Page 62
du boulon) 110 mm Installez toujours les supports d'écran fournis en tenant compte des dimensions indiquées sur l'illustration qui accompagne l'appareil. 2 Posez l'écran à plasma dans les supports. Installation à l'aide du support ou de la fixation PIONEER en option ÷ Que ce soit à l'aide du - Pioneer 504CMX | Operating Instructions - Page 63
arrière (PDP-504CMX) Perçage b Ouïes d'aération (ventilateur) Surface de pose Appareil Axe Perçage b Fixation, etc. Perçage a Boulon 12 à 18 mm Boulon Perçage b 12 à 18 mm Vue de côté Perçage b Perçage a Perçage a Axe Perçage b Perçage b Axe Perçage b Vue arrière (PDP-434CMX) 11 - Pioneer 504CMX | Operating Instructions - Page 64
partir de la prise ANALOG RGB OUT (INPUT1). Remarque Le signal vidéo n'est pas présent sur la prise ANALOG RGB OUT (INPUT1) lorsque l'écran à plasma est hors tension ou en veille. Raccordement de INPUT2 Un ordinateur, muni d'une sortie DVI (signal RVB numérique) peut être raccordé au connecteur DVI - Pioneer 504CMX | Operating Instructions - Page 65
, raccordé sur INPUT1, à la prise d'entrée stéréo (G/D) miniformat AUDIO (INPUT1) de l'écran à plasma. Le son est fourni au niveau de la prise stéréo (G/D) miniformat AUDIO (OUTPUT) et des bornes SPEAKER (G/ D) selon la sélection de l'entrée vidéo. Raccordement audio pour un appareil (ordinateur - Pioneer 504CMX | Operating Instructions - Page 66
soit convenablement câblée. En cas d'utilisation d'un adaptateur, le conducteur de masse doit tout de même être relié à la terre. NON! Alimentez l'écran à plasma à partir de la tension prescrite (100 - 120 Volts CA, 50/60 Hz); tout autre tension peut provoquer un incendie ou une secousse électrique - Pioneer 504CMX | Operating Instructions - Page 67
difficile. Fermez-les soigneusement. Fixation des colliers rapides à l'écran à plasma Engagez les colliers rapides dans les trous 6 repérés par "‡" sur d'un côté ou de l'autre. Cette illustration présente le modèle PDP-504CMX. * Vue de l'arrière de l'écran. Installation et raccordements Pour - Pioneer 504CMX | Operating Instructions - Page 68
2/3 SET 5/∞ Panneau de commande de l'écran à plasma Télécommande 1 Réglez l'interrupteur MAIN POWER du panneau arrière sur ON (marche). Le INPUT1 PICTURE SCREEN SETUP OPTION LANGUAGE ENERGY SAVE SCREEN MGT. ORBITER MASK CONTROL AUTO SET UP MODE AUTO FUNCTION AUDIO OUT : ENGLISH : STANDARD : - Pioneer 504CMX | Operating Instructions - Page 69
2/3 SET MENU 2/3 SET 5/∞ Panneau de commande de l'écran à plasma Télécommande 1 Appuyez sur la touche MENU pour afficher la page de menu automatiquement entre [XGA] et [WXGA]. Remarques ÷ Le réglage [PC AUTO.] supporte la sélection de signal automatique uniquement à l'emploi des entrées SYNC sé - Pioneer 504CMX | Operating Instructions - Page 70
CLAMP TYPE DE SIGNAL ENTRÉE1 SETUP OPTION : ARRÊT : AUTO : VGA MENU 5/∞ 2/3 SET MENU 2/3 SET 5/∞ Panneau de commande de l'écran à plasma Télécommande 1 Appuyez sur la touche MENU pour afficher la page de menu. MENU IMAGE ÉCRAN CONTRASTE : LUMINOSITÉ : NIV. ROUGE : NIV. VERT - Pioneer 504CMX | Operating Instructions - Page 71
manière de mettre sous tension, ou hors tension, l'écran à plasma, de le mettre en service ou en veille, et de choisir un appareil parmi ceux qui sont sur la touche STANDBY/ON pour placer l'écran à plasma en veille. 6 Réglez l'interrupteur MAIN POWER du panneau arrière sur OFF. Le témoin STANDBY - Pioneer 504CMX | Operating Instructions - Page 72
réduire ou augmenter le volume du son provenant des enceintes. VOLUME : 5 Coupure des sons Panneau de commande de l'écran à plasma Télécommande Appuyez sur la touche DISPLAY. Le nom de l'entrée choisie, le format de l'image et les fréquences de rafraîchissement seront affichés pendant 3 secondes - Pioneer 504CMX | Operating Instructions - Page 73
SCREEN SIZE Panneau de commande de l'écran à plasma Le format d'image change comme suit chaque fois que la touche SCREEN SIZE est actionnée. [PDP-504CMX] 3 POINT PAR POINT 3 PARTIEL PLEIN ÉCRAN 2 4:3 2 ou PLEIN ÉCRAN 2 4:3 2 [PDP-434CMX] 3 POINT PAR POINT 3 4:3 PLEIN ÉCRAN 2 ou - Pioneer 504CMX | Operating Instructions - Page 74
sur l'écran. 5 ZOOM (*Supporté seulement sur le PDP-434CMX) Le format [ZOOM] n'est 5/∞/2/3 ou la touche DISPLAY est actionnée. DISPLAY POINT ZOOM 5/∞/2/3 Fonctionnement le format d'écran ne peut pas être modifié. ¶ Lorsque l'écran à plasma est utilisé pour une activité à but lucratif ou pour la pré - Pioneer 504CMX | Operating Instructions - Page 75
ée. Affichage multi-écran La fonction Multi-écran de cet écran à plasma autorise l'affichage simultané de deux entrées. L'affichage Multiécran (2 écrans), PinP (image dans l'image) et PoutP (image hors de l'image). DISPLAY 2 PinP (Image dans l'image) Le sous-écran est affiché dans un des quatre - Pioneer 504CMX | Operating Instructions - Page 76
. Si la touche DISPLAY est actionnée en mode Multi-écran, l'écran principal et le sous-écran afficheront respectivement leur entrée actuellement sélectionnée. Remarques ¶ Lorsque l'écran à plasma est utilisé pour une activité à but lucratif ou pour la présentation d'images en public, l'emploi - Pioneer 504CMX | Operating Instructions - Page 77
Français Réglages de l'IMAGE et de l'ÉCRAN Réglage de l'IMAGE MENU 5/∞ 2/3 SET MENU 2/3 SET 5/∞ Panneau de commande de l'écran à plasma Télécommande 1 Appuyez sur la touche MENU pour afficher la page de menu. MENU IMAGE ÉCRAN CONTRASTE : LUMINOSITÉ : NIV. ROUGE : NIV. VERT : NIV. - Pioneer 504CMX | Operating Instructions - Page 78
et de la PHASE Une pression sur la touche AUTO SET UP de la télécommande ou du panneau de commande de l'écran à plasma (ou en sélectionnant [PARAMÉTRAGE AUTO.] sur le menu), l'appareil ajuste automatiquement la position de l'écran et de l'horloge pour convenir au mieux à l'entr - Pioneer 504CMX | Operating Instructions - Page 79
la POSITION de l'écran, de l'HORLOGE et de la PHASE MENU 5/∞ 2/3 SET MENU 2/3 SET 5/∞ Panneau de commande de l'écran à plasma Télécommande 1 Appuyez sur la touche MENU pour afficher la page de menu. MENU ENTRÉE1 IMAGE ÉCRAN CONTRASTE : LUMINOSITÉ : NIV. ROUGE : NIV - Pioneer 504CMX | Operating Instructions - Page 80
Français Réglages de l'IMAGE et de l'ÉCRAN 3 Utilisez les touches 5/∞ pour choisir le paramètre à régler puis appuyez sur la touche SET. MENU ENTRÉE1 IMAGE ÉCRAN POSITION HORLOGE PHASE SETUP : 0/ :0 :0 OPTION 0 RÉINIT. ÉCRAN SET ENTRÉE MENU SORTIE 4 Utilisez les touches 2/3 et 5/∞ pour - Pioneer 504CMX | Operating Instructions - Page 81
atténuer les "brûlures" causées par les images rémanentes sur l'écran. MENU 5/∞ 2/3 SET MENU 2/3 SET 5/∞ Panneau de commande de l'écran à plasma Télécommande 1 Appuyez sur la touche MENU pour afficher la page de menu. MENU IMAGE ÉCRAN CONTRASTE : LUMINOSITÉ : NIV. ROUGE : NIV. VERT - Pioneer 504CMX | Operating Instructions - Page 82
sources d'entrée. Réglages de gestion d'écran (GESTION ÉCRAN) Afin d'éviter les brûlures causées par la rémanence d'images virtuelles, cet écran à plasma est doté d'un programme de gestion d'écran qui permet un déplacement de l'image affichée à intervalles réguliers. Le programme peut être réglé de - Pioneer 504CMX | Operating Instructions - Page 83
réglage sur [UNE FOIS] ou [RÉPÉTITION], si l'interrupteur d'alimentation MAIN POWER est coupé, le programme de gestion d'écran s'arrêtera et cette partie 5/∞ 2/3 SET MENU 2/3 SET 5/∞ Panneau de commande de l'écran à plasma Télécommande 1 Appuyez sur la touche MENU pour afficher la page de menu. - Pioneer 504CMX | Operating Instructions - Page 84
INPUT1 lorsqu'un signal d'image est détecté à la prise INPUT1. 32 Fr MENU 5/∞ 2/3 SET MENU 2/3 SET 5/∞ Panneau de commande de l'écran à plasma Télécommande 1 Appuyez sur la touche MENU pour afficher la page de menu. MENU ENTRÉE1 IMAGE ÉCRAN CONTRASTE : LUMINOSITÉ : NIV. ROUGE : NIV - Pioneer 504CMX | Operating Instructions - Page 85
défaut effectué en usine est [ARRÊT] (hors service). A chaque pression sur la touche SET, la fonction ètre [MODE AUTO] pour [ENTRÉE1] est supporté uniquement lorsqu'un signal RVB analogique SYNC sépar 2/3 SET Panneau de commande de l'écran à plasma Télécommande MENU 2/3 SET 5/∞ Autres démarches 1 - Pioneer 504CMX | Operating Instructions - Page 86
Guide de dépannage Le nettoyage régulier de l'écran à plasma prolonge plasma. ¶ Le ventilateur de refroidissement fonctionne mal. Mettez immédiatement l'écran hors tension, retirez la fiche d'alimentation hors de la prise secteur et consultez un centre de service ou un concessionnaire Pioneer - Pioneer 504CMX | Operating Instructions - Page 87
une prise secteur? (page 14) • L'écran à plasma est-il sous tension grâce à l'interrupteur MAIN POWER? (page 9) • Des causes extérieures telles que correctes? (pages 21, 22 et 26 à 28) • La fonction POINT ZOOM est-elle en service? (page 22) • Réglez la tonalité des couleurs (page 25). • La pièce est - Pioneer 504CMX | Operating Instructions - Page 88
d'ordinateur est affichée en permanence. Cela est dû à la fonction de protection de l'écran à plasma qui détecte les images fixes et diminue automatiquement leur luminosité. Cette fonction se met en service lorsque l'écran ne détecte aucun mouvement ou seulement peu de mouvement pendant 3 minutes - Pioneer 504CMX | Operating Instructions - Page 89
W Dimensions hors tout 1218 (L) x 714 (H) x 98 (P : Poignées non comprises) mm (avec le support 1218 (L) x 737 (H) x 300 (P) mm Poids 41,0 kg (avec le support 41,6 kg Gamme de température de fonctionnement ...... 0 à 40 °C Généralités (PDP-434CMX) Panneau électroluminescent Panneau à plasma AC - Pioneer 504CMX | Operating Instructions - Page 90
Tableau des compatibilités de signal d'ordinateur Supplément 1-1/4: PDP-504CMX (INPUT1) Tableau des compatibilités de signal d'ordinateur 85,1Hz 60Hz 66,7Hz 72,8Hz 75Hz 85Hz 60Hz 37,9kHz 31,5kHz 35,0kHz 37,9kHz 37,5kHz 43,3kHz 31,0kHz 640x480 ± ± ± ± 848x480 1024x768 ± ± ± ± ± 1280x768 ± ± ± ± - Pioneer 504CMX | Operating Instructions - Page 91
Français Informations complémentaires Supplément 1-2/4: PDP-504CMX (INPUT2) Tableau des compatibilités de signal d'ordinateur (INPUT2) : Non disponible Définition Fréquence de rafraîchissement Format d'image (points x lignes) (Points x Lignes) Vertical Horizontal - Pioneer 504CMX | Operating Instructions - Page 92
mentaires Français Informations complémentaires Supplément 1-3/4: PDP-434CMX (INPUT1) Tableau des compatibilités de signal d'ordinateur 66,7Hz 72,8Hz 75Hz 85Hz 60Hz 31,5kHz 37,9kHz 31,5kHz 35,0kHz 37,9kHz 37,5kHz 43,3kHz 31,0kHz 640x480 ± ± ± ± 848x480 768x768 ± ± ± ± 1024x768 ± 1024x768 ± ± - Pioneer 504CMX | Operating Instructions - Page 93
Français Informations complémentaires Supplément 1 -4/4: PDP-434CMX (INPUT2) Tableau des compatibilités de signal d'ordinateur (INPUT2) : Non disponible Définition Fréquence de rafraîchissement Format d'image (points x lignes) (Points x Lignes) Vertical Horizontal POINT - Pioneer 504CMX | Operating Instructions - Page 94
) DDC SDA HD ou H/V SYNC Display Video Electronics Standards Association. Power Management et Sun Microsystems sont des marques déposées de Sun Microsystems, Inc. VGA et XGA sont des marques déposées de International Business Machines Co., Inc. Publication de Pioneer Corporation. C 2004 Pioneer - Pioneer 504CMX | Operating Instructions - Page 95
D50-5-10-1_Ja Published by Pioneer Corporation. Copyright © 2004 Pioneer Corporation. All rights reserved. PIONEER CORPORATION 4-1, Meguro 1-Chome, Meguro-ku, Tokyo 153-8654, Japan PIONEER ELECTRONICS (USA) INC. P. O. BOX 1540, Long Beach, California 90801-1540, U.S.A. TEL: 1-310
-
 1
1 -
 2
2 -
 3
3 -
 4
4 -
 5
5 -
 6
6 -
 7
7 -
8
-
9
-
10
-
11
-
12
-
13
-
14
-
15
-
16
-
17
-
18
-
19
-
20
-
21
-
22
-
23
-
24
-
25
-
26
-
27
-
28
-
29
-
30
-
31
-
32
-
33
-
34
-
35
-
36
-
37
-
38
-
39
-
40
-
41
-
42
-
43
-
44
-
45
-
46
-
47
-
48
-
49
-
50
-
51
-
52
-
53
-
54
-
55
-
56
-
57
-
58
-
59
-
60
-
61
-
62
-
63
-
64
-
65
-
66
-
67
-
68
-
69
-
70
-
71
-
72
-
73
-
74
-
75
-
76
-
77
-
78
-
79
-
80
-
81
-
82
-
83
-
84
-
85
-
86
-
87
-
88
-
89
-
90
-
91
-
92
-
93
-
94
-
95
 |
 |

PDP-504CMX
PDP-504CMX-S
PDP-434CMX
Plasma Display
Écran à plasma
Operating Instructions
Mode d’emploi
Contents related to system specifications, power requirements,
accessories, and other information differ with respect to the
country where this unit is purchased. For customers living in the
U.S.A. or Canada, please use and refer to the instructions written
in either English or French. For customers in Japan, please use
and refer to the instructions written in Japanese.
Les caractéristiques, les spécifications d'alimentation, les
accessoires et d'autres informations diffèrent d'un pays à
l'autre. Si vous vivez au Canada ou aux États-Unis, reportez-
vous aux instructions en français ou en anglais. Si vous vivez
au Japon, reportez-vous aux instructions en japonais.
電源、付属品などの差異があ1
0
匟 扐
使用の際は、本書の日本語ページをご覧ください。その足鵠 扐
国、地域でご購入・ご使用の際は、英語また1
餈
をご覧ください。
販売店様へ
この取扱説明書は据え付け終了後お客様に必ずお渡し
して、取り扱い方法の説明1
詺
膞 扐
「据付工事」について
●
●
K042_Ja
本機は十分な技術・技能を有する専門
業者が据付けを行うことを前提に販売
されているものです。据付1鼿 曵
扐
は必ず工事専門業者また1
詆~
扐
依頼ください。
なお、据付け・取付けの不備っ
蠁 扐
改造、天災などによる事故足遯
虂扐
ては、弊社は一切責任を負1臋
扐