Pioneer 504CMX Operating Instructions - Page 30
Automatic power-off, POWER MANAGEMENT
 |
UPC - 012562689784
View all Pioneer 504CMX manuals
Add to My Manuals
Save this manual to your list of manuals |
Page 30 highlights
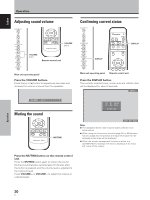
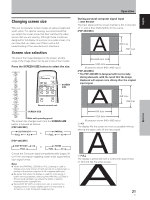
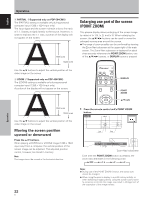
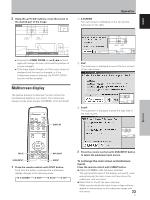
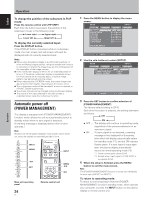
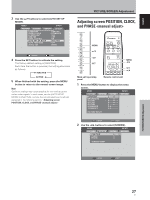
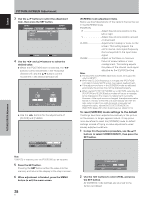
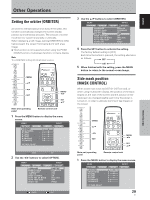
Operation English Operation To change the position of the subscreen in PinP mode: Press the remote control unit's PIP SHIFT. Each time the button is pressed, the position of the subscreen moves in the following order: 3 Lower right 3 Upper right Lower left 2 Upper left 2 To display the currently selected input: Press the DISPLAY button. If the DISPLAY button is pressed while in multiscreen mode, the main screen and sub-screen will each be displayed with its currently selected input. Notes ¶ When using the plasma display in a profit-making activity, or when exhibiting images publicly, using the screen size function to compress or stretch the image may result in infringement of the copyrights of the image owners. ¶ If the multiscreen display is left on for an extended period of time, or if the same multiscreen display is repeatedly shown for short periods on an everyday basis, a residual image pattern may be burned onto the screen. ¶ When selecting the 2-SCREEN mode, the screen image may appear somewhat rougher, depending on the source used. ¶ The multiscreen mode will be canceled if a menu is opened, or if POINT ZOOM is performed. ¶ The screen size cannot be changed during multiscreen display. ¶ The sound of the input selected in the main screen is outputted when using the multiscreen function. Automatic power-off (POWER MANAGEMENT) This display is equipped with [POWER MANAGEMENT] function, which allows the unit to automatically switch to standby mode when no sync signal is detected. (A warning message is displayed before this function operates.) Note Always turn off the plasma display's main power switch when not using the display for extended periods of time. INPUT MENU INPUT 2/3 SET MENU 2/3 SET Main unit operating panel 24 En Remote control unit 1 Press the MENU button to display the menu screen. MENU INPUT1 PICTURE SCREEN CONTRAST : BRIGHTNESS : R.LEVEL : G.LEVEL : B.LEVEL : H.ENHANCE : V. E N H A N C E : SETUP 0 0 0 0 0 0 0 OPTION PICTURE RESET SET ENTER MENU EXIT 2 Use the 2/3 buttons to select [SETUP]. MENU INPUT1 PICTURE SCREEN SETUP OPTION POWER MANAGEMENT CLAMP POSITION SIGNAL FORMAT : OFF : AUTO : VGA SET CHANGE MENU EXIT 3 Press the SET button to confirm selection of [POWER MANAGEMENT]. The factory default setting is [OFF]. Each time the button is pressed, the setting alternates as follows: 3 OFF ON 2 ÷ OFF ..... The display will continue in operating mode, regardless of the presence/absence of an input sync signal. ÷ ON ....... If a sync signal is not detected, a warning message is first displayed for 8 seconds, after which the display automatically enters the standby mode (*1), and the ON indicator flashes green. If a sync signal is input again later, the plasma display automatically returns to normal operating mode (*2). *1. Power consumption about 0.8 W *2. Except when input signal is G ON SYNC or composite SYNC 4 When the setup is finished, press the MENU button to exit the menu screen. Note The [POWER MANAGEMENT] function must be set individually for each input (INPUT1 or INPUT2). To return to operating mode: To return to normal operation from the [POWER MANAGEMENT] function's standby mode, either operate your computer, or press the INPUT button on the plasma display or remote control unit.
-
 1
1 -
2
-
3
-
4
-
5
-
6
-
7
-
8
-
9
-
10
-
11
-
12
-
13
-
14
-
15
-
16
-
17
-
18
-
19
-
20
-
21
-
22
-
23
-
24
-
 25
25 -
 26
26 -
 27
27 -
 28
28 -
 29
29 -
 30
30 -
 31
31 -
 32
32 -
 33
33 -
 34
34 -
 35
35 -
36
-
37
-
38
-
39
-
40
-
41
-
42
-
43
-
44
-
45
-
46
-
47
-
48
-
49
-
50
-
51
-
52
-
53
-
54
-
55
-
56
-
57
-
58
-
59
-
60
-
61
-
62
-
63
-
64
-
65
-
66
-
67
-
68
-
69
-
70
-
71
-
72
-
73
-
74
-
75
-
76
-
77
-
78
-
79
-
80
-
81
-
82
-
83
-
84
-
85
-
86
-
87
-
88
-
89
-
90
-
91
-
92
-
93
-
94
-
95
 |
 |
