Pioneer AVIC-9DVD Other Manual - Page 19
Caution
 |
View all Pioneer AVIC-9DVD manuals
Add to My Manuals
Save this manual to your list of manuals |
Page 19 highlights
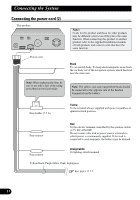
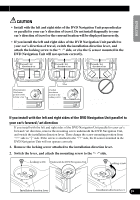
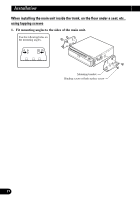
ENGLISH ESPAÑOL DEUTSCH CAUTION • Install with the left and right sides of the DVD Navigation Unit perpendicular or parallel to your car's direction of travel. Do not install diagonally to your car's direction of travel or the current location will be displayed incorrectly. • If you install the left and right sides of the DVD Navigation Unit parallel to your car's direction of travel, switch the installation direction lever, and attach the locking screw to the "↔" side, or else the G sensor mounted in the DVD Navigation Unit will not operate correctly. Forward / Art direction of car Front Front (Perpendicular) Attachment position of the locking screw ↕ Forward / Art direction of car Front (Parallel) Attachment position of the locking screw ↔ Forward / Art direction of car Front Front If you install with the left and right sides of the DVD Navigation Unit parallel to your car's forward / art direction If you install with the left and right sides of the DVD Navigation Unit parallel to your car's forward / art direction, remove the mounting screw underneath the DVD Navigation Unit, and switch the installation direction lever. Then change the screw mounting position from "↔" side to "↕" side. If the screw is attached to the "↔" side, the G sensor mounted in the DVD Navigation Unit will not operate correctly. 1. Remove the locking screw attached to the installation direction lever. 2. Switch the lever, and attach the mounting screw to the "↔" side. Locking screw Underneath the DVD Navigation Unit Locking screw FRANÇAIS ITALIANO NEDERLANDS Installation direction lever Installation direction lever 18
-
 1
1 -
2
-
3
-
4
-
5
-
6
-
7
-
8
-
9
-
10
-
11
-
12
-
13
-
 14
14 -
 15
15 -
 16
16 -
 17
17 -
 18
18 -
 19
19 -
 20
20 -
 21
21 -
 22
22 -
 23
23 -
 24
24 -
25
-
26
-
27
-
28
-
29
-
30
-
31
-
32
-
33
-
34
-
35
-
36
-
37
-
38
-
39
-
40
-
41
-
42
-
43
-
44
-
45
-
46
-
47
-
48
-
49
-
50
-
51
-
52
-
53
-
54
-
55
-
56
-
57
-
58
-
59
-
60
-
61
-
62
 |
 |
