Pioneer AVIC N2 Installation Manual
Pioneer AVIC N2 - Navigation System With DVD player Manual
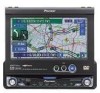 |
UPC - 012562735191
View all Pioneer AVIC N2 manuals
Add to My Manuals
Save this manual to your list of manuals |
Pioneer AVIC N2 manual content summary:
- Pioneer AVIC N2 | Installation Manual - Page 1
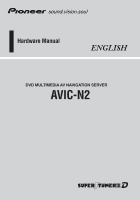
Hardware Manual ENGLISH DVD MULTIMEDIA AV NAVIGATION SERVER AVIC-N2 - Pioneer AVIC N2 | Installation Manual - Page 2
- Pioneer AVIC N2 | Installation Manual - Page 3
used in this manual. Familiarity with these conventions will help you greatly as you learn how to use your new equipment. • Buttons on your Navigation System are referred to as: e.g.) POS button, NAVI MENU button. • Items in various menus or touch keys displayed on the screen are referred to - Pioneer AVIC N2 | Installation Manual - Page 4
1 How to use this manual 1 Terminology 1 Table of Contents 2 Important Safety Information 3 Notes Before Using the System and Additional Safety Information 4 Precaution 4 After-sales service for Pioneer products 6 Product registration 6 Update DVD 6 Playable discs 6 DVD-Video disc region numbers - Pioneer AVIC N2 | Installation Manual - Page 5
in this manual and follow the instructions carefully. ❒ Do not install the display Update DVDs are available through your local Pioneer dealer. ❒ Never use headphones while driving. ❒ Do not attempt to install or service your navigation system by yourself. Installation or servicing of the navigation - Pioneer AVIC N2 | Installation Manual - Page 6
. Precaution CAUTION: USE OF CONTROL OR ADJUSTMENT OR PERFORMANCE OF this product or cords associated with accessories sold with the product may expose screen that is purchased for use in conjunc- 4 Parking brake interlock Certain functions offered by this Navigation Manual" for more information. - Pioneer AVIC N2 | Installation Manual - Page 7
DVD or TV. ❒ The map screen navigation images output to the rear display differ from standard NTSC format images. Therefore, their quality will be inferior to the images that appear on the front display. • NEVER install ➞ Operation Manual • SCREEN IMAGE MAY APPEAR REVERSED. • USE INPUT ONLY FOR - Pioneer AVIC N2 | Installation Manual - Page 8
is moving forward. Update DVD • Updated Navigation DVDs are available for purchase from your local Pioneer dealer that includes the most current map and point of interest information. Contact your local Pioneer dealer for details. After-sales service for Pioneer products Please contact the - Pioneer AVIC N2 | Installation Manual - Page 9
the same video system or else images will not be correctly reproduced. Dolby Digital/DTS compatibility When using Pioneer multi-channel processors that are planned to be compatible with this navigation unit, please consult your dealer or nearest authorized Pioneer Service Station. ❒ Manufactured - Pioneer AVIC N2 | Installation Manual - Page 10
is prohibited. Rear entertainment By setting the DVD-Video, etc. in the built-in DVD drive, you can output images and sounds (or sound only) from the DVD drive to the rear display even when the screen of this unit is displaying navigation and another video source. ➲ "Using the REAR button" ➞ Page 14 - Pioneer AVIC N2 | Installation Manual - Page 11
installation. • If the unit fails to operate properly. • If there appear to be problems controlled by this unit. Please inquire to your dealer or nearest authorized Pioneer service Manual. Note: The system will use direct satellite-to-receiver broadcasting technology to provide listeners in their cars - Pioneer AVIC N2 | Installation Manual - Page 12
fee is consumer only. All fees and programming subject to change. Subscriptions subject to Customer Agreement available at xmradio.com. XM radio service only available in the 48 contiguous United States. © 2004 XM Satellite Radio Inc. All rights reserved. NAVTEQ Traffic- is a trademark of NAVTEQ - Pioneer AVIC N2 | Installation Manual - Page 13
Chapter 1 How to Use Navigation Unit and Names of the Parts Display unit Chapter 1 How to Use Navigation Unit and Names of the Parts (1) DISP button Press to select different displays. (2) PGM button Press to operate the preprogrammed functions for each source. ➲ "Using the PGM button" ➞ Page 16 - Pioneer AVIC N2 | Installation Manual - Page 14
. (12) Joystick Move to do manual seek tuning, fast forward, reverse and track search controls, etc. Push to display A.MENU. Touch and hold this button when a disc containing an MP3 file is inserted returns you to the root folder. (16) ANGLE (+/-) button Press to change the LCD panel angle. (17) WIDE - Pioneer AVIC N2 | Installation Manual - Page 15
to Use Navigation Unit and Names of the Parts Turning the unit on and selecting a source • If the program is not installed, see "Operation Manual" and install the program. 1 Turn the ignition switch (ACC) ON. The product's power supply comes on. ❒ External unit refers to a Pioneer product (such - Pioneer AVIC N2 | Installation Manual - Page 16
to Use Navigation Unit and Names of the Parts Chapter 1 ❒ If the DVD drive does not operate properly, an error message such as ERROR-11 may be displayed. ➲ Error messages ➞ Operation Manual ❒ When a CD or CD-ROM is inserted, sound only is output to the rear display. ➲ Selecting the video of rear - Pioneer AVIC N2 | Installation Manual - Page 17
Chapter 1 How to Use Navigation Unit and Names of the Parts Adjusting the LCD panel angle Important: • If you of the normal picture. ❒ Different settings can be memorized for each video source. ❒ When video is viewed in a wide screen mode that does not match its original aspect ratio, it may appear - Pioneer AVIC N2 | Installation Manual - Page 18
Unit and Names of the Parts Chapter 1 ❒ The navigation map and the rear view camera picture is always FULL. Operating the picture adjustment 1 Press WIDE button and hold to display PICTURE ADJUST. BRIGHT - Adjust the black intensity CONTRAST - Adjust the contrast COLOR - Adjust the color saturation - Pioneer AVIC N2 | Installation Manual - Page 19
Chapter 1 How to Use Navigation Unit and Names of the Parts • Press PGM button to turn pause on when selecting the following sources: DISC - Built-in DVD drive S-DVD - DVD player/multi-DVD player M-CD - Multi-CD player To turn pause off, press PGM button again. • Press PGM button and hold to turn - Pioneer AVIC N2 | Installation Manual - Page 20
How to Use Navigation Unit and Names of the Parts Chapter 1 18 - Pioneer AVIC N2 | Installation Manual - Page 21
has been ejected. • The disc without a video source is playbacked. • The REAR button was pressed and REAR ON mode switched off. • There was a problem with the rear display or a faulty wiring connection, for example. • Rear View is selected on the screen. • When the shift lever is in [R], displays - Pioneer AVIC N2 | Installation Manual - Page 22
Manual Pioneer. ➲ For suitable discs ➞ Page 6 ❒ If you wish to use other navigation discs, first check that they are compatible with this equipment and approved by Pioneer. DVD GPS signal, the actual position of your vehicle may differ from the position displayed on the map screen Avoid touching the - Pioneer AVIC N2 | Installation Manual - Page 23
Video format (video mode), because of disc characteristics, scratches or dirt on the disc, or dirt, condensation, etc. on the lens of this unit. • It is not possible to play back DVD-ROM discs other than Pioneer DVD map disc or DVD characters, the screen may not be software. player with a short - Pioneer AVIC N2 | Installation Manual - Page 24
Appendix • Files are compatible with the ID3 Tag Ver. 1.0 and Ver. 1.1 formats for display of album (disc title), track (track title) and artist (track artist). • Only when MP3 files of 32, 44.1 and 48 kHz frequencies are played back, the emphasis function is valid. (16, 22.05, 24, 32, 44.1, 48 kHz - Pioneer AVIC N2 | Installation Manual - Page 25
your dealer or the nearest authorized PIONEER Service Station for internal inspection, adjustments or repairs. Handling the display unit • When black dots or white dots (bright dots) may appear on the LCD screen. These are due to the characteristics of the LCD screen and do not indicate a problem - Pioneer AVIC N2 | Installation Manual - Page 26
• When using a portable phone, keep the antenna of the portable phone away from the display unit to prevent disruption of the video by the appearance of spots, colored stripes, etc. Glossary ➲ Glossary ➞ Appendix of the Operation Manual Keeping the LCD screen in good condition • When removing dust - Pioneer AVIC N2 | Installation Manual - Page 27
once per second GPS antenna: Antenna Micro strip flat antenna/ right-handed helical polarization Antenna cable 5.0 m(16 ft. 5 in.) Dimensions (W ✕ H ✕ D) 33 ✕ 13 ✕ 36 mm (1-1/4 ✕ 1/2 ✕ 1-3/8 in.) Weight 105 g(0.23 lbs) Display Screen size/aspect ratio ..... 6.5 inch wide/16:9 (effective display - Pioneer AVIC N2 | Installation Manual - Page 28
response 5 - 44,000 Hz (with DVD, at sampling frequency 96 kHz) Signal-to-noise ratio 97 dB (1 kHz) (IHF-A network) (CD: 96 dB (1 kHz) (IHF-A network)) Dynamic range 95 dB (1 kHz) (CD: 94 dB (1 kHz)) Distortion 0.008 % (1 kHz) Output level: Video 1.0 Vp-p/75 Ω (±0.2 V) Audio 1.0 V (1 kHz, 0 dB - Pioneer AVIC N2 | Installation Manual - Page 29
ELECTRONICS (USA) INC. P.O. Box 1540, Long Beach, California 90801-1540, U.S.A. TEL: (800) 421-1404 PIONEER EUROPE NV Haven 1087, Keetberglaan 1, B-9120 Melsele, Belgium TEL: (0) 3/570.05.11 PIONEER ELECTRONICS ASIACENTRE PTE. LTD. 253 Alexandra Road, #04-01, Singapore 159936 TEL: 65-6472-7555
-
 1
1 -
 2
2 -
 3
3 -
 4
4 -
 5
5 -
 6
6 -
 7
7 -
8
-
9
-
10
-
11
-
12
-
13
-
14
-
15
-
16
-
17
-
18
-
19
-
20
-
21
-
22
-
23
-
24
-
25
-
26
-
27
-
28
-
29
 |
 |

Hardware Manual
DVD MULTIMEDIA AV NAVIGATION SERVER
AVIC-N2
ENGLISH