Pioneer CD-VS33 Owner's Manual
Pioneer CD-VS33 - A/V Switcher Manual
 |
UPC - 012562528700
View all Pioneer CD-VS33 manuals
Add to My Manuals
Save this manual to your list of manuals |
Pioneer CD-VS33 manual content summary:
- Pioneer CD-VS33 | Owner's Manual - Page 1
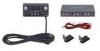
ENGLISH ESPAÑOL DEUTSCH AUDIO VIDEO SELECTOR SÉLECTEUR AUDIO/VIDÉO Operation Manual CD-VS33 Mode d'emploi This product conforms to new cord colors. Los colores de los cables de este producto se conforman con un nuevo código de colores. - Pioneer CD-VS33 | Owner's Manual - Page 2
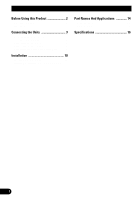
Product 2 Precaution 2 Connecting the Units 3 Connecting the Power Cord and Controller Unit 4 Connecting the System (1 5 Connecting the System (2 7 Connecting the Audio/Video equipment 9 Installation 10 Installing Hide-away Unit 10 Installing Controller Unit 11 Part Names And Applications - Pioneer CD-VS33 | Owner's Manual - Page 3
audio-video selector that enables you to switch the display between audio and video. s When using this product We recommend that you familiarize yourself with the functions and their operation by reading through the manual adverse effect on hearing. WARNING • Connect the product to a display that - Pioneer CD-VS33 | Owner's Manual - Page 4
installation and wiring, double check that there are no mistakes. Re-install any parts removed from the car during installation, then connect the battery negative terminal. • Refer to the owner's manual for details on connecting the various cords of the power amp and other units, then make - Pioneer CD-VS33 | Owner's Manual - Page 5
ENGLISH Connecting the Power Cord and Controller Unit Hide-away unit ESPAÑOL DEUTSCH FRANÇAIS ITALIANO NEDERLANDS Fuse holder (1 A) 2 m Red To electric terminal controlled by ignition - Pioneer CD-VS33 | Owner's Manual - Page 6
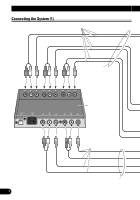
Connecting the Units Connecting the System (1) Connecting cords with RCA pin plugs (sold separately) AV OUT (1 - 3) Hide-away unit Connecting cords with RCA pin plugs (sold separately) AV IN (2 - 3) 5 - Pioneer CD-VS33 | Owner's Manual - Page 7
ENGLISH Front ESPAÑOL DEUTSCH FRANÇAIS ITALIANO NEDERLANDS Audio input Video input Audio input Video input Video output for rear Audio output Video output Audio output Rear Display 2 AVD-W8000, etc Display Hide-away unit Rear Display 1 AVD-W8000, etc Display Hide-away unit Rear Display 3 - Pioneer CD-VS33 | Owner's Manual - Page 8
CAoTnintlec(tEinnggtlhisehU) nits Connecting the System (2) Connecting cords with RCA pin plugs (sold separately) AV OUT (1 - 3) Hide-away unit Connecting cords with RCA pin plugs (sold separately) AV IN (2 - 3) 7 - Pioneer CD-VS33 | Owner's Manual - Page 9
2 AVD-W8000, etc Display Hide-away unit Rear Display 1 AVD-W8000, etc Display Hide-away unit Rear Display 3 AVD-W8000, etc Hide-away unit Display Video input Audio input FRANÇAIS ITALIANO NEDERLANDS Video output for rear Audio output AVM-P9000R Multi-DVD player XDV-P9 Rear 8 - Pioneer CD-VS33 | Owner's Manual - Page 10
the Units Connecting the Audio / Video equipment Controller unit ∅ 3.5 mini pin plug Headphones (sold separately) ∅ 3.5 mini pin plug Headphones (sold separately) Connecting cords with RCA pin plugs (sold separately) Video output Audio output 8mm video, vehicle-mounted portable video, etc - Pioneer CD-VS33 | Owner's Manual - Page 11
ENGLISH ESPAÑOL DEUTSCH Installation Note: • Before finally installing the unit, connect the wiring temporarily, making sure it is all connected up properly, and the unit and the system work properly. • Use only the parts included with the unit to ensure proper installation. The use of - Pioneer CD-VS33 | Owner's Manual - Page 12
Installation Installing Controller Unit I Installation using the L-fixture The controller unit, when installed with L-fixtures, can be tilted for optimal ease of use. Peel off the paper backing of the double-sided tape of the L-fixture and adhere to the installation location. 1. Attach L-fixtures - Pioneer CD-VS33 | Owner's Manual - Page 13
ENGLISH ESPAÑOL DEUTSCH 3. Release the controller unit from the L-fixtures once. 4. Press the L-fixtures firmly against the intended installation position of the controller unit. 5. Attach the controller unit to the L-fixtures. Keep the screws loose. 12 FRANÇAIS ITALIANO NEDERLANDS - Pioneer CD-VS33 | Owner's Manual - Page 14
Installation 6. Adjust the installation angle of the controller unit. Adjust the angle for optimal ease of use. 7. Secure the controller unit firmly with the L-fixtures. Tighten the screws fully. Note: • Be careful not to overtighten the screws or tighten them slanted. An expanded screw hole might - Pioneer CD-VS33 | Owner's Manual - Page 15
Rotate counterclockwise to reduce the volume and rotate clockwise to increase the volume. SOURCE SELECTOR (1 - 3) Used to switch the video and audio connected to the AV IN jack (1 - 3) for each AV OUT jack (1 - 3). ESPAÑOL DEUTSCH FRANÇAIS ITALIANO NEDERLANDS Power indicator, power switch The - Pioneer CD-VS33 | Owner's Manual - Page 16
Part Names And Applications Hide-away Unit AV OUT jacks (1 - 3) RCA video output (yellow) RCA audio output (white, red) Outputs the video and audio signals (Multi-DVD player, vehicle-mounted portable video, etc.) connected to the AV IN jack. Power Connect the power cord (provided). AV IN jacks (2 - Pioneer CD-VS33 | Owner's Manual - Page 17
V allowable) Grounding System Negative Type Max. Current Consumption 0.4 A Audio Output Level 1Vp-p/75Ω Hide-away Unit Dimensions 160 (W) × 28 (H) × 120 (D) mm Weight 0.53 kg Controller Dimensions 120 (W) × 60 (H) × 32 (D) mm Weight 0.32 kg Note: • Specifications and the design are subject - Pioneer CD-VS33 | Owner's Manual - Page 18
las unidades 3 Conexión del cable de alimentación y del unidad controlador 4 Conexión del sistema (1 5 Conexión del sistema (2 7 Equipo de audio/vídeo 9 Instalación 10 Instalación del unidad oculta-alejada 10 Instalación del unidad controlador 11 Nombre de las piezas y aplicaciones .. 14 - Pioneer CD-VS33 | Owner's Manual - Page 19
93/68/CEE). Este producto es un selector de audio-vídeo para el asiento trasero que le permite conmutar la pantalla entre audio y vídeo. s Cuando se usa página siguiente y en las otras secciones. Precaución • Mantenga el manual a la mano para las referencias de los procedimientos de las operaciones - Pioneer CD-VS33 | Owner's Manual - Page 20
una doble verificación para cerciorarse de que no hay errores. Vuelva a instalar las partes retiradas del automóvil durante la instalación, luego conecte el terminal negativo de la batería. • Refiérase al manual del propietario para los detalles acerca de la conexión de los variados cables del - Pioneer CD-VS33 | Owner's Manual - Page 21
ía eléctrica controlado por el interruptor de encendido del vehículo (12 V C.C.) ON/OFF. 2 m Negro (tierra) A la carrocería (metálica) del vehículo (parte metálica). Unidad controlador 3 m Lado trasero del controlador Ranura Cable Tienda el cable del controlador dentro de la ranura dispuesta en la - Pioneer CD-VS33 | Owner's Manual - Page 22
Conectando las unidades Conexión del sistema (1) Cables de conexión con clavjás RCA (en venta por separado). AV OUT (1-3) Unidad oculta-alejada Cables de conexión con clavjás RCA (en venta por separado). AV IN (2-3) 5 - Pioneer CD-VS33 | Owner's Manual - Page 23
delantera ESPAÑOL DEUTSCH FRANÇAIS ITALIANO NEDERLANDS Entrada de audio Entrada de vídeo Entrada de audio Entrada de vídeo Salida de vídeo para la parte trasera Salida de audio Salida de vídeo Salida de audio Pantalla trasera 2 AVD-W8000, etc Pantalla Unidad ocultaalejada Pantalla trasera - Pioneer CD-VS33 | Owner's Manual - Page 24
Conectando las unidades Conexión del sistema (2) Cables de conexión con clavjás RCA (en venta por separado). AV OUT (1-3) Unidad ocultaalejada Cables de conexión con clavjás RCA (en venta por separado). AV IN (2-3) 7 - Pioneer CD-VS33 | Owner's Manual - Page 25
ENGLISH ESPAÑOL DEUTSCH Salida de audio Salida de vídeo Entrada de audio Entrada de vídeo Entrada de audio Entrada de vídeo Parte delantera Sintonizador de TV GEX-P7000TV Pantalla delantera AVX-P7000CD, etc Pantalla trasera 2 AVD-W8000, etc Pantalla Unidad ocultaalejada Pantalla trasera 1 - Pioneer CD-VS33 | Owner's Manual - Page 26
- rado) Miniclavija monopolar de ∅ 3,5 Auriculares (en venta por sepa- rado) Cables de conexión con clavjás RCA (en venta por separado) Salida de vídeo Salida de audio Vídeo de 8 mm, vídeo portátil montado en vehículo, etc. 9 - Pioneer CD-VS33 | Owner's Manual - Page 27
una al frenar por una emergencia. • Al colocar este producto, asegúrese de que ninguno de los conductores quede atrapado entre este producto y las partes metálicas circundantes o dispositivos. • No coloque este producto cerca de la salida de calefacción, en donde podría ser afectada por el calor - Pioneer CD-VS33 | Owner's Manual - Page 28
Instalación Instalación del unidad controlador I Instalación utilizando el sujetador L Para una óptima facilidad de empleo, instale el controlador con los sujetadores L. Despegue el papel del dorso de la cinta de doble cara del sujetador L y péquela en el sitio de instalación. 1. Fije los - Pioneer CD-VS33 | Owner's Manual - Page 29
ENGLISH ESPAÑOL DEUTSCH 3. Retire los sujetadores del unidad controlador. 4. Presione firmemente los sujetadores L contra el sitio de instalación previsto para el unidad controlador. 5. Fije el unidad controlador a los sujetadores L. Mantenga los tornillos flojos. 12 FRANÇAIS ITALIANO - Pioneer CD-VS33 | Owner's Manual - Page 30
ensanchen y que no se puedan fijar los sujetadores L. s Instalación utilizando la cinta velcro Pegue la cinta Velcro (rígida) suministrada sobre la parte posterior del unidad controlador y la cinta Velcro (blanda) sobre el sitio de instalación y realice la instalación. Cinta Velcro (rígida) Unidad - Pioneer CD-VS33 | Owner's Manual - Page 31
umen de los auriculares conectados a PHONES B. SELECTOR DE FUENTE (1-3) Gire en sentido contrario a audio de AV OUT 1 sale por los auriculares conectados a PHONES A. El audio de AV OUT 3 sale de los auriculares conectados a PHONES B. Tomas AV IN (1) Entrada de vídeo RCA (amarillo), entrada de audio - Pioneer CD-VS33 | Owner's Manual - Page 32
DVD, vídeo portátil montado en el vehículo, etc.) conectadas a la toma AV IN. Alimentación Se utiliza para conectar el cable de alimentación suministrado. Tomas AV IN (2 - 3) Entrada de vídeo RCA (amarillo) Entrada de audio RCA (blanco, rojo) Se utiliza para conectar las tomas de entrada de RCA de - Pioneer CD-VS33 | Owner's Manual - Page 33
ón 14,4 V CC (10,8 - 15,1 V permisible) Sistema de conexión a tierra De tipo negativo Máx. consumo de energía 0,4 A Nivel de Salida de Audio 1 Vp-p/75 Ω Unidad oculto-alejado Dimensiones ........ 160 (An) × 28 (Al) × 120 (Pr) mm Peso 0,53 kg Unidad controlador Dimensiones .......... 120 - Pioneer CD-VS33 | Owner's Manual - Page 34
3 Anschließen des Stromkabels und des Controllers- Einheit 4 Anschließen der Geräte (1 5 Anschließen der Geräte (2 7 Anschließen der Audio/Video-Geräte 9 Einbau 10 Einbauen des Steuerungsgeräts 10 Einbauen des Controllers-Einheit 11 Bezeichnung der Teile und ihre Funktionen 14 Controllers - Pioneer CD-VS33 | Owner's Manual - Page 35
EMC-Richtlinien (89/336/EEC, 92/31/EEC) und CE-Markierungsrichtlinien (93/68/EEC). Dieses Gerät ist ein Rücksitz-Audio-Video-Selektor, der die Umschaltung zwischen Audio und Video des Displays ermöglicht. s Bei Gebrauch dieses Produit Wir empfehlen, daß Sie sich mit den Funktionen und der Bedienung - Pioneer CD-VS33 | Owner's Manual - Page 36
Anschließen der Geräte Hinweis: • Dieses Produkt ist für Fahrzeuge mit 12-V-Batterie und negativer Erdung konzipiert. Bevor Sie es in ein Freizeitfahrzeug, einen LKW oder Bus einbauen, müssen Sie die Batteriespannung überprüfen. • Um Kurzschlüsse beim elektrischen System zu vermeiden, unbedingt das - Pioneer CD-VS33 | Owner's Manual - Page 37
ENGLISH Anschließen des Stromkabels und des Controllers- Einheit Hideaway-Einheit ESPAÑOL DEUTSCH FRANÇAIS ITALIANO NEDERLANDS Sicherungshalter (1 A) 2 m Rot An eine Stromversorgung anschließen, (12 V Gleichstrom), die mit dem Zündschloß ein- und ausgeschaltet wird. Schwarz (Erdung) 2 m An - Pioneer CD-VS33 | Owner's Manual - Page 38
Anschließen der Geräte Anschließen der Geräte (1) Verbindungskabel mit RCAStiftstecker (getrennt erhältlich) AV OUT (1 - 3) Hideaway-Einheit Verbindungskabel mit RCAStiftstecker (getrennt erhältlich) AV IN (2 - 3) 5 - Pioneer CD-VS33 | Owner's Manual - Page 39
Display 1 AVD-W8000, u.s.w. Display HideawayEinheit Hinteres Display 3 AVD-W8000, u.s.w. HideawayEinheit Display VideoEingang AudioEingang Video-Ausgang für hinten Audio-Ausgang Video-Ausgang Audio-Ausgang Multi-DVD player XDV-P9 Tragbares Videogerät (getrennt erhältlich), u.s.w. Hinten 6 - Pioneer CD-VS33 | Owner's Manual - Page 40
Anschließen der Geräte Anschließen der Geräte (2) Verbindungskabel mit RCAStiftstecker (getrennt erhältlich) AV OUT (1 - 3) Hideaway-Einheit Verbindungskabel mit RCAStiftstecker (getrennt erhältlich) AV IN (2 - 3) 7 - Pioneer CD-VS33 | Owner's Manual - Page 41
ENGLISH ESPAÑOL DEUTSCH Audio-Ausgang Video-Ausgang Audio-Eingang Video-Eingang Audio-Eingang Video-Eingang Vorn Fernsehtuner GEX-P7000TV Vorderes Display AVX-P7000CD, u.s.w Hinteres Display 2 AVD-W8000, u.s.w. Display HideawayEinheit Hinteres Display 1 AVD-W8000, u.s.w. Display - Pioneer CD-VS33 | Owner's Manual - Page 42
äte Anschließen der Audio / Video-Geräte ControllersEinheit ∅ 3,5 Mini-Klinkenstecker Kopfhörer (getrennt erhältlich) ∅ 3,5 Mini-Klinkenstecker Kopfhörer (getrennt erhältlich) Verbindungskabel mit RCAStiftstecker (getrennt erhältlich) Video-Ausgang Audio-Ausgang 8-mm-Video-Gerät, tragbares Bord - Pioneer CD-VS33 | Owner's Manual - Page 43
ENGLISH ESPAÑOL DEUTSCH Einbau Hinweis: • Bevor Sie das Gerät endgültig einbauen, schließen Sie die Kabel provisorisch an, und überzeugen Sie sich, daß alle Anschlüsse stimmen, und daß das ganze System richtig funktioniert. • Verwenden Sie für den Einbau nur die mitgelieferten Teile. Durch den - Pioneer CD-VS33 | Owner's Manual - Page 44
Einbau Einbauen des Controllers-Einheit I Installation mit L-Haltern Wenn der Controller mit den L-Haltern befestigt wird, kann er für optimale Bedienungsfreundlichkeit geneigt werden. Lösen Sie das Schutzpapier vom doppelseitigen Klebeband der L-Halter ab, und bringen Sie diese an der Montageflä - Pioneer CD-VS33 | Owner's Manual - Page 45
ENGLISH ESPAÑOL DEUTSCH FRANÇAIS 3. Den Controllers-Einheit vorübergehend von den L-Haltern abnehmen. 4. Die L-Halter fest gegen die vorgesehene Montagefläche des ControllersEinheit pressen. 5. Den Controllers-Einheit an den L-Haltern anbringen. Die Schrauben locker halten. 12 ITALIANO - Pioneer CD-VS33 | Owner's Manual - Page 46
Einbau 6. Den Neigungswinkel des Controllers-Einheit einstellen. Den Winkel für optimale Bedienungsfreundlichkeit einstellen. 7. Den Controllers-Einheit fest an den L-Haltern sichern. Die Schrauben fest anziehen. Hinweis • Achten Sie darauf, die Schrauben nicht zu fest oder schief anzuziehen. Dies - Pioneer CD-VS33 | Owner's Manual - Page 47
OUT 1 wird über den an PHONES A angeschlossenen Kopfhörer ausgegeben. Das Audiosignal von AV OUT 3 wird über den an PHONES B angeschlossenen Kopfhörer ausgegeben. Buchsen AV IN (1) Cinch-Video-Eingangsbuchse (gelb) Cinch-AudioAusgangsbuchsen (weiß, rot) Diese Buchsen dienen zum Anschluss eines 8-mm - Pioneer CD-VS33 | Owner's Manual - Page 48
, tragbares Bord-Videogerät usw.) ausgegeben. Stromeingang Hier wird das mitgelieferte Stromkabel angeschlossen. Buchsen AV IN (2 - 3) Cinch-Video-Eingangsbuchse (gelb) Cinch-Audio-Ausgangsbuchsen (weiß, rot) Diese Buchsen werden mit den CinchAusgangsbuchsen einer Videokamera, eines tragbaren - Pioneer CD-VS33 | Owner's Manual - Page 49
ENGLISH Technische Daten Stromversorgung Gleichspannung 14,4 V (10,8 - 15,1 V zulässig) Erdungssystem Minuspol an Masse Max. Leistungsaufnahme 0,4 A Audio-Ausgangspegel 1 Vp-p/75 Ω Hideaway-Einheit Abmessungen .......... 160 (B) × 28 (H) × 120 (T) mm Gewicht 0,53 kg Controllers-Einheit - Pioneer CD-VS33 | Owner's Manual - Page 50
des appareils 3 Connexion du cordon d'alimentation et de l'unité de commande 4 Connexion du système (1 5 Connexion du système (2 7 Appareils audio/vidéo 9 Installation 10 Installation de l'appareil 10 Installation de l'unité de commande 11 Nom et fonction des commandes ........ 14 Unité de - Pioneer CD-VS33 | Owner's Manual - Page 51
68/CEE). Cet appareil est sélecteur audio-vidéo pour sièges arrière qui vous permet de commuter l'affichage entre audio et vidéo. s Utilisation de ce le conducteur, utilisez un affichage qui peut détecteur l'état en/hors service du frein à main et assurezvous de l'installer correctement de façon - Pioneer CD-VS33 | Owner's Manual - Page 52
. • N'alimentez aucun autre élément par branchement sur le câble d'alimentation de l'appareil. Le courant que ce câble est en mesure de supporter pourrait être dépassé, ce qui provoquerait une surchauffe. • Lors du remplacement d'un fusible, veillez à utiliser le fusible dont la valeur nominale - Pioneer CD-VS33 | Owner's Manual - Page 53
ENGLISH Connexion du cordon d'alimentation et de l'unité de commande Unité dissimulée ESPAÑOL DEUTSCH FRANÇAIS ITALIANO NEDERLANDS Porte-fusible (1 A) 2 m Rouge Vers une borne dont l'alimentation est commandée par la clé de contact (12 V CC). Noir (masse) 2 m Fil de masse vers un élément en - Pioneer CD-VS33 | Owner's Manual - Page 54
Connexion des appareils Connexion du système (1) Câbles de liaison munis de prises RCA (vendu séparément) AV OUT (1 - 3) Unité dissimulée Câbles de liaison munis de prises RCA (vendu séparément) AV IN (2 - 3) 5 - Pioneer CD-VS33 | Owner's Manual - Page 55
ENGLISH Avant ESPAÑOL DEUTSCH FRANÇAIS ITALIANO NEDERLANDS Entrée audio Entrée vidéo Entrée audio Entrée vidéo Sortie vidéo pour l'arrière Sortie audio Sortie vidéo Sortie audio Affichage arrière 2 AVD-W8000, etc Affichage Unité dissimulée Affichage arrière 1 AVD-W8000, etc Affichage Unité - Pioneer CD-VS33 | Owner's Manual - Page 56
Connexion des appareils Connexion du système (2) Câbles de liaison munis de prises RCA (vendu séparément) AV OUT (1 - 3) Unité dissimulée Câbles de liaison munis de prises RCA (vendu séparément) AV IN (2 - 3) 7 - Pioneer CD-VS33 | Owner's Manual - Page 57
, etc Affichage Unité dissimulée Affichage arrière 1 AVD-W8000, etc Affichage Unité dissimulée Affichage arrière 3 AVD-W8000, etc Unité dissimulée Affichage Entrée vidéo Entrée audio FRANÇAIS ITALIANO NEDERLANDS AVM-P9000R Sortie vidéo pour l'arrière Sortie - Pioneer CD-VS33 | Owner's Manual - Page 58
Mini fiche ∅ 3,5 Casque d'écoute (vendu séparément) Mini fiche ∅ 3,5 Casque d'écoute (vendu séparément) Câbles de liaison munis de prises RCA (vendu séparément) (video output)/ Sortie vidéo (audio ouput)/ Sortie audio Caméra vidéo 8 mm, appareil vidéo portable monté sur véhicule, etc. 9 - Pioneer CD-VS33 | Owner's Manual - Page 59
ENGLISH ESPAÑOL DEUTSCH Installation Remarque: • Avant d'effectuer l'installation définitive de ce produit, procédez à un câblage provisoire de façon à vous assurer que tous les éléments sont correctement reliés et fonctionnent convenablement. • Pour réaliser une installation correcte, n'utilisez - Pioneer CD-VS33 | Owner's Manual - Page 60
Installation Installation de l'unité de commande I Installation en utilisant la patte de fixation en L L'unité de commande, quand elle est installée avec les fixations en L, peut être penchée dans la position qui permet l'utilisation la plus facile. Décollez le papier de protection du ruban adhé - Pioneer CD-VS33 | Owner's Manual - Page 61
ENGLISH ESPAÑOL DEUTSCH 3. Détachez l'unité de commande des fixations en L. 4. Appuyez fermement sur les fixations en L dans leur positon d'installation de l'unité de commande. 5. Attachez l'unité de commande sur les fixations en L. Ne serrez pas complètement les vis. 12 FRANÇAIS ITALIANO - Pioneer CD-VS33 | Owner's Manual - Page 62
Installation 6. Ajustez l'angle d'installation de l'unité de commande. Ajustez l'angle pour un confort d'utilisation optimal. 7. Fixez l'unité de commande solidement avec les fixations en L. Serrez complètement les vis. Remarque: • Faites attention de ne pas trop serrer les vis ou de ne pas assez - Pioneer CD-VS33 | Owner's Manual - Page 63
pour l'augmenter. Sélecteur de source (1-3) Utilisez ces boutons pour commuter les appareils vidéo et audio connectés aux prises AV IN (1-3) pour chaque prise AV OUT (1-3). ESPAÑOL DEUTSCH FRANÇAIS ITALIANO NEDERLANDS Indicateur d'alimentation, Interrupteur d'alimentation Chaque que fois - Pioneer CD-VS33 | Owner's Manual - Page 64
monté sur véhicule, etc.) par les prises AV IN. Prise d'alimentation Connectez à cette prise le cordon d'alimentation fourni. Prises AV IN (2-3) Entrée vidéo cinch (RCA) (jaune) Entrée audio cinch (RCA) (blanc, rouge) Utilisez ces prises pour connecter les prises d'entrée cinch (RCA) d'appareils - Pioneer CD-VS33 | Owner's Manual - Page 65
écifications Source d'alimentation 14,4 V CC (10,8 - 15,1 V admissible) Système demise à la masse Type négatif Consommation max 0,4 A Niveau de sortie audio 1 Vc-c/75 Ω Appareil déporté Dimensions 160 (L) × 28 (H) × 120 (P) mm Poids 0,53 kg Contrôleur Dimensions 120 (L) × 60 (H) × 32 (P) mm - Pioneer CD-VS33 | Owner's Manual - Page 66
unit 3 Collegamento del cavo di alimentazione e dell'unità di controllo 4 Collegamenti del sistema (1 5 Collegamenti del sistema (2 7 Apparecchiature audio/video 9 Installazione 10 Installazione dell'unit 10 Installazione dell'unità di controllo 11 Nome e funzione dei componenti ........ 14 - Pioneer CD-VS33 | Owner's Manual - Page 67
CE (93/68/CEE) Questo prodotto è un selettore audio-video per sedile posteriore che permette di cambiare il display alternativamente tra audio e video. s Quando si usa quest prodotto Prima di usare l'unità, leggere completamente questo manuale per familiarizzarsi con l'unità e le sue funzioni. La - Pioneer CD-VS33 | Owner's Manual - Page 68
negativo della batteria. • Per dettagli sul collegamento dei cavi dell'amplificatore di potenza e delle altre unità, consultare il rispettivo manuale e quindi procedere con i collegamenti. • Fissare i cavi con fermafilo o nastro adesivo. Per proteggerli, avvolgerli in nastro isolante dove toccano - Pioneer CD-VS33 | Owner's Manual - Page 69
Portafusibili (1A) 2 m Rosso Collegare alla chiave d'avviamento ON/OFF (12 V di c.c.). Nero (massa) 2 m Al telaio (parte metallica) dell'auto- mobile. Unità di controllo 3 m Parte posteriore dell'unità di controllo Scanalatura Cavo di alimentazione Führen Sie das Kabel des Controllers durch - Pioneer CD-VS33 | Owner's Manual - Page 70
Collegamenti delle unità Collegamenti del sistema (1) Cavi di collegamento con spine a terminale RCA (venduto separatamente) AV OUT (1 - 3) Unità nascosta Cavi di collegamento con spine a terminale RCA (venduto separatamente) AV IN (2 - 3) 5 - Pioneer CD-VS33 | Owner's Manual - Page 71
Display posteriore 1 AVD-W8000, ecc. Display Unità nascosta Display posteriore 3 AVD-W8000, ecc. Unità nascosta Display Uscita video per parte posteriore Uscita audio Uscita video Uscita audio Lettori multiDVD XDV-P9 Video portatile (venduto separata- mente), ecc. Lato posteriore Ingresso - Pioneer CD-VS33 | Owner's Manual - Page 72
Collegamenti delle unità Collegamenti del sistema (2) Cavi di collegamento con spine a terminale RCA (venduto separatamente) AV OUT (1 - 3) Unità nascosta Cavi di collegamento con spine a terminale RCA (venduto separatamente) AV IN (2 - 3) 7 - Pioneer CD-VS33 | Owner's Manual - Page 73
nascosta Display posteriore 1 AVD-W8000, ecc. Display Unità nascosta Display posteriore 3 AVD-W8000, ecc. Unità nascosta Display Ingresso video Ingresso audio FRANÇAIS ITALIANO NEDERLANDS Uscita video per parte posteriore Uscita audio AVM-P9000R Lettori multi-DVD XDV-P9 Lato posteriore 8 - Pioneer CD-VS33 | Owner's Manual - Page 74
delle unità Apparecchiature audio/video Unità di controllo Minispinotto di ∅ 3,5 Cuffie (venduto separatamente) Minispinotto di ∅ 3,5 Cuffie (venduto separatamente) Cavi di collegamento con spine a terminale RCA (venduto separatamente) Uscita video Uscita audio Videocamera 8 mm, videocamera - Pioneer CD-VS33 | Owner's Manual - Page 75
che siano collegati bene e che l'unità ed il sistema funzionino regolarmente. • Per assicurarsi un funzionamento ottimale dell'unità, usare solo le part ad essa accluse. Usandone di altro tipo potreste causare problemi di funzionamento. • Installare l'unità in una posizione in cui non ostacoli il - Pioneer CD-VS33 | Owner's Manual - Page 76
Installazione Installazione dell'unità di controllo I Installazione mediante la staffa a L L'unità controller, se installata con le parti di montaggio L, può essere inclinata per la comodità d'uso. Rimuovere la carta di protezione dal lato posteriore del nastro biadesivo presente sulla staffa a L, - Pioneer CD-VS33 | Owner's Manual - Page 77
ENGLISH ESPAÑOL DEUTSCH 3. Sganciare una volta l'unità controller dalle parti di montaggio L. 4. Premere saldamente le parti di montaggio L contro la posizione designata all'installazione dell'unità controller. 5. Installare l'unità controller alle parti di montaggio L. Lasciare le viti allentate - Pioneer CD-VS33 | Owner's Manual - Page 78
di un foro filettato potrebbe compromettere l'installazione complessiva delle parti di montaggio L. s Installazione mediante il nastro Velcro Incollare la parte dura del nastro Velcro in dotazione al lato posteriore dell'unità di controllo e quella morbida nel punto di installazione, quindi - Pioneer CD-VS33 | Owner's Manual - Page 79
SELETTORE DI SORGENTE (1 - 3) Questi interruttori servono per la commutazione dei segnali video e audio collegati alle prese a jack AV IN (Ingresso audio/video) (da 1 a 3) verso ciascuna presa a jack AV OUT (Uscita audio/video) (da 1 a 3). ESPAÑOL DEUTSCH FRANÇAIS ITALIANO NEDERLANDS Indicatore - Pioneer CD-VS33 | Owner's Manual - Page 80
portatili installate sul veicolo, e così via) collegate alle prese a jack AV IN. Alimentazione Collegare a questa presa il cavo di alimentazione in dotazione. Prese a jack AV IN (2 - 3) Ingresso video RCA (giallo) Ingresso audio RCA (bianco e rosso) Questa prese servono per il collegamento alle - Pioneer CD-VS33 | Owner's Manual - Page 81
Alimentazione 14,4 V CC (10,8 - 15,1 V ammissibile) Sistema di messa a massa Tipo negativo Consumo massimo di corrente 0,4 A Livello di uscita audio 1 Vp-p/75 Ω Apparecchio retraibile Dimensioni 160 (L) × 28 (A) × 120 (P) mm Peso 0,53 kg Apparecchio di controllo Dimensioni 120 (L) × 60 - Pioneer CD-VS33 | Owner's Manual - Page 82
Del Valle, Mexico D.F. C.P. 03100 TEL: 5-688-52-90 Published by Pioneer Corporation. Copyright © 2000 by Pioneer Corporation. All rights reserved. Publication de Pioneer Corporation. Copyright © 2000 Pioneer Corporation. Tous droits de reproduction et de traduction réservés. Printed
-
 1
1 -
 2
2 -
 3
3 -
 4
4 -
 5
5 -
 6
6 -
 7
7 -
8
-
9
-
10
-
11
-
12
-
13
-
14
-
15
-
16
-
17
-
18
-
19
-
20
-
21
-
22
-
23
-
24
-
25
-
26
-
27
-
28
-
29
-
30
-
31
-
32
-
33
-
34
-
35
-
36
-
37
-
38
-
39
-
40
-
41
-
42
-
43
-
44
-
45
-
46
-
47
-
48
-
49
-
50
-
51
-
52
-
53
-
54
-
55
-
56
-
57
-
58
-
59
-
60
-
61
-
62
-
63
-
64
-
65
-
66
-
67
-
68
-
69
-
70
-
71
-
72
-
73
-
74
-
75
-
76
-
77
-
78
-
79
-
80
-
81
-
82
 |
 |

ENGLISH
ESPAÑOL
DEUTSCH
FRANÇAIS
ITALIANO
NEDERLANDS
AUDIO VIDEO SELECTOR
SÉLECTEUR AUDIO/VIDÉO
This product conforms to new cord colors.
Los colores de los cables de este producto se conforman con un nuevo
código de colores.
Dieses Gerät entspricht den neuen kabelfarben.
Le code de couleur des câbles utilisé pour ce produit est nouveau.
Questo prodotto è conforme ai nuovi codici colori.
Operation Manual
CD-VS33
Mode d’emploi