Pioneer CDX-FM1289 Installation Manual - Page 2
Installing the Display Unit/Installation de l, afficheur
 |
UPC - 012562620398
View all Pioneer CDX-FM1289 manuals
Add to My Manuals
Save this manual to your list of manuals |
Page 2 highlights
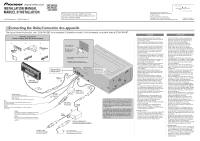
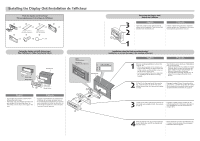
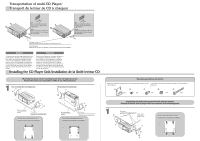
Installing the Display Unit/Installation de l'afficheur Parts for display unit mounting/ Pièces requises pour le montage de l'afficheur A B C ×1 ×1 ×1 (Rough surface) (Surface rugueuse) (Soft surface) (Surface douce) E F G ×1 ×2 ×1 D ×1 Fasten the display unit with Velcro tape/ Fixer I'afficheur à I'aide d'une bande Velcro Console, etc. Velcro tape Bande Velcro Velcro tape Bande Velcro English • Thoroughly wipe off the surface before affixing the Velcro tape. • Obviously, it is very dangerous if the cord gets tangled in the steering wheel, so install the cord so that it cannot get in the way. Français • Essuyez soigneusement la surface avant d'attacher le morceau de bande Velcro. • Il est naturellment dangereux si le cordon sera enchevêtré au volant de direction, et il faudra donc installer le cordon de telle façon qu'il ne soit pas pris. 3 2 Removing the Display Unit/ Enlever de I'afficheur English Insert the G that comes with the unit as shown in the illustration. Turn it to the left and then pull it towards you. Français Insérer la pièce G fournie avec l'appareil comme montré sur l'illustration. La tourner vers la gauche puis la tirer vers soi. 1 Installation using the flush mounting bracket/ Installation au moyen du support du montage affleurant Claws Raise the claws. Mâchoires Soulevez les mâchoires. 110 - 111 mm 40 - 41 mm Console, etc. English Français 1 Start by opening installation holes in the console, etc. • When opening holes in the console, etc., confirm that there is no object at the rear of the console, and be careful not to cut off the power supply cord. • A minimum depth of 20 mm is required for installation of the flush mounting bracket. Tout d'abord, percer les trous d'installation dans la console, etc. • Avant de percer les trous dans la console, s'assurer que l'on peut le faire sans danger et veiller à ne pas endommager les câbles d'alimentation électrique. • La profondeur minimale requise pour le support de montage affleurant est de 20 mm. D E 2 Fit the D into the opening in the console, etc., raise the claws of the D with a flatbladed screwdriver, and secure the bracket in place. Engager la pièce D dans l'ouverture de la console, etc., soulever les griffes de la pièce D au moyen d'un tournevis plat et assurer de cette manière le maintien du support. F A 3 Fit the E into the D (the top and bottom of the holder are predetermined), then secure it with F. Engager la pièce E dans la pièce D (les parties supérieure et inférieure du support sont repérées) et assurer le maintien au moyen de F. 4 Pass the display unit (A) cord through the hole in the holder, and fit the display unit into the holder. Faire cheminer le cordon de l'afficheur (A) à travers le trou du support puis engager l'afficheur dans le support.
-
 1
1 -
 2
2 -
 3
3 -
 4
4
 |
 |
