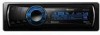
Pioneer DEH-P710BT Installation Manual - Page 13
DIN Front-mount, DIN Rear-mount - install
 |
UPC - 012562943534
View all Pioneer DEH-P710BT manuals
Add to My Manuals
Save this manual to your list of manuals |
Page 13 highlights
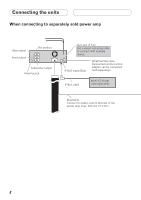
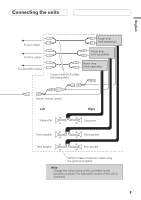
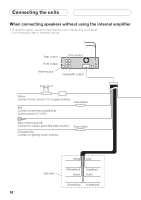
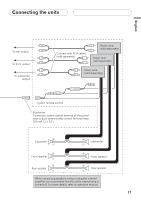
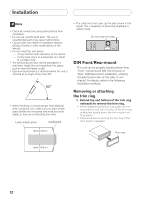
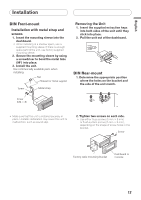
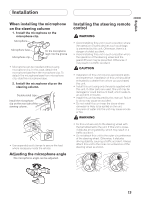
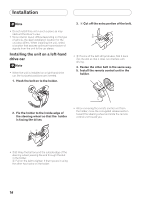
English Installation DIN Front-mount Installation with metal strap and screws 1. Insert the mounting sleeve into the dashboard. • When installing in a shallow space, use a supplied mounting sleeve. If there is enough space behind the unit, use factory supplied mounting sleeve. 2. Secure the mounting sleeve by using a screwdriver to bend the metal tabs (90°) into place. 3. Install the unit. Use commercially available parts when installing. Nut Filrewall or metal support Screw Metal strap Removing the Unit 1. Insert the supplied extraction keys into both sides of the unit until they click into place. 2. Pull the unit out of the dashboard. DIN Rear-mount 1. Determine the appropriate position where the holes on the bracket and the side of the unit match. Screw (M4 × 8) • Make sure that the unit is installed securely in place. Unstable installation may cause this unit to malfunction, such as sound skip. 2. Tighten two screws on each side. • Use either truss screws (5 mm × 8 mm) or flush surface screws (5 mm × 9 mm), depending on the shape of screw holes in the bracket. Screw Factory radio mounting bracket Dashboard or Console 13
-
 1
1 -
2
-
3
-
4
-
5
-
6
-
7
-
 8
8 -
 9
9 -
 10
10 -
 11
11 -
 12
12 -
 13
13 -
 14
14 -
 15
15 -
 16
16 -
 17
17 -
 18
18 -
19
-
20
-
21
-
22
-
23
-
24
-
25
-
26
-
27
-
28
-
29
-
30
-
31
-
32
-
33
-
34
-
35
-
36
-
37
-
38
-
39
-
40
-
41
-
42
-
43
-
44
-
45
-
46
-
47
-
48
-
49
 |
 |
