Pioneer DJM-900SRT Owners Manual - Page 14
Basic Operation - crossfader
 |
View all Pioneer DJM-900SRT manuals
Add to My Manuals
Save this manual to your list of manuals |
Page 14 highlights
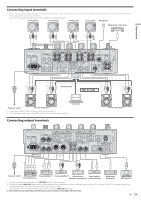
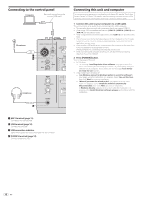
g COLOR control (page 16) This changes the parameters of the SOUND COLOR FX of the different channels. h Channel Fader (page 14) Adjusts the level of audio signals output in each channel. i CROSS FADER ASSIGN (A, THRU, B) selector switch (page 14) Sets the output destination of each channel to [A] or [B]. j Crossfader (page 14) Outputs audio signals assigned by the crossfader assign switch corresponding to the curve characteristics selected by [CROSS FADER] (Crossfader Curve Selector Switch). k MASTER LEVEL control (page 14) Adjusts the audio level output from the [MASTER1] and [MASTER2] terminals. l Master Level Indicator (page 14) Displays the audio level output from the [MASTER1] and [MASTER2] terminals. m BALANCE control (page 15) Adjusts the left/right balance of the sound output from the [MASTER1] terminals, etc. n MONO, STEREO selector switch (page 15) Switches the sound output from the [MASTER1] terminals, etc., between monaural and stereo. o BOOTH MONITOR control (page 15) Adjusts the level of audio signals output from the [BOOTH] terminal. p EQ CURVE (ISOLATOR, EQ) selector switch (page 14) Switches the function of the [EQ/ISO (HI, MID, LOW)] controls. q CH FADER ( , , ) selector switch (page 15) Switches the channel fader's curve characteristics. r CROSS FADER ( , , ) selector switch (page 15) This switches the crossfader curve characteristics. s ON/OFF (UTILITY) button - ON/OFF: Turns the MIDI function on/off (page 17). - UTILITY: Displays the [USER SETUP] or [CLUB SETUP] screen (page 24). t START/STOP button (page 18) Sends the MIDI start/MIDI stop signals. u LFO FORM (WAKE UP) button - LFO FORM: When [MIDI LFO] is selected at BEAT EFFECT, the MIDI signal's waveform switches each time the button is pressed (page 20). - WAKE UP: Cancels the auto standby mode. v Main unit display w X-PAD (page 17) Adjusts the quantitative parameter of the BEAT EFFECT function. x BEAT c, d buttons (page 16) Set the beat fraction for synchronizing the effect sound. y TAP (ENTER) button - TAP: When the BPM measurement mode is set to [TAP], the BPM is input manually by tapping the button with a finger (page 16). - ENTER: Used to change this unit's settings (page 24). z QUANTIZE button When the QUANTIZE function is turned on for BEAT EFFECT, the effect is applied to the sound without going off tempo when the currently playing track. (page 15). A AUTO/TAP button (page 16) Switches the BPM measurement mode. B Beat effect selector switch (page 16) Switches the BEAT EFFECT effect type. C Effect channel selector switch (page 16) Switches the channel to which the BEAT EFFECT is to be applied. D TIME control (page 16) Adjusts the BEAT EFFECT's time parameter. E LEVEL/DEPTH control (page 16) Adjusts the BEAT EFFECT's quantitative parameter. F ON/OFF button (page 16) Turns the BEAT EFFECT function on/off. Do not pull on the channel fader and crossfader knobs with excessive force. The knobs have a structure by which they cannot be pulled off easily. Pulling the knobs strongly may result in damaging the unit. Basic Operation Outputting sound 1 Press [POWER] button. Turn on the power of this unit. 2 Switch the input selector switches. Selects the input sources for the different channels from among the devices connected to this unit. - [DIGITAL]: Selects the DJ player connected to the [DIGITAL] terminals. - [PHONO]: Selects the analog player connected to the [PHONO] terminals. - [CD/LINE]: Selects the cassette deck or CD player connected to the [CD/ LINE] terminals. - [USB]: Selects the sound of the computer connected to the [USB] port. 3 Turn the [TRIM] control. Adjusts the level of audio signals input in each channel. The corresponding channel level indicator lights when audio signals are being properly input to that channel. 4 Move the channel fader away from you. Adjusts the level of audio signals output in each channel. 5 Switch the [CROSS FADER ASSIGN (A, THRU, B)] selector switch. Switches the output destination of each channel. - [A]: Assigns to [A] (left) of the crossfader. - [B]: Assigns to [B] (right) of the crossfader. - [THRU]: Selects this when you do not want to use the crossfader. (The signals do not pass through the crossfader.) 6 Set the crossfader. This operation is not necessary when the [CROSS FADER ASSIGN (A, THRU, B)] selector switch is set to [THRU]. 7 Turn the [MASTER LEVEL] control. Audio signals are output from the [MASTER1] and [MASTER2] terminals. The master level indicator lights. Adjusting the sound quality 1 Switch the [EQ CURVE (ISOLATOR, EQ)] selector switch. - [ISOLATOR]: Functions as an isolator. - [EQ]: The equalizer function is set. 2 Turn the [EQ/ISO (HI, MID, LOW)] controls for the respective channels. The adjustable ranges for the respective controls are as shown below. - HI: -26 dB to +6 dB (13 kHz) - MID: -26 dB to +6 dB (1 kHz) - LOW: -26 dB to +6 dB (70 Hz) Monitoring sound with headphones 1 Connect headphones to the [PHONES] terminal. 2 Press the [CUE] button(s) for the channel(s) you want to monitor. 3 Switch the [MONO SPLIT, STEREO] selector switch. - [MONO SPLIT]: The sound of the channels for which the [CUE] button is pressed is output from the headphones output's left channel, the [MASTER] channel sound is output from the right channel. - [STEREO]: The sound of the channels for which the [CUE] button is pressed is output from the headphones in stereo. 4 Turn the [MIXING] control. This adjusts the monitor volume balance of the sound of channels for which the [CUE] button is pressed and the sound of the [MASTER] channel. 5 Turn the [LEVEL] control for [HEADPHONES]. The sound of the channels for which the [CUE] button is pressed is output from the headphones. ! When the [CUE] button is pressed again, monitoring is canceled. 14 En
-
 1
1 -
2
-
3
-
4
-
5
-
6
-
7
-
8
-
 9
9 -
 10
10 -
 11
11 -
 12
12 -
 13
13 -
 14
14 -
 15
15 -
 16
16 -
 17
17 -
 18
18 -
 19
19 -
20
-
21
-
22
-
23
-
24
-
25
-
26
-
27
-
28
-
29
-
30
-
31
-
32
 |
 |