Pioneer FH-X830BHS Owner s Manual - Page 5
Preparing the remote control, Setup menu, Canceling the demonstration display DEMO OFF
 |
View all Pioneer FH-X830BHS manuals
Add to My Manuals
Save this manual to your list of manuals |
Page 5 highlights
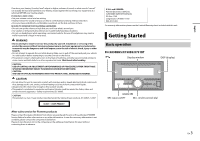
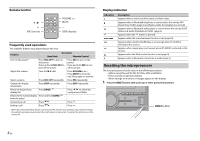
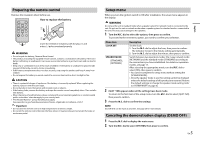
Preparing the remote control Remove the insulation sheet before use. How to replace the battery Insert the CR2025 (3 V) battery with the plus (+) and minus (-) poles orientated properly. WARNING • Do not ingest the battery, Chemical Burn Hazard. • This product, including the supplied remote control, contains a coin/button cell battery. If the coin/ button cell battery is swallowed, it can cause severe internal burns in just two hours and can lead to death. • Keep new or used batteries out of the reach of children. If the battery is swallowed or placed inside any part of the body, consult a doctor immediately. • If the battery compartment does not close securely, stop using the product and keep it away from children. • Do not expose the battery or remote control to excessive heat such as direct sunlight or fire. CAUTION • There is a potential danger of explosion if the battery is incorrectly replaced. When replacing the battery, replace it with the same type. • Do not handle or store the battery with metallic tools or objects. • If the battery leaks, remove the battery and wipe the remote control completely clean. Then install a new battery. • When disposing of used batteries, please comply with governmental regulations or environmental public institutions' rules that apply in your country/area. • "Perchlorate Material - special handling may apply. See www.dtsc.ca.gov/hazardouswaste/perchlorate. (Applicable to California, U.S.A.)" Important • Do not store the remote control in high temperatures or direct sunlight. • Do not let the remote control fall onto the floor, where it may become jammed under the brake or accelerator pedal. Setup menu When you turn the ignition switch to ON after installation, the setup menu appears in the display. WARNING Do not use the unit in standard mode when a speaker system for network mode is connected to the unit. Do not use the unit in network mode when a speaker system for standard mode is connected to the unit. This may cause damage to the speakers. 1 Turn the M.C. dial to select the options, then press to confirm. To proceed to the next menu option, you need to confirm your selection. Menu Item Description CLOCK SET Set the clock. 1 Turn the M.C. dial to adjust the hour, then press to confirm. The indicator moves to the minute setting automatically. 2 Turn the M.C. dial to adjust the minute, then press to confirm. SPEAKER MODE [STANDARD], [NETWORK] Switch between two operation modes: the 2-way network mode (NETWORK) and the standard mode (STANDARD) according to the connections you have established. For details on operation modes, see page 17. After selecting the appropriate mode, turn the M.C. dial to select [YES], then press to confirm. • You cannot complete the setup menu without setting the [SPEAKER MODE]. • Once the speaker mode is set, this setting cannot be changed unless the default settings of this product are restored. Restore the default settings to change the speaker mode setting (refer to SYSTEM RESET on page 6). 2 [QUIT :YES] appears when all the settings have been made. To return to the first item of the setup menu, turn the M.C. dial to select [QUIT :NO], then press to confirm. 3 Press the M.C. dial to confirm the settings. NOTE [CLOCK SET] can be made at any time. See page 20 for more details. Canceling the demonstration display (DEMO OFF) 1 Press the M.C. dial to display the main menu. 2 Turn the M.C. dial to select [SYSTEM], then press to confirm. En 5 English
-
 1
1 -
 2
2 -
 3
3 -
 4
4 -
 5
5 -
 6
6 -
 7
7 -
 8
8 -
 9
9 -
 10
10 -
 11
11 -
12
-
13
-
14
-
15
-
16
-
17
-
18
-
19
-
20
-
21
-
22
-
23
-
24
-
25
-
26
-
27
-
28
-
29
-
30
-
31
-
32
-
33
-
34
-
35
-
36
-
37
-
38
-
39
-
40
-
41
-
42
-
43
-
44
-
45
-
46
-
47
-
48
-
49
-
50
-
51
-
52
-
53
-
54
-
55
-
56
-
57
-
58
-
59
-
60
-
61
-
62
-
63
-
64
-
65
-
66
-
67
-
68
-
69
-
70
-
71
-
72
-
73
-
74
-
75
-
76
-
77
-
78
-
79
-
80
-
81
-
82
-
83
-
84
-
85
-
86
-
87
-
88
-
89
-
90
-
91
-
92
-
93
-
94
-
95
-
96
-
97
-
98
-
99
-
100
 |
 |
