Pioneer MEP-7000 Owner's Manual - Page 66
Troubleshooting - problems
 |
UPC - 012562879185
View all Pioneer MEP-7000 manuals
Add to My Manuals
Save this manual to your list of manuals |
Page 66 highlights
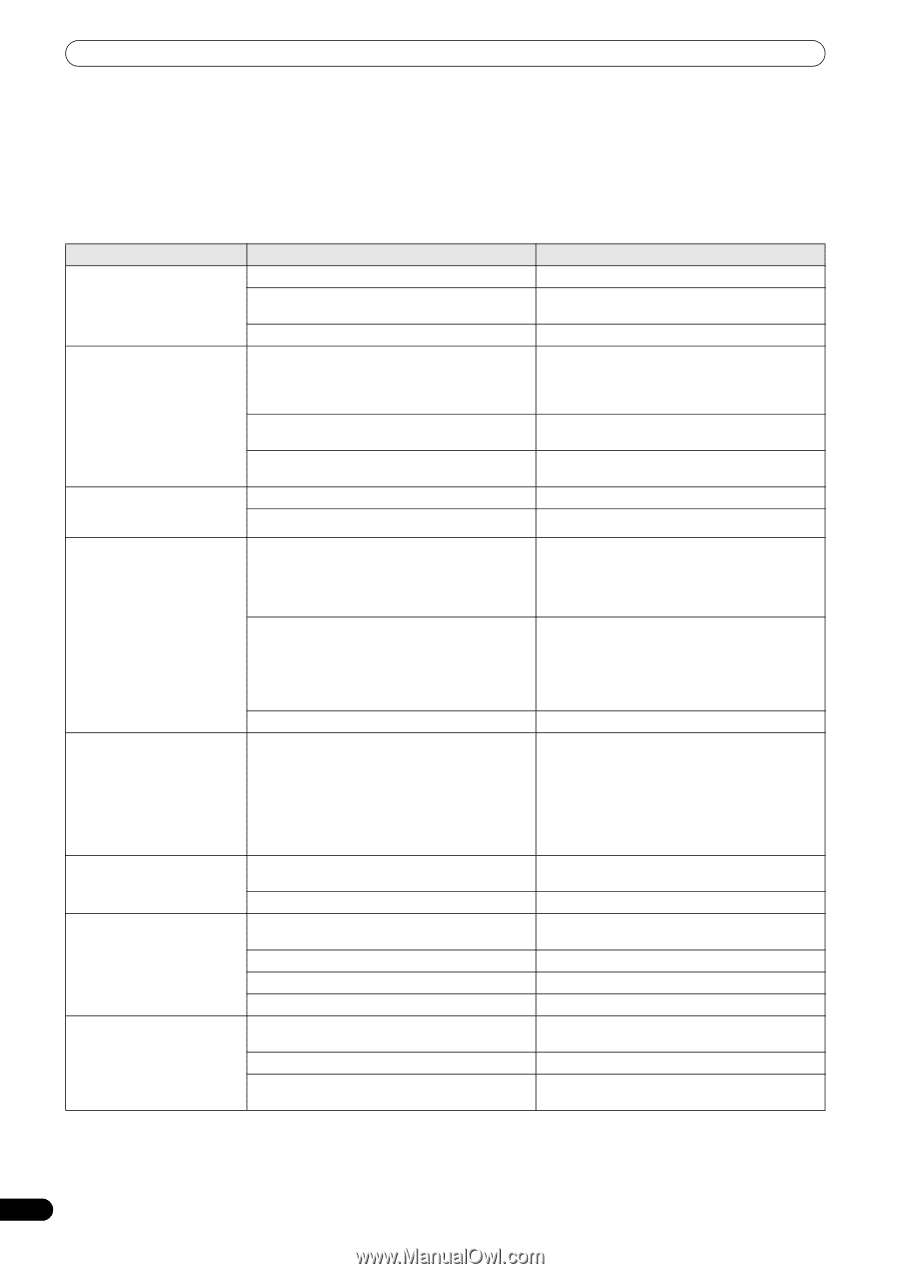
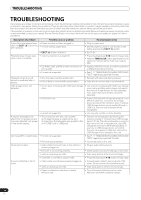
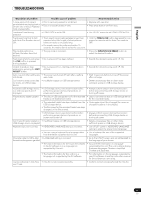
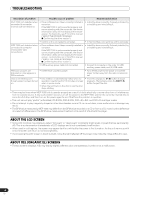
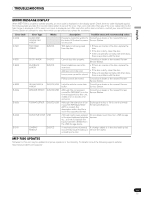
TROUBLESHOOTING TROUBLESHOOTING If you believe your player is failing to work properly, check the following troubleshooting table for tips. Sometimes simple mistakes in setup or operation may appear like serious problems. There are also times when the problem in question may be caused by something else other than your player, and at times like these you should check any other electronic devices being used at the same time. If the problem in question continues to persist even after checking the troubleshooting table below and taking whatever corrective action is recommended, contact your nearest Pioneer Service Station or contact the store from which you purchased your player for further assistance. Description of problem Possible cause of problem Recommended action A disc fails to be ejected even • Power cord has not been plugged in. after the EJECT () button has been pressed. • A track is being played back. • Plug in power cord. • Set the player to pause or cue standby mode before pressing the EJECT () button. • EJECT () button is broken. • See P. 24. Playback doesn't begin even • Auto Cue function is turned ON. when a disc is inserted. • Press the play/pause () button to begin play. • Hold the TIME/A.CUE button depressed for one second or more to set the Auto Cue mode to OFF. • CD-R/RW, DVD ±R/RW or other media are of • Replace with other media, or media recorded on poor quality. a different recording machine. • Format not supported. • See P. 11 "REGARDING PLAYABLE DISCS AND FILES" regarding supported formats. Playback comes to a halt almost immediately after it begins. • Disc has been inserted upside down. • Disc is dirty or covered with condensation. • Reinsert with label side facing upward. • Wipe disc to remove dust or condensation. USB storage device not detected. • Device does not comply with USB mass storage class. • Use a device complying with USB mass storage class (some portable audio players included in the class of image devices are not supported. Also, some flash card readers cannot be detected). • USB hub in use. • Some USB hubs will not operate properly. Try a different USB hub, or connect the storage device directly to the USB port. Also, if multiple USB storage devices are connected through a USB hub, only one of the devices will be recognized. • Format not supported. • Use only FAT, FAT32, or HFS+ formats. A caution message to the effect that "an excess current has been detected" will appear in the center display. • The connection with this unit has been terminated because an electrical current stronger than that allowable was applied to this unit's USB1 port or USB2 port. • Restore normal operation by following the directions listed in "Connecting a USB storage device" (P. 26). The rating (allowable current) for this unit is 500 mA or less per port. Use USB storage devices that meet these standards. If you have a USB storage device connected through a bus-powered USB hub, connect the USB storage device directly to this unit. Can't play MP3 or AAC tracks. • Format not supported. • See P. 11 "REGARDING PLAYABLE DISCS AND FILES" regarding supported formats. • Files are copy-protected. • Cannot be used on this unit. No sound is output. • Audio cable has come loose or has not been properly plugged in. • Plug in audio cable properly. • DJ mixer is not working properly. • Check switch and volume settings on DJ mixer. • Jacks or jack plugs are dirty. • Wipe away dust or dirt and reinsert plugs. • Controller is currently in pause mode. • Press the play/pause () button to begin play. Sound is distorted or full of noise. • Audio cable has not been properly plugged in. • Connect audio cable to line input jack of DJ mixer. Do not connect to microphone jack. • Jacks or jack plugs are dirty. • Wipe away dust or dirt and reinsert plugs. • Player is subject to noise from a nearby television set. • Turn off power to television set or move television set further away from player. 66 En
-
 1
1 -
2
-
3
-
4
-
5
-
6
-
7
-
8
-
9
-
10
-
11
-
12
-
13
-
14
-
15
-
16
-
17
-
18
-
19
-
20
-
21
-
22
-
23
-
24
-
25
-
26
-
27
-
28
-
29
-
30
-
31
-
32
-
33
-
34
-
35
-
36
-
37
-
38
-
39
-
40
-
41
-
42
-
43
-
44
-
45
-
46
-
47
-
48
-
49
-
50
-
51
-
52
-
53
-
54
-
55
-
56
-
57
-
58
-
59
-
60
-
 61
61 -
 62
62 -
 63
63 -
 64
64 -
 65
65 -
 66
66 -
 67
67 -
 68
68 -
 69
69 -
 70
70 -
 71
71 -
72
 |
 |