Pioneer PD-F17 Owner's Manual - Page 8
Remote Control Unit, Remote Control Operations, Put Batteries Into The Remote, Control Unit
 |
View all Pioneer PD-F17 manuals
Add to My Manuals
Save this manual to your list of manuals |
Page 8 highlights
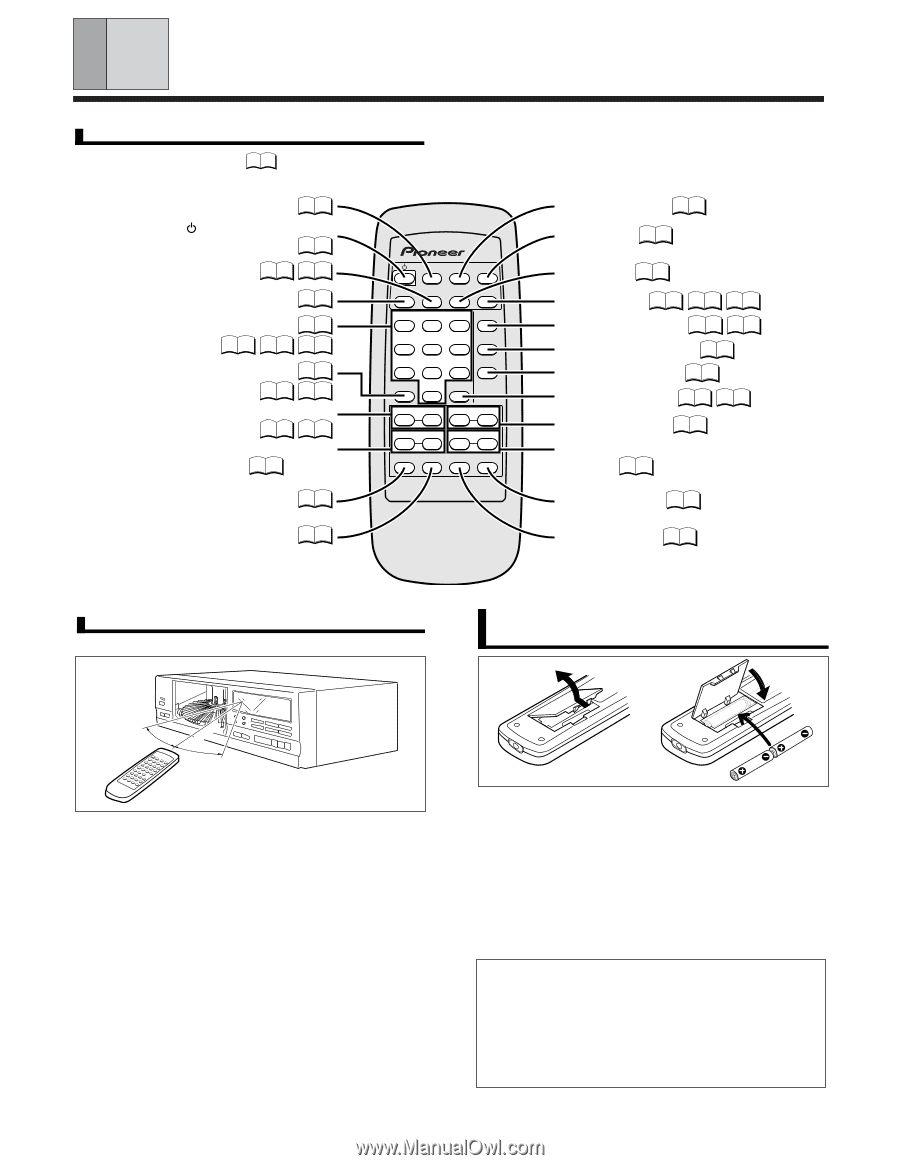
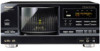
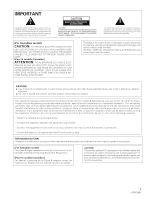
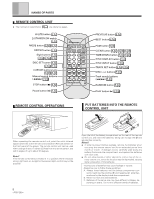
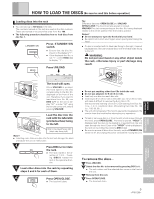
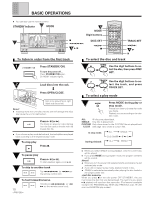
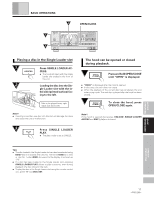
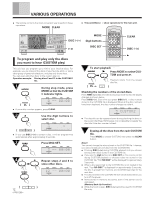
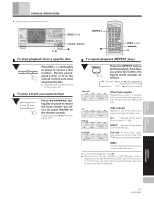
NAMES OF PARTS REMOTE CONTROL UNIT ÷ The numbers in parenthesis P. are reference pages. HI-LITE button P. 17 STANDBY/ON switch P. 10 MODE button P. 10 P. 12 REPEAT button P. 13 Digit buttons P. 10 P. 12 P. 15 P. 18 DISC SET button P. 10 P. 12 P. 15 CURSOR buttons () P. 18 P. 19 Manual search buttons (1/¡) P. 10 STOP button (7) P. 10 Pause button (8) P. 10 HI-LITE PREVIOUS BEST REPEAT MODE PGM CLEAR ABC DEF TIME/ 1 2 3 CHARA GHI 4 JKL 5 MNO TITLE 6 DISPLAY PQRS 7 TUV 8 WXYZ 9 TITLE INPUT DISC SET MARK TRACK 0 SET < CURSOR > - DISC + 1 ¡ 4¢ 7 8 3 RANDOM FILE-TYPE CD PLAYER REMOTE CONTROL UNIT Î PREVIOUS button P. 16 BEST button P. 16 PGM button P. 15 CLEAR button P. 12 P. 15 P. 19 TIME/CHARA button P. 18 P. 21 TITLE DISPLAY button P. 20 TITLE INPUT button P. 18 TRACK SET button P. 10 P. 15 DISC (-/+) buttons P. 13 Track search buttons (4/¢) P. 10 RANDOM button P. 14 PLAY button (3) P. 10 REMOTE CONTROL OPERATIONS PUT BATTERIES INTO THE REMOTE CONTROL UNIT 30° 7 m (23 ft) 30° When operating the remote control unit, point the unit's infrared signal transmitter at the remote control receiver (Remote Sensor) on the front panel of the player. The remote control unit can be used within a range of about 7 meters (23 feet) from the remote sensor, and within angles of up to about 30 degrees. Note!! If the remote control sensor window is in a position where it receives strong light such as sunlight or fluorescent light, control may not be possible. 8 Open the lid of the battery compartment on the rear of the remote control unit, and insert the batteries, taking care to align the ª and · polarities correctly. Notes!! ÷ In order to prevent battery leakage, remove the batteries when not using the remote control unit for an extended period (one month or more). If leakage occurs, carefully wipe away any battery fluid inside the compartment, and replace the batteries with new ones. ÷ Do not allow books or other objects to rest on top of the remote control unit, since the buttons may be depressed, causing faster exhaustion of the batteries. Incorrect use of batteries may cause leakage or rupture. Always be sure to follow these guidelines: A. Always insert batteries into the battery compartment cor- rectly matching the positive ª and negative · polarities, as shown by the display inside the compartment. B. Never mix new and used batteries. C. Batteries of the same size may have different voltages, depending on brand. Do not mix different brands of batteries.
-
 1
1 -
2
-
 3
3 -
 4
4 -
 5
5 -
 6
6 -
 7
7 -
 8
8 -
 9
9 -
 10
10 -
 11
11 -
 12
12 -
 13
13 -
14
-
15
-
16
-
17
-
18
-
19
-
20
-
21
-
22
-
23
-
24
 |
 |