Pioneer PDP-6071HD Owner's Manual - Page 63
Adjustments and Settings - user manual
 |
View all Pioneer PDP-6071HD manuals
Add to My Manuals
Save this manual to your list of manuals |
Page 63 highlights
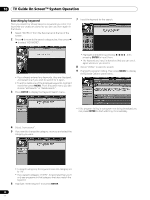
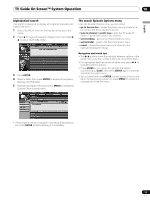
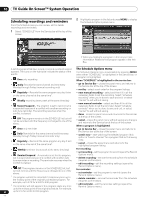
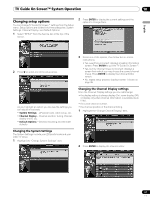
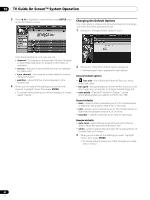
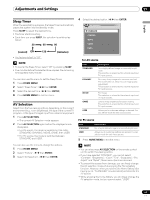
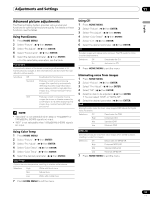
Adjustments and Settings 11 Adjustments and Settings English Sleep Timer When the selected time elapses, the Sleep Timer automatically places the system into the standby mode. Press SLEEP to select the desired time. • The timer starts counting. • Each time you press SLEEP, the selection is switched as below: 4 Select the desired option. ( / then ENTER) AV Selection STANDARD DYNAMIC MOVIE 30 60 90 (cancel) Off 120 (minutes) GAME USER • The factory default is "Off". NOTE • To cancel the Sleep Timer, select "Off" by pressing SLEEP. • Five minutes before the selected time elapses, the remaining time appears every minute. You can also use the menu to set the Sleep Timer. 1 Press HOME MENU. 2 Select "Sleep Timer". ( / then ENTER) 3 Select the desired time. ( / then ENTER) 4 Press HOME MENU to exit the menu. AV Selection Select from the five viewing options, depending on the current environment (e.g., room brightness), the type of the current TV program, or the type of images input from external equipment. 1 Press AV SELECTION. • The current AV Selection mode appears. 2 Press AV SELECTION again before the displayed mode disappears. • For AV source, the mode is switched in this order; STANDARD, DYNAMIC, MOVIE, GAME, then USER. • For PC source, the mode is switched between STANDARD and USER. For AV source Item STANDARD Description For a highly defined image in a normally bright room This selection is shared by the external input and TV input sources. DYNAMIC MOVIE GAME USER For a very sharp image with maximum contrast This mode does not allow manual image quality adjustment. This selection is shared by the external input and TV input sources. For movies This selection is shared by the external input and TV input sources. Lowers image brightness for easier viewing. This selection is shared by the external input and TV input sources. Allows you to customize settings as desired. You can set the mode for each input source. For PC source Item STANDARD USER Description For a highly defined image in a normally bright room Allows you to customize settings as desired. You can set the mode for each input source. 5 Press HOME MENU to exit the menu. You can also use the menu to change the options. 1 Press HOME MENU. 2 Select "Picture". ( / then ENTER) 3 Select "AV Selection". ( / then ENTER) NOTE • You can also press AV SELECTION on the remote control unit to switch the viewing option. • If you have selected "DYNAMIC", you cannot select "Contrast", "Brightness", "Color", "Tint", "Sharpness", "Pro Adjust" and "Reset"; these menu items are dimmed. • To prevent the screen from damage, you can freely change the AV selection mode while enjoying the Home Gallery function. However, when you resume the Home Gallery after having quit it, "STANDARD" is automatically selected for the AV source. • While enjoying the Home Gallery, you can freely change the AV selection mode, but you cannot select "USER". 63 En
-
 1
1 -
2
-
3
-
4
-
5
-
6
-
7
-
8
-
9
-
10
-
11
-
12
-
13
-
14
-
15
-
16
-
17
-
18
-
19
-
20
-
21
-
22
-
23
-
24
-
25
-
26
-
27
-
28
-
29
-
30
-
31
-
32
-
33
-
34
-
35
-
36
-
37
-
38
-
39
-
40
-
41
-
42
-
43
-
44
-
45
-
46
-
47
-
48
-
49
-
50
-
51
-
52
-
53
-
54
-
55
-
56
-
57
-
 58
58 -
 59
59 -
 60
60 -
 61
61 -
 62
62 -
 63
63 -
 64
64 -
 65
65 -
 66
66 -
 67
67 -
 68
68 -
69
-
70
-
71
-
72
-
73
-
74
-
75
-
76
-
77
-
78
-
79
-
80
-
81
-
82
-
83
-
84
-
85
-
86
-
87
-
88
-
89
-
90
-
91
-
92
-
93
-
94
-
95
-
96
-
97
-
98
-
99
-
100
-
101
-
102
-
103
-
104
-
105
-
106
-
107
-
108
-
109
-
110
-
111
-
112
-
113
-
114
-
115
-
116
-
117
-
118
-
119
-
120
-
121
-
122
-
123
-
124
-
125
-
126
-
127
-
128
-
129
-
130
-
131
-
132
-
133
-
134
-
135
-
136
-
137
-
138
-
139
-
140
-
141
-
142
-
143
-
144
-
145
-
146
-
147
-
148
-
149
-
150
-
151
-
152
-
153
-
154
-
155
-
156
-
157
-
158
-
159
-
160
-
161
-
162
-
163
-
164
-
165
-
166
-
167
-
168
-
169
-
170
-
171
-
172
-
173
-
174
-
175
-
176
-
177
-
178
-
179
-
180
-
181
-
182
-
183
-
184
-
185
-
186
-
187
-
188
-
189
-
190
-
191
-
192
-
193
-
194
-
195
-
196
-
197
-
198
-
199
-
200
-
201
-
202
-
203
-
204
-
205
-
206
-
207
-
208
-
209
-
210
-
211
-
212
-
213
-
214
-
215
-
216
-
217
-
218
-
219
-
220
-
221
-
222
-
223
-
224
-
225
-
226
-
227
-
228
-
229
-
230
-
231
-
232
-
233
-
234
-
235
-
236
-
237
-
238
-
239
-
240
-
241
-
242
-
243
-
244
-
245
-
246
-
247
-
248
-
249
-
250
-
251
-
252
-
253
-
254
-
255
-
256
-
257
-
258
-
259
-
260
-
261
-
262
-
263
-
264
-
265
-
266
-
267
-
268
-
269
-
270
-
271
-
272
-
273
-
274
-
275
-
276
-
277
-
278
-
279
-
280
-
281
-
282
-
283
-
284
-
285
-
286
-
287
-
288
-
289
-
290
-
291
-
292
 |
 |
