Pioneer PRS-X340 Owners Manual
Pioneer PRS-X340 Manual
 |
View all Pioneer PRS-X340 manuals
Add to My Manuals
Save this manual to your list of manuals |
Pioneer PRS-X340 manual content summary:
- Pioneer PRS-X340 | Owners Manual - Page 1
ENGLISH ESPAÑOL BRIDGEABLE FOUR-CHANNEL POWER AMPLIFIER AMPLIFICATEUR DE PUISSANCE PONTABLE A QUATRE VOIES Owner's Manual PRS-X340 Mode d'emploi DEUTSCH FRANÇAIS ITALIANO NEDERLANDS - Pioneer PRS-X340 | Owners Manual - Page 2
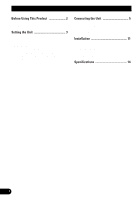
Contents Before Using This Product 2 In case of trouble 2 WARNING 2 Setting the Unit 3 Gain Control 3 Power Indicator 3 Cut Off Frequency Control 3 BFC (Beat Frequency Control) Switch 3 RCA 11 Fitting the end cap 12 Example of a set up with two units side by side 13 Specifications 14 1 - Pioneer PRS-X340 | Owners Manual - Page 3
manual. In case of trouble When the unit does not operate properly, contact your dealer or the nearest authorized PIONEER Service Station. WARNING • Always use the special red battery and ground wires ([RD-223] × 2), which are sold separately. Connect the battery wire directly to the car battery - Pioneer PRS-X340 | Owners Manual - Page 4
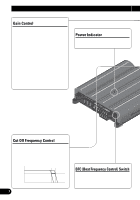
Adjusting the gain controls A and B will help match the output of the car stereo to the Pioneer amplifier. Normally, set the gain controls to the "NORMAL" position. If the output is low, even when the volume of the car stereo is turned up, turn these controls clockwise. If there is distortion when - Pioneer PRS-X340 | Owners Manual - Page 5
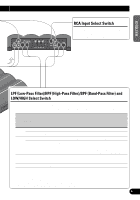
/HPF/BPF and LOW/HIGH select switch as follows according to the type of speaker that is connected to the speaker output connector and the car stereo system: LPF/HPF/BPF and LOW/HIGH Select Switch LPF HIGH LOW HPF HIGH LOW Audio frequency range to be output *1 - 3k to 9k - Pioneer PRS-X340 | Owners Manual - Page 6
at rest or idling. • If the system remote control wire of the amplifier is connected to the power terminal through the ignition switch (12 V DC), the amplifier will always be on when the ignition is on- regardless of whether the car stereo is on or off. Because of this, the battery could go - Pioneer PRS-X340 | Owners Manual - Page 7
Connecting wires with RCA pin plugs (sold separately). Amplifier with RCA input jacks External Output For details on "Connecting the Speakers and Input wires" section. Car stereo with RCA output jacks Back side DEUTSCH " section for speaker connection instructions. System remote control wire - Pioneer PRS-X340 | Owners Manual - Page 8
positive terminal (+) and the ground wire to the car body. 1. Pass the battery wire from the engine compartment to the interior of the vehicle. • After making all other connections to the amplifier, connect the battery wire terminal of the amplifier to the positive (+) terminal of the battery. Fuse - Pioneer PRS-X340 | Owners Manual - Page 9
ENGLISH ESPAÑOL Connecting the Speaker Output Terminals 1. Expose the end of the speaker wires by about 10 mm and twist using nippers or a cutter. Twist 3. Connect the speaker wires to the speaker output terminals. • Fix the speaker wires securely with the terminal screws. Terminal screw 10 mm - Pioneer PRS-X340 | Owners Manual - Page 10
to the right. RCA input jack A (Right) Speaker out A (Left) Connecting wires with RCA plugs (sold separately) From car stereo (RCA output) If only one input plug is used, such as when the car stereo has only one output (RCA output), connect the plug to RCA input jack A, but do not connect - Pioneer PRS-X340 | Owners Manual - Page 11
-channel mode (Stereo) RCA input jack A RCA Input Select Switch Slide this switch to the left. Connecting wire with RCA plugs (sold separately) From car stereo (RCA output) Two-channel mode (Mono) RCA input jack A RCA Input Select Switch Slide this switch to the left. Connecting wire with RCA - Pioneer PRS-X340 | Owners Manual - Page 12
tip does not touch any wire. This is important to prevent wires from being cut by vibration of the car, which can result in fire. • To prevent electric shock, do not install the amplifier in places where it might come in contact with liquids. • To ensure proper installation, use the supplied parts - Pioneer PRS-X340 | Owners Manual - Page 13
ENGLISH ESPAÑOL 3. Drill 2.5 mm diameter holes at the point marked, and install the amplifier, either on the carpet or directly to the chassis. Tapping-screws (4 × 18 mm) Fitting the end cap 1. Align the main unit and end cap holes, - Pioneer PRS-X340 | Owners Manual - Page 14
Installation Example of a set up with two units side by side You can set up two units with the opposing ends joined together. (Refer to the illustration in step 2.) 1. Remove the bracket screw, adjust the bracket to the desired position, and then tighten the screw once more to secure. 2. Setting - Pioneer PRS-X340 | Owners Manual - Page 15
360 W × 2 (DIN45324, +B=14.4 V) Load impedance ...4 Ω (1 - 8 Ω allowable) (Bridge connection: 2 - 8 Ω allowable) Frequency response ...10 - 50,000 Hz (+0 dB, -1 22 kΩ (0.4 - 6.5 V) Note: • Specifications and the design are subject to possible modification amplifiers. 14 FRANÇAIS ITALIANO NEDERLANDS - Pioneer PRS-X340 | Owners Manual - Page 16
Contenido Antes de usar este producto 2 En caso de desperfectos 2 ADVERTENCIA 2 Ajuste de esta unidad 3 Control de ganancia 3 Indicador de alimentación 3 Control de frecuencia de corte 3 Interruptor BFC (Control de la frecuencia de batido 3 Interruptor de selección de entrada RCA .......... - Pioneer PRS-X340 | Owners Manual - Page 17
, 92/31/CEE) y Directiva de Marcación CE (93/68/CEE). Muchas gracias por la adquisición de este producto PIONEER. Antes de tratar de operarlo, lea atentamente este manual. • Confirme que ninguna parte quede detrás del panel, cuando perfore un orificio para la instalación del amplificador. Asegúrese - Pioneer PRS-X340 | Owners Manual - Page 18
a igualar la salida del equipo estéreo para automóvil al amplificador Pioneer. Normalmente, ajuste los controles de ganancia a la posición "NORMAL". Si ajuste a la posición NORMAL. Cuando use con un estéreo de automóvil Pioneer equipado con RCA con una salida máxima de 4 V o más, ajuste el nivel - Pioneer PRS-X340 | Owners Manual - Page 19
ENGLISH Interruptor de selección de entrada RCA Para la entrada de dos canales, deslice este interruptor hacia la izquierda. Para la entrada de cuatro canales, deslice este interruptor hacia la derecha. ESPAÑOL DEUTSCH FRANÇAIS ITALIANO NEDERLANDS Interruptor de selección LPF (Filtro de paso - Pioneer PRS-X340 | Owners Manual - Page 20
para las unidades pueden ser de colores diferentes aun si tienen la misma función. Cuando se conecta esta unidad a otra, refiérase a los manuales de instalación de ambas unidades y conecte los cables que tienen la misma función. Canal de altavoces Cuatro canales Dos canales Salida de altavoz A de - Pioneer PRS-X340 | Owners Manual - Page 21
ENGLISH ESPAÑOL Diagrama de conexión Fusible (30 A) × 2 Ojal Fusible (30 A) × 2 Cable de batería rojo especial [RD-223] (en venta por separado). Después de realizar todas las conexiones al amplificador, conecte el terminal del conductor de batería del amplificador al terminal positivo (+) de la - Pioneer PRS-X340 | Owners Manual - Page 22
Conexión de la unidad Conexión del terminal de alimentación • Siempre utilice los cables rojos especiales de batería y de tierra ([RD-223] × 2), vendidos separadamente. Conecte el cable de batería directamente al terminal positivo de la batería del vehículo (+) y el cable de tierra a la carrocería - Pioneer PRS-X340 | Owners Manual - Page 23
ENGLISH ESPAÑOL Conexión del terminal de salida de altavoz 1. Desnude la extremidad de los cables de altavoces por aproximadamente 10 mm y tuérzala utilizando alicates o una tajadera. Tuérzala 3. Conecte los cables de altavoz al terminal de salida de altavoz. • Fije los cables firmemente - Pioneer PRS-X340 | Owners Manual - Page 24
Conexión de la unidad Conexión de los altavoces y cables de entrada El modo de salida de altavoz puede ser de cuatro canales, tres canales (estéreo + mono) o dos canales (estéreo, mono). Conecte los cables de altavoz para ajustarse al modo según los diagramas mostrados abajo. Modo de cuatro - Pioneer PRS-X340 | Owners Manual - Page 25
ENGLISH ESPAÑOL DEUTSCH Modo de dos canales (estéreo) Toma de conector de entrada RCA A Interruptor de selección de entrada RCA Deslice este interruptor hacia la izquierda. Conexión de cables con enchufes de conector RCA (en venta por separado) Desde el sistema estereofónico del coche (salida - Pioneer PRS-X340 | Owners Manual - Page 26
Instalación PRECAUCION • No lo instale en: -Donde podría lesionar al conductor o a los pasajeros si se detiene el vehículo bruscamente. -Donde podría interferir con el conductor, como por ejemplo en el piso en frente al asiento del conductor. • Asegúrese que los cables no se enganchen en el - Pioneer PRS-X340 | Owners Manual - Page 27
ENGLISH ESPAÑOL 3. Perfore orificios de 2,5 mm de diámetro en el punto marcado, e instale el amplificador, ya sea en la alfombra o directamente en el chasis. Tornillos autoterrajantes (4 × 18 mm) Fijando la tapa de extremo 1. Alinee los orificios de la unidad principal y la tapa de extremo, e - Pioneer PRS-X340 | Owners Manual - Page 28
Instalación Ejemplo de fijar con dos unidades lado a lado Puede fijar hasta dos unidades con los extremos opuestos unidos juntos. (Refiérase a la ilustración en el paso 2.) 1. Retire el tornillo de ménsula, ajuste la ménsula a la posición deseada, y luego apriete el tornillo una vez más para - Pioneer PRS-X340 | Owners Manual - Page 29
Consumo de corriente promedio 14,5 A (4 Ω para cuatro canales) 26,5 A (4 Ω para dos canales) Fusible ...30 A × 3 Dimensiones ...264 (An) × 65 (Al) × 345 (Pr) mm Peso 7,0 kg (No se incluyen los conductores para el cabledo) Potencia de salida continua 37,5 W × 4 (en 14,4V, 4 Ω, 20 - 20.000 Hz, 0,04 - Pioneer PRS-X340 | Owners Manual - Page 30
Inhaltsverzeichnis Vor Gebrauch dieses Produkts 2 Im Störungsfall 2 WARNUNG 2 Einstellen dieses Geräts 3 Verstärkungsregelung 3 Stromanzeige 3 Ausschaltfrequenz-Regelung 3 Interferenzschutzschalter (BFC 3 RCA-Eingangs-Wahlschalter 4 LPF (Tiefpassfilter)/HPF (Hochpassfilter) /BPF ( - Pioneer PRS-X340 | Owners Manual - Page 31
(93/68/EEC). Vielen Dank für den Kauf dieses PIONEER Produkts. Diese Bedienungsanleitung vor der Inbetriebnahme sorgfältig durchlesen. Sie die Stromversorgungs- und Lautsprecheranschlüsse. Ermitteln Sie die Ursache des Problems und schaffen Sie umgehend Abhilfe. • Wenden Sie sich bitte an lhren - Pioneer PRS-X340 | Owners Manual - Page 32
dieses Geräts Verstärkungsregelung Durch Einstellung der Verstärkungsregler A und B kann der Ausgang der Auto-Stereo-Anlage dem Pioneer-Verstärker angepaßt werden. Normalerweise wird der verstaerkungsregelung auf die Position "NORMAL" eingestellt. Wenn die Ausgangsleistung niedrig ist, obwohl - Pioneer PRS-X340 | Owners Manual - Page 33
ENGLISH RCA-Eingangs-Wahlschalter Für Zwei-Kanal-Eingang diesen Schalter nach links legen. Für VierKanal-Eingang diesen Schalter nach rechts legen. ESPAÑOL DEUTSCH FRANÇAIS ITALIANO NEDERLANDS LPF (Tiefpassfilter)/HPF (Hochpassfilter)/BPF (Bandpassfilter) und LOW (Tief)/HIGH (Hoch)- - Pioneer PRS-X340 | Owners Manual - Page 34
Anschluß der Einheit VORSICHT • Trennen Sie das Batterieanschlußkabel vom negativen (-) Batteriepol, um Kurzschlüsse und Schäden am Gerät zu vermeiden. • Befestigen Sie die Kabel mit Kabelklemmen oder Klebeband. Kabel, die Kontakt mit Metallteilen haben, sollten an den betreffenden Stellen mit - Pioneer PRS-X340 | Owners Manual - Page 35
ENGLISH ESPAÑOL Auschlußschema Tülle Sicherung (30 A) × 2 Sicherung (30 A) × 2 Spezielles rotes Batteriekabel [RD-223] (separat enhältlich). Nachdem alle anderen Anschlüsse am Verstärker ausgeführt worden sind, das Batterie-Kabelklemme des Verstärkers mit der positiven (+) Klemme der Batterie - Pioneer PRS-X340 | Owners Manual - Page 36
Anschluß der Einheit Anschluß der Stromversorgung • Immer werden die getrennt erhaeltliche rote Spezial-Batterie und Erdungsdraehte ([RD-223] × 2) verwenden. Das Batteriekabel direkt an den Pluspol (+) der Wagenbatterie und das Massekabel an Karosseriemasse anschließen. 1. Führen Sie das - Pioneer PRS-X340 | Owners Manual - Page 37
ENGLISH ESPAÑOL Anschluß der LautsprecherAusgang-Klemmen 1. Die Enden der Lautsprecherkabel um ca. 10 mm mit einem Clip oder einer Kneifzange abisolieren, und die Kabelenden zusammendrehen. Zusammendrehen 3. Schließen Sie die Lautsprecherkabel an die Lautsprecherausgangklemmen an. • Die - Pioneer PRS-X340 | Owners Manual - Page 38
Anschluß der Einheit Anschluß der Lautsprecher und Eingangskabel Der Lautsprecher-Ausgabe-Modus kann auf Vier-Kanal, Drei-Kanal (Stereo + Mono) oder Zwei-Kanal (Stereo , Mono) eingestellt werden. Schliessen Sie den Lautsprecherkabel an, um der Tonart anzupassen, gemäss folgenden Bilder. Vier-Kanal - Pioneer PRS-X340 | Owners Manual - Page 39
ENGLISH ESPAÑOL DEUTSCH Zwei-Kanal-Modus (Stereo) RCAEingangsbuchse A RCA-Eingangs-Wahlschalter Diesen Schalter nach links legen. Anschlußkabel mit RCA-Stiftsteckern (separat enhältlich) Von der Autostereoanlage (RCA-Ausgang) Zwei-Kanal-Modus (Mono) RCAEingangsbuchse A RCA-Eingangs- - Pioneer PRS-X340 | Owners Manual - Page 40
Einbau VORSICHT • Keinesfalls an Orten einbauen: -Plätze, an denen sich der Fahrer oder die Fahrzeuginsassen bei plötzlichem Abbremsen am Gerät verletzen könnten. -Plätze, an denen das Gerät den Fahrer behindern könnte, wie z.B. auf dem Boden vor der Fahrersitz. • Achten Sie darauf, daß sich die - Pioneer PRS-X340 | Owners Manual - Page 41
ENGLISH ESPAÑOL 3. Bohren Sie Löcher mit einem Durchmesser von 2,5 mm an den zuvor markierten Punkten, und bringen Sie den Verstärker an, entweder direkt am Teppich oder am Rahmen. Schneidschrauben (4 × 18 mm) Anbringen der Abschlußkappe 1. Haupteinheit- und Abschlußkappenöffnungen aufeinander - Pioneer PRS-X340 | Owners Manual - Page 42
Einbau Beispiel für eine Installation mit zwei Einheiten, Seite bei Seite Zwei Einheiten können unter Verbindung deren gegenüberliegenden Enden installiert werden. (Siehe Abbildung in Schritt 2.) 1. Die Halterungsschraube herausdrehen, die Halterung auf die gewünschte Position einstellen, dann die - Pioneer PRS-X340 | Owners Manual - Page 43
ENGLISH ESPAÑOL DEUTSCH Technische Daten Stromversorgung 14,4 V Gleichspannung (Toleranz 10,8 - 15,1 V) Erdungssystem ...Negativ Leistungsaufnahme 43,7 A (bei gleichbleibendem Strom, 4 Ω) Durchschnittliche Stromentnahme 14,5 A (4 Ω für Vier-Kanal) 26,5 A (4 Ω für Zwei-Kanal) Sicherung ...30 A - Pioneer PRS-X340 | Owners Manual - Page 44
Table des matières Avant d'utiliser cet appareil 2 En cas d'anomalie 2 AVERTISSEMENT 2 Réglage de l'appareil 3 Commande du gain 3 Témoin d'alimentation 3 Commande de la fréquence de coupure 3 Interrupteur BFC (Commande de fréquence de battement 3 Sélecteur d'entrée Cinch (RCA 4 Sélecteur - Pioneer PRS-X340 | Owners Manual - Page 45
tique (89/336/CEE, 92/31/CEE) et à la directive CE relative aux marquages (93/68/CEE). Nous vous remercions d'avoir acheté cet appareil PIONEER. Avant de l'utiliser, prendre soin de lire ce manuel. En cas d'anomalie En cas d'anomalie de fonctionnement, veuillez consulter le distributeur ou le centre - Pioneer PRS-X340 | Owners Manual - Page 46
stéréo est équipé de prises Cinch (RCA) (niveau de sortie standard à 500 mV). Si cet appareil est utilisé conjointement avec un autoradio stéréo Pioneer pourvu de prises Cinch (RCA) sur lesquelles peuvent se trouver une tension de sortie de 4 V ou plus, réglez le niveau en fonction du niveau de - Pioneer PRS-X340 | Owners Manual - Page 47
ENGLISH Sélecteur d'entrée Cinch (RCA) Dans le cas où deux voies sont appliquées sur l'amplificateur, placez ce sélecteur sur la position de gauche; dans le cas de quatre voies, placez ce sélecteur sur la position de droite. ESPAÑOL DEUTSCH FRANÇAIS ITALIANO NEDERLANDS Sélecteur LPF (Filtre - Pioneer PRS-X340 | Owners Manual - Page 48
N'alimentez pas un appareil par un piquage sur le câble qui alimente un autre appareil. Ce câble n'a peut-être pas la section suffisante pour supporter sans danger l'intensité consommée par les deux appareils. Pour éviter toute anomalie • Ne reliez pas à la masse le câble (-) d'un haut-parleur; ne - Pioneer PRS-X340 | Owners Manual - Page 49
ENGLISH ESPAÑOL Schéma de raccordement Passe-câble Fusible (30 A) × 2 caoutchouté Fusible (30 A) × 2 Câble rouge de liaison à la batterie [RD-223] (vendu séparément). Après avoir effectué tous les autres raccordements de l'amplificateur, reliez ce câble à la borne positive (+) de la batterie. Câ - Pioneer PRS-X340 | Owners Manual - Page 50
Raccordement de l'appareil Raccordement de la borne d'alimentation • Utiliser toujours la batterie rouge spéciale et des câbles du terrain ([RD-223] × 2), qui sont vendus séparément. Reliez le câble rouge à la borne positive (+) de la batterie et le câble de masse à la carrosserie du véhicule. 3. - Pioneer PRS-X340 | Owners Manual - Page 51
ENGLISH ESPAÑOL Raccordement des bornes de sortie vers les haut-parleurs 1. Dénudez, sur 10 mm, l'extrémité des câbles de liaison aux haut-parleurs et torsadez les brins du câble. Torsadez 3. Reliez les câbles de liaisons aux haut-parleurs aux bornes de sortie vers les haut-parleurs. • Serrez - Pioneer PRS-X340 | Owners Manual - Page 52
Raccordement de l'appareil Raccordement des haut-parleurs et des câbles Les haut-parleurs peuvent fonctionner selon trois modes: quatre voies, trois voies (stéréo + mono) ou deux voies (stéréo, mono). Connecter les fils du haut-parleur pour se conformer au mode suivant les figures cidessous. Mode - Pioneer PRS-X340 | Owners Manual - Page 53
ENGLISH ESPAÑOL DEUTSCH Mode deux voies (stéréo) Prise d'entrée Cinch A (RCA) Sélecteur d'entrée Cinch (RCA) Placez ce sélecteur sur la position de gauche. Câble de liaison muni de prises Cinch (RCA) (vendu séparément) De l'autoradio (Sortie sur prises Cinch (RCA)) Mode deux voies (mono) - Pioneer PRS-X340 | Owners Manual - Page 54
un tapis ou d'une moquette. • N'installez pas l'amplificateur près d'une portière car il pourrait être mouillé par la pluie lorsque la porti le tapis de sol ou sur le châssis 1. Attacher le support à l'unitè principale. Support Vis 2. Posez l'amplificateur à l'emplacement choisi. Introduisez les vis - Pioneer PRS-X340 | Owners Manual - Page 55
ENGLISH ESPAÑOL 3. Percer des trous de 2,5 mm de diamètre aux emplacements marqués puis fixez l'amplificateur soit à travers le tapis, soit directement sur le châssis. Vis autotaraudeuses (4 × 18 mm) Pose du capuchon 1. Placez en regard les perçages de l'appareil et du capuchon puis introduisez - Pioneer PRS-X340 | Owners Manual - Page 56
sorte qu'ils soient réunis par leurs extrémités opposées. (Reportez-vous à l'illustration qui accompagne l'opération 2.) 1. Retirez la vis du support, réglez le support comme il convient puis serrez la vis pour assurer le maintien. 2. Montage avec les deux appareils réunis. Si vous retirez la vis - Pioneer PRS-X340 | Owners Manual - Page 57
Hz Pente ...-12 dB/oct. Niveau maximale/impédance d'entrée RCA: 6,5 V/22 kΩ (0,4 - 6,5 V) Remarque: • Les caractéristiques et la présentation peuvent être modifiées sans avis préalable à fin d'amélioration. * Consommation moyenne de courant • Le courant moyen est proche du courant maximal lorsqu'un - Pioneer PRS-X340 | Owners Manual - Page 58
Indice Prima di usare questo prodotto 2 In caso di difficot 2 ATTENZIONE 2 Regolazione di questa unit 3 Comando del guadagno 3 Indicatore dell'alimentazione 3 Comando della soglia della frequenza di taglio 3 Commutatore BFC (Comando della frequenza di battimento 3 Selettore di ingresso RCA - Pioneer PRS-X340 | Owners Manual - Page 59
(89/336/CEE, 92/31/CEE) e alla direttiva sul marchio CE (93/68/CEE). Grazie per aver acquistato questo prodotto PIONEER. Leggere attentamente queste istruzioni prima di usare questo apparecchio. • Per evitare qualsiasi scossa elettrica oppure cortocircuito durante il collegamento e l'installazione - Pioneer PRS-X340 | Owners Manual - Page 60
e B serve ad adeguare l'uscita dello stereo all'amplificatore Pioneer. Normalmente lasciare controllo l'aumento di totenza sulla posizione "NORMAL porre questo comando sulla posizione NORMAL. In caso di uso in combinazione con un car stereo dotato di presa di tipo RCA con uscita massima di 4 V, o pi - Pioneer PRS-X340 | Owners Manual - Page 61
ENGLISH Selettore di ingresso RCA Per l'ingresso di due canali, far scorrere questo selettore alla sinistra. Per l'ingresso di quattro canali, far scorrere questo selettore alla destra. ESPAÑOL DEUTSCH FRANÇAIS ITALIANO NEDERLANDS Selettore LPF (filtropassa-basso)/HPF (filtro passa-alto)/BPF ( - Pioneer PRS-X340 | Owners Manual - Page 62
Come collegare l'unità PRECAUZIONE • Togliere il contatto negativo (-) dalla batteria per evitare ogni rischio di cortocircuito e danni all'unità. • Fissare il cablaggio con dei fermi per cavi oppure nastro adesivo. Per proteggere il cablaggio, avvolgere il nastro adesivo intorno al cablaggio dove - Pioneer PRS-X340 | Owners Manual - Page 63
ENGLISH ESPAÑOL Schema di collegamento Fusibile (30 A) × 2 Occhiello Fusibile (30 A) × 2 Cavo rosso speciale della batteria [RD-223] (venduto separatamente). Dopo aver eseguito tutti gli altri collegamenti all'amplificatore, collegare il terminale del cavo dell'amplificatore destinato alla - Pioneer PRS-X340 | Owners Manual - Page 64
Come collegare l'unità Come collegare il terminale dell'alimentazione • Usare sempre lo speciale cavo rosso per batteria e i cavi di messa a terra ([RD-223] × 2), venduti a parte. Collegare il cavo per la batteria direttamente al terminale positivo (+) della batteria dell'auto, ed il cavo per la - Pioneer PRS-X340 | Owners Manual - Page 65
ENGLISH ESPAÑOL Come collegare il terminale di uscita degli altoparlanti 1. Esporre l'estremità dei cavi di altoparlanti per circa 10 mm e torcerla utilizzando delle pinze oppure una tagliatrice. Torcere 3. Collegare i cavi degli altoparlanti al terminale di uscita degli altoparlanti. • Fissare - Pioneer PRS-X340 | Owners Manual - Page 66
Come collegare l'unità Come collegare gli altoparlanti ed i cavi di ingresso Il modo di uscita dell'altoparlante può essere a quattro canali, a tre canali (stereo + mono) e a due canali (stereo, mono). Colleja i fili dell'alpoparlanpe in giuspo modo secondo le norme di sicurezza sotto le riportate - Pioneer PRS-X340 | Owners Manual - Page 67
ENGLISH ESPAÑOL DEUTSCH Modo a due canali (stereo) Presa di ingresso A tipo RCA Selettore di ingresso tipo RCA Far scorrere questo selettore alla sinistra. Cavo di connessione con spinotti RCA (venduto separatamente) Dall'impianto stereofonico della vettura (uscita RCA) Modo a due canali ( - Pioneer PRS-X340 | Owners Manual - Page 68
Installazione PRECAUZIONE • Non installare l'unità sulle posizioni seguenti: -Posti dove potrebbe ferire il conducente o i passaggeri se il veicolo si arresta bruscamente. -Posti dove potrebbe disturbare il conducente, come pavimento verso la parte anteriore del sedile del conducente. • Assicurarsi - Pioneer PRS-X340 | Owners Manual - Page 69
ENGLISH ESPAÑOL 3. Eseguire dei fori del diametro di 2,5 mm al punto marcato ed installare l'amplificatore, sia su tappeto, sia direttamente sullo chassis. Viti autofilettanti (4 × 18 mm) Inserimento del cappuccio terminale 1. Allineare i fori dell'apparecchio e del cappuccio terminale, ed - Pioneer PRS-X340 | Owners Manual - Page 70
Installazione Esempio di installazione con due apparecchi uno vicino all'altro Si possono installare due apparecchi con le estremità opposte unite insieme (vedere l'illustrazione al successivo punto 2). 1. Togliere le viti delle staffe, regolare la staffa alla posizione desiderata, e riserrare le - Pioneer PRS-X340 | Owners Manual - Page 71
ENGLISH ESPAÑOL DEUTSCH Caratteristiche Alimentazione 14,4 V C.C. (10,8 - 15,1 V permissìbile) Collegamento a terra ...Tipo negativo Consumo ...43,7 A (ad alimentazione continua, 4 Ω) Corrente media consumata 14,5 A (4 Ω per quattro canali) 26,5 A (4 Ω per due canali) Fusibile ...30 A × 3 - Pioneer PRS-X340 | Owners Manual - Page 72
Inhoudsopgave Alvorens gebruik 2 Bij problemen 2 WAARSCHUWING 2 Instellen van dit toestel 3 Versterkingsregelaar 3 Spanningsindicator 3 Regelaar voor drempelfrequentie 3 Schakelaar voor de regeling van de slagfrequentie (BFC 3 RCA-ingangskeuzeschakelaar 4 LPF (lage-doorlaatfilter)/HPF ( - Pioneer PRS-X340 | Owners Manual - Page 73
Bij problemen Neem contact op met uw dealer of het dichtstbijzijnde PIONEER service-centrum, wanneer de eenheid niet juist functioneert. • Controleer of probleem op. Plaats vervolgens een nieuwe zekering van hetzelfde formaat en ampèrage. • Om een onjuiste werking van de versterker en luidsprekers - Pioneer PRS-X340 | Owners Manual - Page 74
stand draaien. • Wanneer u een auto-stereo gebruikt met RCA (standaard uitgangsspanning 500 mV), dient u de NORMAL stand in te stellen. Wanneer u een Pioneer auto-stereo met RCA gebruikt, met een maximale uitgangsspanning van 4 V of meer, dient u het niveau aan te passen aan het uitgangsniveau van - Pioneer PRS-X340 | Owners Manual - Page 75
ENGLISH RCA-ingangskeuzeschakelaar Schuif deze schakelaar naar links voor invoer vanuit twee kanalen. Schuif deze schakelaar naar rechts voor invoer vanuit vier kanalen. ESPAÑOL DEUTSCH FRANÇAIS ITALIANO NEDERLANDS LPF (lage-doorlaatfilter)/HPF (hoge-doorlaatfilter)/BPF (banddoorlaatfilter) en - Pioneer PRS-X340 | Owners Manual - Page 76
Aansluiten van het toestel WAARSCHUWING • Voorkom kortsluiting en beschadiging van de eenheid en ontkoppel de nagatieve (-) accupool van het voertuig. • Zet de bedrading met kabelklemmen of isoleerof plakband vast. Bescherm de bedrading door de gedeelten in de buurt van metalen delen met - Pioneer PRS-X340 | Owners Manual - Page 77
ENGLISH ESPAÑOL Aansluitschema Zekering (30 A) × 2 Doorvoerbuisje Speciaal rood accusnoer [RD-223] (los verkrijgbaar). Sluit, nadat alle andere aansluitingen op de versterker zijn gemaakt, het accusnoer-aansluitpunt van de versterker aan op het positieve aansluitpunt (+) van de accu. Zekering ( - Pioneer PRS-X340 | Owners Manual - Page 78
(+) van de accu. Zekering (30 A) Motor- Interieur van compartiment het voertuig Zekering (30 A) Boor een gat van Positieve aansluiting 14 mm in de car- Steek het rubberen O- rosserie van de vormige doorvoerbuisje in auto. de carrosserie van de auto. 2. Draai het accudraad, aardedraad en - Pioneer PRS-X340 | Owners Manual - Page 79
ENGLISH ESPAÑOL Verbinden van de luidsprekeruitgangsaansluitingen 1. Verwijder ongeveer 10 mm isolatie van het uiteinde van de luidspreker- draden. Draai de draadstrengen ineen met een tang. Ineendraaien 3. Verbind de luidsprekerdraden met de luidsprekeruitgangsaansluiting. • Zet de - Pioneer PRS-X340 | Owners Manual - Page 80
Aansluiten van het toestel Aansluiten van de luidsprekers en ingangssnoeren De luidsprekeruitgangsstand kan voor vier, drie (stereo + mono) of twee kanalen (stereo, mono) zijn. Sluit de luidsprekersnoercn aan overeenkomstig de gewenste functie zoals aangegeven in de onderstaande afbeeldingen. - Pioneer PRS-X340 | Owners Manual - Page 81
ENGLISH ESPAÑOL DEUTSCH Twee-kanalen functie (stereo) RCA-ingangspenaansluiting A RCA-ingangskeuzeschakelaar Schuif deze schakelaar naar links. Aansluitsnoeren met RCA-penstekkers (los verkrijgbaar) Van auto-stereo (RCA uitgang) Twee-kanalen functie (mono) RCA-ingangspenaansluiting A RCA- - Pioneer PRS-X340 | Owners Manual - Page 82
Installatie WAARSCHUWING • Niet installeren op: -Plaatsen waar het de bestuurder of passagiers zou kunnen verwonden wanner de auto plotseling stopt. -Plaasten waar de bestuurder door de eenheid tijdens het rijden zou kunnen worden gehinderd, zoals bijvoorbeeld op de vloer voor de bestuurdersstoel. - Pioneer PRS-X340 | Owners Manual - Page 83
ENGLISH ESPAÑOL 3. Boor gaten met een diameter van 2,5 mm op de plaatsen die zijn gemerkt en installeer de versterker, ofwel op de vloermat ofwel rechtstreeks op het chassis. Tapschroeven (4 × 18 mm) Aanbrengen van de afdekkap 1. Breng de schroefgaatjes in het toestel en die in de afdekkap op een - Pioneer PRS-X340 | Owners Manual - Page 84
Installatie Voorbeeld van een installatie met twee toestellen naast elkaar U kunt twee toestellen tegen elkaar aan monteren. (Zie de afbeelding bij stap 2.) 1. Verwijder de schroef van de beugel, zet de beugel in de gewenste positie en draai vervolgens de schroef weer vast. 2. Installatie met twee - Pioneer PRS-X340 | Owners Manual - Page 85
ENGLISH ESPAÑOL DEUTSCH Technische gegevens Spanningsbron 14,4 V gelijkstroom (10,8 - 15,1 V toelaatbaar) Aarding ...Negatieve klem aan massa Stroomverbruik ...43,7 A (met continu spanning, 4 Ω) Gemiddeld stroomverbruik 14,5 A (4 Ω voor vier kanalen) 26,5 A (4 Ω voor twee kanalen) Zekering ... - Pioneer PRS-X340 | Owners Manual - Page 86
- Pioneer PRS-X340 | Owners Manual - Page 87
- Pioneer PRS-X340 | Owners Manual - Page 88
Del Valle, Mexico D.F. C.P. 03100 TEL: 5-688-52-90 Published by Pioneer Corporation. Copyright © 2000 by Pioneer Corporation. All rights reserved. Publication de Pioneer Corporation. Copyright © 2000 Pioneer Corporation. Tous droits de reproduction et de traduction réservés. Printed
-
 1
1 -
 2
2 -
 3
3 -
 4
4 -
 5
5 -
 6
6 -
 7
7 -
8
-
9
-
10
-
11
-
12
-
13
-
14
-
15
-
16
-
17
-
18
-
19
-
20
-
21
-
22
-
23
-
24
-
25
-
26
-
27
-
28
-
29
-
30
-
31
-
32
-
33
-
34
-
35
-
36
-
37
-
38
-
39
-
40
-
41
-
42
-
43
-
44
-
45
-
46
-
47
-
48
-
49
-
50
-
51
-
52
-
53
-
54
-
55
-
56
-
57
-
58
-
59
-
60
-
61
-
62
-
63
-
64
-
65
-
66
-
67
-
68
-
69
-
70
-
71
-
72
-
73
-
74
-
75
-
76
-
77
-
78
-
79
-
80
-
81
-
82
-
83
-
84
-
85
-
86
-
87
-
88
 |
 |

ENGLISH
ESPAÑOL
DEUTSCH
FRANÇAIS
ITALIANO
NEDERLANDS
BRIDGEABLE FOUR-CHANNEL POWER AMPLIFIER
AMPLIFICATEUR DE PUISSANCE PONTABLE A
QUATRE VOIES
Owner’s Manual
PRS-X340
Mode d’emploi