Pioneer PRS-X340 Owners Manual - Page 14
Example of a set up with two units, side by side
 |
View all Pioneer PRS-X340 manuals
Add to My Manuals
Save this manual to your list of manuals |
Page 14 highlights
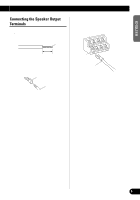
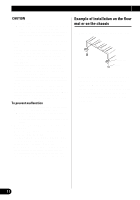
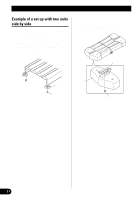
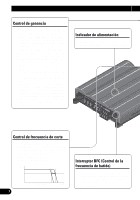
Installation Example of a set up with two units side by side You can set up two units with the opposing ends joined together. (Refer to the illustration in step 2.) 1. Remove the bracket screw, adjust the bracket to the desired position, and then tighten the screw once more to secure. 2. Setting up with two units joined. If you remove the end cap badge screw, you can adjust the badge so that the letters are straight. Badge Bracket Screw Endcap Screw 13
-
 1
1 -
2
-
3
-
4
-
5
-
6
-
7
-
8
-
 9
9 -
 10
10 -
 11
11 -
 12
12 -
 13
13 -
 14
14 -
 15
15 -
 16
16 -
 17
17 -
 18
18 -
 19
19 -
20
-
21
-
22
-
23
-
24
-
25
-
26
-
27
-
28
-
29
-
30
-
31
-
32
-
33
-
34
-
35
-
36
-
37
-
38
-
39
-
40
-
41
-
42
-
43
-
44
-
45
-
46
-
47
-
48
-
49
-
50
-
51
-
52
-
53
-
54
-
55
-
56
-
57
-
58
-
59
-
60
-
61
-
62
-
63
-
64
-
65
-
66
-
67
-
68
-
69
-
70
-
71
-
72
-
73
-
74
-
75
-
76
-
77
-
78
-
79
-
80
-
81
-
82
-
83
-
84
-
85
-
86
-
87
-
88
 |
 |

13
Installation
Example of a set up with two units
side by side
You can set up two units with the oppos-
ing ends joined together.
(Refer to the illustration in step 2.)
1.
Remove the bracket screw, adjust
the bracket to the desired position,
and then tighten the screw once
more to secure.
2.
Setting up with two units joined.
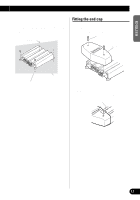
If you remove the end cap badge screw,
you can adjust the badge so that the letters
are straight.
Endcap
Screw
Bracket
Screw
Badge