Polaroid DRM-2001G User Manual
Polaroid DRM-2001G - DVDr / HDDr Manual
 |
View all Polaroid DRM-2001G manuals
Add to My Manuals
Save this manual to your list of manuals |
Polaroid DRM-2001G manual content summary:
- Polaroid DRM-2001G | User Manual - Page 1
DVD Recorder with 80GB Hard Drive DRM-2001G User's Manual 20060425 - Polaroid DRM-2001G | User Manual - Page 2
user to the presence of important operation and maintenance (servicing) instructions to be used for a long time, disconnect the power plug from the wall outlet. • For optimum manual carefully. • Keep this manual for future reference. If the unit requires servicing, please contact the seller or - Polaroid DRM-2001G | User Manual - Page 3
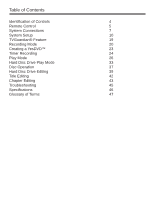
Remote Control 5 System Connections 7 System Setup 10 TVGuardian® Feature 19 Recording Mode 20 Creating a YesDVD™ 23 Timer Recording 24 Play Mode 26 Hard Disc Drive Play Mode 33 Disc Operation 37 Hard Disc Drive Editing 39 Title Editing 42 Chapter Editing 43 Troubleshooting - Polaroid DRM-2001G | User Manual - Page 4
of Controls FRONT PANEL 1. Power button 2. Standby LED 3. IR (Remote Sensor) 4. DVD Door 5. Display 6. Open/Close button 7. Source button 8. Play button 9. Stop button 10. Record button 11. Digital video input 12. Audio input (front left) 13. Audio input (front right) 14. Composite video input - Polaroid DRM-2001G | User Manual - Page 5
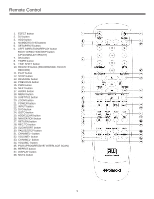
button 10. REC/OTR button (RECORD/ONE-TOUCH RECORD) 11. PLAY button 12. STOP button 13. REVERSE button 14. PREVIOUS button 15. FWD button 16. NEXT button 17. AUDIO button 18. MENU button 19. SUBTITLE button 20. ZOOM button 21. POWER button 22. INPUT button 23. DVD button 24. GOTO button 25. ADD - Polaroid DRM-2001G | User Manual - Page 6
To install batteries and use remote control: Notes: • Do not drop the remote control or leave it in places with high humidity. • Do not leave the IR remote sensor exposed to direct sunlight or bright light. • Do not mix old and new batteries should they need replacing. • Do not use rechargeable - Polaroid DRM-2001G | User Manual - Page 7
quality, the component video is the best, followed by S-video, then composite video. • When connecting the audio output of the unit to the TV, connect the left and right audio outputs to the TV audio inputs of the same group as the connected video inputs. • Component video and S-video cables not - Polaroid DRM-2001G | User Manual - Page 8
Connections CONNECTING TO 5.1 CHANNEL AMPLIFIER CONNECTING TO AN AMPLIFIER WITH DIGITAL DECODER • In audio setup, set the "Digital Output Mode" to "LPCM Output" (For details, see "System Setup: Digital Audio Output" section.) • When using a digital signal output (coaxial or optical), the Analog - Polaroid DRM-2001G | User Manual - Page 9
unit and other devices. Notes: • Refer to your user's manual when connecting the unit. • Turn off the power and unplug both units before setting up any connections. CONNECTION FOR RECORDING EXTERNAL SIGNALS (REAR PANEL SIGNAL) • From the video input terminals, select one as desired. • In terms of - Polaroid DRM-2001G | User Manual - Page 10
the "SETUP" button to enter the System Setup mode. The system setup control bar menu will appear on the top of the OSD, as shown mode, otherwise some settings cannot be done. Auto Chapter Marker 1. In the Recording Settings menu, use arrow buttons to select "Automatic Chapter Marker" and press the - Polaroid DRM-2001G | User Manual - Page 11
of channels that have been stored to memory. 5. Press the "SETUP" button on the remote control to exit. Notes: • If you are using a set-top box (cable TV receiver or satellite broadcast receiver), set the DVD recorder to channel 3 or 4 (depending on your equipment). • Be sure to connect the antenna - Polaroid DRM-2001G | User Manual - Page 12
information is modified, select OK and press the "OK" button to confirm. Then return to the Channel Scan menu. SETUP MENU VIDEO TV Type The product supports two different television systems that are incompatible with each other. NTSC is the television system that is adopted in the North America region - Polaroid DRM-2001G | User Manual - Page 13
format shall be in accordance with the TV screen. Video Output Format 1. In the General Settings menu, use the ▲ or ▼ button to move the cursor, select the "Video Output Format" item and press the "OK" button. 2. Select the Progressive or Interlace option for video scan output mode, and press the - Polaroid DRM-2001G | User Manual - Page 14
not, select the "OFF". • If you want to know more about creating a YesDVD, see the "Creating a YesDVD" section of this manual. SETUP MENU-AUDIO 1. Enter the System Setup control menu. 2. Use the ▲ or ▼button to select the "AUDIO" item. 3. Press the "OK" button to enter the Play Setting mode. Analog - Polaroid DRM-2001G | User Manual - Page 15
interfaces languages. 1. Enter the system setup mode. 2. In the System Setup control bar menu, use the ▲ or ▼ button to move the cursor, as the DVD audio output language. If the DVD played does not support the selected language, the setting will be invalid. • You can change the audio language at - Polaroid DRM-2001G | User Manual - Page 16
/TIME Date-Time Setting The time and date have to be set before a timed recording can be set. There are two ways to set the product clock: AUTO setting and MANUAL setting. 1. Press the "INPUT" button on the remote control to display the SYSTEM SET-UP MENU. 2. Use the CURSOR buttons to highlight Date - Polaroid DRM-2001G | User Manual - Page 17
" function to see if the unit can restore to its normal working status. 1. In the General Settings menu, use the ▲ or ▼ button to select the "Reset to Factory Default" item and press the "OK" button. The OSD will display as follows. 2. Use the ▲ or ▼ button to select "OK" 3. Press the "OK - Polaroid DRM-2001G | User Manual - Page 18
shift default source: Tuner (ON): When the system is turned on, it will enter the tuner and time shift hard disc drive is full. Please erase some programs to perform further recordings. Empty hard disc 1. Erase all programs on HDD 2. A message will be shown: All video programs on the hard disc drive - Polaroid DRM-2001G | User Manual - Page 19
DVD supports Closed Captioning by identifying the CC logo on the back cover of the DVD case. (2) Replaced Closed Captioning phrases are available through the TV's Closed Captioning decoder. If the TV does not have a Closed Captioning decoder, such as the LCD screen of portable DVD players, replaced - Polaroid DRM-2001G | User Manual - Page 20
connected to the front audio inputs. Recording to DVD or HDD Select to record to hard drive or optical disc: 1. Press the "TIME SHIFT" button once to switch to manual recording mode. 2. Press "REC TO" button to switch between the HDD or DVD Record sources. If you have a recordable media in the tray - Polaroid DRM-2001G | User Manual - Page 21
SP+ (Standard Play) EP (Extended Play) LP (Long Play) SLP (Super Long Play) Record Time (4.7GB, DVD) 1 hour 2 hours 2.5 hours 3 hours 4 hours 6 hours Recording Time (80GB, HDD) 17 hours 34 hours 42 hours 51 hours 68 hours 102 hours Video Quality Best Very good Good Normal Moderate Low One Touch - Polaroid DRM-2001G | User Manual - Page 22
Mode Record from hard drive to optical disc Press the "HDD" button and enter into the HDD display state. Press the "ADD/CLEAR" button to select the five titles you desire to copy to DVD. Press the "REC" key to copy selected file to DVD. Notes: • In DVD tray, there should be a blank re-writable DVD - Polaroid DRM-2001G | User Manual - Page 23
option and select "ON". Step 3: Before recording, place a blank DVD+R/RW disc in the DVD tray. Step 4: Select input signal source and press the "RECORD" button to start recording. Step 5: You may stop recording by pressing the "STOP" button on the remote control. A dialog box will appear, asking if - Polaroid DRM-2001G | User Manual - Page 24
recordings to begin and end at a specific time. You can record to the hard drive or directly to a DVD. This feature is useful if you know the specific quality, time, date, and channel of a program you want to record want to record. • If you select "Once" press the "OK" button. The date input editor box - Polaroid DRM-2001G | User Manual - Page 25
function is used to set up the starting time of the recording. If the input value is beyond the range of 0:00-23:59, the recording process will be stopped and the unit turns to standby status. Record To source: You may choose to record directly to a disc or the hard disc drive. Setting up the record - Polaroid DRM-2001G | User Manual - Page 26
to show or hide the control bar menu. The following charts are control bar menus for DVD, VCD, CD and MPEG AUDIO: Channel selection when playing VCD, CD. 12. PBC ON/OFF: Play menu control. This function is available only for 2.0 and above versions. 13. File Type: Such as Audio, PIC (picture), Video - Polaroid DRM-2001G | User Manual - Page 27
For some discs, you can input numbers to select a title directly Picture of the DVD disc will be displayed on the TV screen. • record the stopping time. • Pressing the "PLAY" or "RETURN" button, the unit will playback from the recorded the disc tray. 5. Press the "POWER" button to standby the unit. - Polaroid DRM-2001G | User Manual - Page 28
system to play designated title, chapter or track according to the instructions you set. 1. Select the Play Mode Control value as "Program". 2. Press the "OK" button. the Disc Content List Box contains sub items, such as a title of a DVD disc, press the "OK" button and the sub item list will pop up - Polaroid DRM-2001G | User Manual - Page 29
forward play speed will increase. • For MUSIC discs, such operation is invalid. Fast Rewind • Press the button of the remote control. The system will skip back to the previous chapter (DVD) or the previous track (VCD, etc.) and start playing. • Press the button. The system will skip backward. With - Polaroid DRM-2001G | User Manual - Page 30
applies to DVD discs. 1. In the play control bar menu, select the "Chapter" item. 2. Press the "OK" button to enter the input mode. will automatically play the selected track. Track Selection Play for Audio or MPEG4 Discs For audio or video discs like MPEG4, you can select a track from the Disc - Polaroid DRM-2001G | User Manual - Page 31
the "OK" button of the remote control to confirm. Audio Channel Selection This section only applies to CD, VCD and MUSIC discs. 1. In the play control bar menu, press the ▲ or ▼ button to select the "Audio" item. 2. Press the "OK" button to confirm and enter the input mode. 3. Use the ▲ or ▼ button - Polaroid DRM-2001G | User Manual - Page 32
play any of these tracks using the number buttons of the remote control. • When the PBC is off, the system will play the disc in the normal order. • Not all VCD discs support PBC play. Picture Zoom Function This section only applies to DVD, VCD and JPEG discs. 1. In the playing status, press the - Polaroid DRM-2001G | User Manual - Page 33
Mode Hard Disc Drive Playback • Press the remote control Hard Disc Drive (HDD) button or in the NAVIGATION mode, switch to HDD/Playback state. • During HDD playback, the following remote control keys are valid: KEY Play Pause Stop Return FF Slow Next Previous Display Repeat Right Left HDD DVD Time - Polaroid DRM-2001G | User Manual - Page 34
in a buffer that contains 60 minutes of recording. After 60 minutes, the buffer will be progressively overwritten. If you need to keep the video contained in this buffer for future use, you can save all or part of the buffer. REMOTE CONTROL Display (pressed once) Display (pressed twice) Display - Polaroid DRM-2001G | User Manual - Page 35
Hard Disc Drive Play Mode You can navigate in Time Shifting mode and control the audio by using the following remote control keys: KEY RESULT NOTE CH +/- Change the channel By default, changing the channel will erase all Time Shifting required for the current channel. 0-9 Change the - Polaroid DRM-2001G | User Manual - Page 36
space on the hard disc drive, the unit will stop recording and request the user to erase some titles and create more room on the HDD. • When the source is DV, the recording will not be in time shifting buffer. Press Source (repeatedly) to select DV as your video source. The remote control will be - Polaroid DRM-2001G | User Manual - Page 37
the Disc Operation Mode: 1. Place the DVD with your recorded content in the recorder. 2. On the remote, press the "DVD" button. 3. Press the "UP" arrow button. 4. Press the "RIGHT" arrow button. The OSD menu will appear. Erase Optical Disc: 1. In the Disc operation control bar menu, use the ▲ or - Polaroid DRM-2001G | User Manual - Page 38
change to TV status. 2. Press the "INPUT" button to switch to other input sources. 3. Press the "REC/OTR" button to start recording and overwriting all other information in the disc. Finalize Disc: 1. Place the DVD with your recorded content in the recorder. 2. On the remote, press the "DVD" button - Polaroid DRM-2001G | User Manual - Page 39
from the Hard Drive: • Five operations are possible: Play, Delete, Split, Segment, Change Index Picture and Rename. • When you edit a title, its corresponding representation on the HDD title list will bear the edit icon to remind you. • During HDD edit operation, you can continue to record. 1. Press - Polaroid DRM-2001G | User Manual - Page 40
remote control functions are as follows: OK Display Return KEYS Add/Clear Play Stop FUNCTION Mark the IN/OUT points Toggles between: Progress bar - Helper Text - Add Title info - No overlay Back do hard drive is played back (HDD-> Play). • The segments will not be copied to DVD if the segmented - Polaroid DRM-2001G | User Manual - Page 41
if needed) and press "OK". 3. When you Protect a program, the user can play the title or dub it to DVD, but cannot do any edit operations (split, segment, change index picture, delete). 4. In order to unprotect, once you highlight the program on the HDD title list, and bring up the Popup menu by - Polaroid DRM-2001G | User Manual - Page 42
2. In the Title Display mode, press the ► button to pop up the following dialog box. 1. Title Name 2. Recording Date 3. Starting Time of the Recording 4. The Length of the Recording 5. Recording Quality 1. Play Title: play the current title 2. Edit Title: enter the Title Editing mode, similar to the - Polaroid DRM-2001G | User Manual - Page 43
editing function solves the problem. Enter the Chapter Editing Mode: When the disc in the drive is DVD+/-RW and the system is in the DVD Root menu, Press the title to be edited: 1. Enter the Editing Mode. 2. In the Editing Mode control bar menu, use the ▲ or ▼ buttons to select the title. 3. Press - Polaroid DRM-2001G | User Manual - Page 44
. • Delete all marks: Delete all chapters in the title. The first chapter cannot be deleted. Hiding and un-hiding the chapter: In the Chapter Editing control bar menu, use the ▲ or ▼ button to move the cursor and select the "Hide Chapter" item, and then press the "SELECT" button. • If the value - Polaroid DRM-2001G | User Manual - Page 45
Troubleshooting Guide Before contacting service personnel, please check possible problems and solutions below: No power SYMPTOM No sound No picture No color Disc cannot be played Remote control malfunction Sudden malfunction Picture dividing External signals cannot be recorded POSSIBLE CAUSE - Polaroid DRM-2001G | User Manual - Page 46
TECHNICAL SPECIFICATIONS* Supported disc formats Supported recordable disc functions Recording format Recording quality Input Output Input RF features Video features Audio specifications General specifications Working humidity DVD, DVD+R/RW, DVD-R/RW, SVCD, VCD, JPEG, MPEG4 DVD+R/RW, DVD-R/RW DVD - Polaroid DRM-2001G | User Manual - Page 47
a frame picture can be scanned to two fields. This unit provides both progressive and interlace modes. For DVD±R/RW discs with the capacity of 4.7GB, HDD disc with capacity of 80GB, there are 6 different recording qualities in accordance with the compressing program. SLP: Good image quality; 6 hours - Polaroid DRM-2001G | User Manual - Page 48
Each region can only use DVD players and DVD discs with certain region codes. The six regions are: 1 DVDs, or VCDs is divided into several areas. Each area is a track. Each track has it own unique number so it can be searched easily. For service, support and warranty information, visit www.polaroid
-
 1
1 -
 2
2 -
 3
3 -
 4
4 -
 5
5 -
 6
6 -
 7
7 -
8
-
9
-
10
-
11
-
12
-
13
-
14
-
15
-
16
-
17
-
18
-
19
-
20
-
21
-
22
-
23
-
24
-
25
-
26
-
27
-
28
-
29
-
30
-
31
-
32
-
33
-
34
-
35
-
36
-
37
-
38
-
39
-
40
-
41
-
42
-
43
-
44
-
45
-
46
-
47
-
48
 |
 |
DVD Recorder with 80GB Hard Drive
DRM-2001G
20060425
User’s Manual