Polaroid XSA-00750B User Manual - Page 8
Control Button Functions - continued, Demo Slide Show, Connecting a USB Device to the Digital Photo - digital picture frame
 |
UPC - 683728173012
View all Polaroid XSA-00750B manuals
Add to My Manuals
Save this manual to your list of manuals |
Page 8 highlights
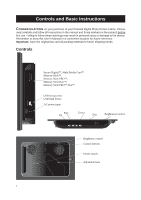
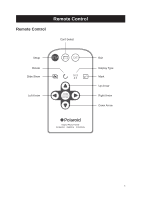
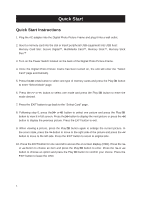
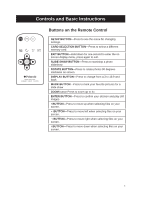
Controls and Basic Instructions Control Button Functions - continued OSD Functions Note: To enter the OSD, hold the EXIT button down for one second. To exit, simply press the EXIT button again. Note: The OK button has two functions: 1: Press it just for a second to confirm your choice. 2: Press and hold it down for a longer time to enter the slide show mode. Button Command Up II Select Down EXIT Exit OSD Menu Viewing Pictures Individually Button II EXIT Command Previous Picture Zoom in the Select Picture Next Picture Press once to zoom out the picture to original size or hold down for one second to enter OSD Menu. Select Mode Page / Select Card Page Button II EXIT Command Left Select Right Back to "Select Card" Page Demo Slide Show Some demo pictures have been loaded into your Digital Photo Picture Frame. These pictures can be viewed without inserting any memory cards. Power on the Digital Photo Picture Frame, wait for a while, the demo slide show will run automatically. Connecting a USB Device to the Digital Photo Frame Your Digital Photo Picture Frame has a built-in USB port. Using a USB cable (not included) and your digital camera or a USB flash drive, you have the ability to view images directly from the USB source. 1. Connect the AC adapter to the Digital Photo Picture Frame and slide the power switch to the "on" position. 2. Connect one end of a USB cord to a USB device such as a digital camera or USB flash drive, and the other end to the Digital Photo Picture Frame. 3. Once the Digital Photo Picture Frame has recognized the USB source, you will be able to view all the pictures on the camera's internal memory, its memory card, or a USB flash drive. 7
-
 1
1 -
2
-
 3
3 -
 4
4 -
 5
5 -
 6
6 -
 7
7 -
 8
8 -
 9
9 -
 10
10 -
 11
11 -
 12
12
 |
 |
