Poulan 1980-02 User Manual - Page 8
Chain, Sharpening, Filing, Chisel
 |
View all Poulan 1980-02 manuals
Add to My Manuals
Save this manual to your list of manuals |
Page 8 highlights
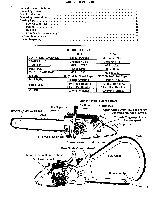
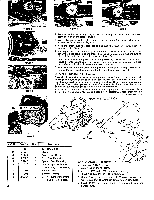
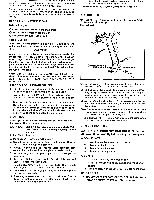
V BE CAREFUL! The chain will be moving during this v procedure. 1. Stop the engine. 2. Turn the high speed and low speed mixture screws clockwise ON until they stop. (Figure 10) Don't tighten them, you may damage the needle seats! 3. Turn the high speed and low speed mixture screws one full turn counterclockwise ir% 4. Start the engine. If it stops, increase the idle speed by turning the idle speed screw clockwise eV . (Figure 11) 5. Run the engine for a few minutes to bring it up to operating temperature. 6. Set the idle speed as fast as possible without the chain moving. Turn the idle speed screw clockwise " for faster idle, counterclockwise " for slower idle. 7. Squeeze the trigger quickly. If the engine stops, restart it. The engine should accelerate without hesitating when the trigger is squeezed. If it does not, turn the low speed mixture screw counterclockwise " 1/16 of a turn, and check the acceleration again. If the idle speed slows while adjusting the low speed mixture, reset the idle speed as in step 6. Continue step 7 until acceleration is smooth. 8. Make a test cut with the saw. 9. If the engine seems to smoke excessively in the cut, turn the high speed mixture screw clockwise rtil 1/16 of a turn. Repeat step 8 and 9, if necessary. WARNING: The high speed needle must never be less than 7/8 turn open. Too lean of a setting will quickly ruin the engine. 10. If the engine seems to weaken or lose power in the cut, -1 Speed 0") ' 11 -•%(\ Hi Speed. Figure 10 Figure 11 OIL Idle Speed= Adjustment OKE Irk turn the high speed mixture screw counterclockwise 1/16 of a turn at a time until the saw cuts smooth- ly. The high speed mixture screw should not be open more than 1'4 turns (counterclockwise " from the stopped position in step 2. 11. Reset the idle speed (see step 6). CHAIN SHARPENING A .properly sharpened chain is the secret of effortless, trouble free cutting. Your authorized dealer or authorized master service center will be happy to answer your question on chain sharpening and supply whatever materials you need. To avoid any delay, while working, carry a spare sharp chain and do your sharpening after you have completed cutting. 3. Using a 3/16" dia. file, press the flat side of the file holder firmly against the top of the cutters. FILING CHISEL CHAIN To properly sharpen your chain, you will need a fileholder, the correct size file and jointer. Follow these instructions: 1. If possible, remove the chain from the saw and put it an a saw chain filing vise. If you do not have a filing vise, tension the chain up snugly on the guide bar. 0 Filing 2. There are three angles that must be maintained for a properly sharpened chain. These are: (a) 30° Top Plate Filing Angle, (b) 60° Top Plate Cutting Angle, (c) and 75° Side Plate Angle. All three angles can be maintained accurately by using a No. 55047 Fileholder and holding it in the right position. 75• ii \ 60° 4. Lower fileholder handle down 10°below horizontal position. 5. Maintain 30° mark on file holder parallel to the chain. 6. Push the file through the cutter, from inside out while holding the holder in the position outlined above. Apply pressure on the forward stroke only. Jointer D .-t.°Itc) .ruitorvoliort.Me LOWER FILE HANDLE 10' • 8 63793 2/80 7. To set all depth gauges at the same level, place the jointer over each depth gauge and file the depth gauge with a flat file until it is level with the jointer, then round off the leading edge of each depth gauge. Printed in U.S.A.
-
 1
1 -
2
-
 3
3 -
 4
4 -
 5
5 -
 6
6 -
 7
7 -
 8
8 -
 9
9
 |
 |
