Poulan 271190 User Manual - Page 24
Engine, To Adjust Carburetor
 |
View all Poulan 271190 manuals
Add to My Manuals
Save this manual to your list of manuals |
Page 24 highlights
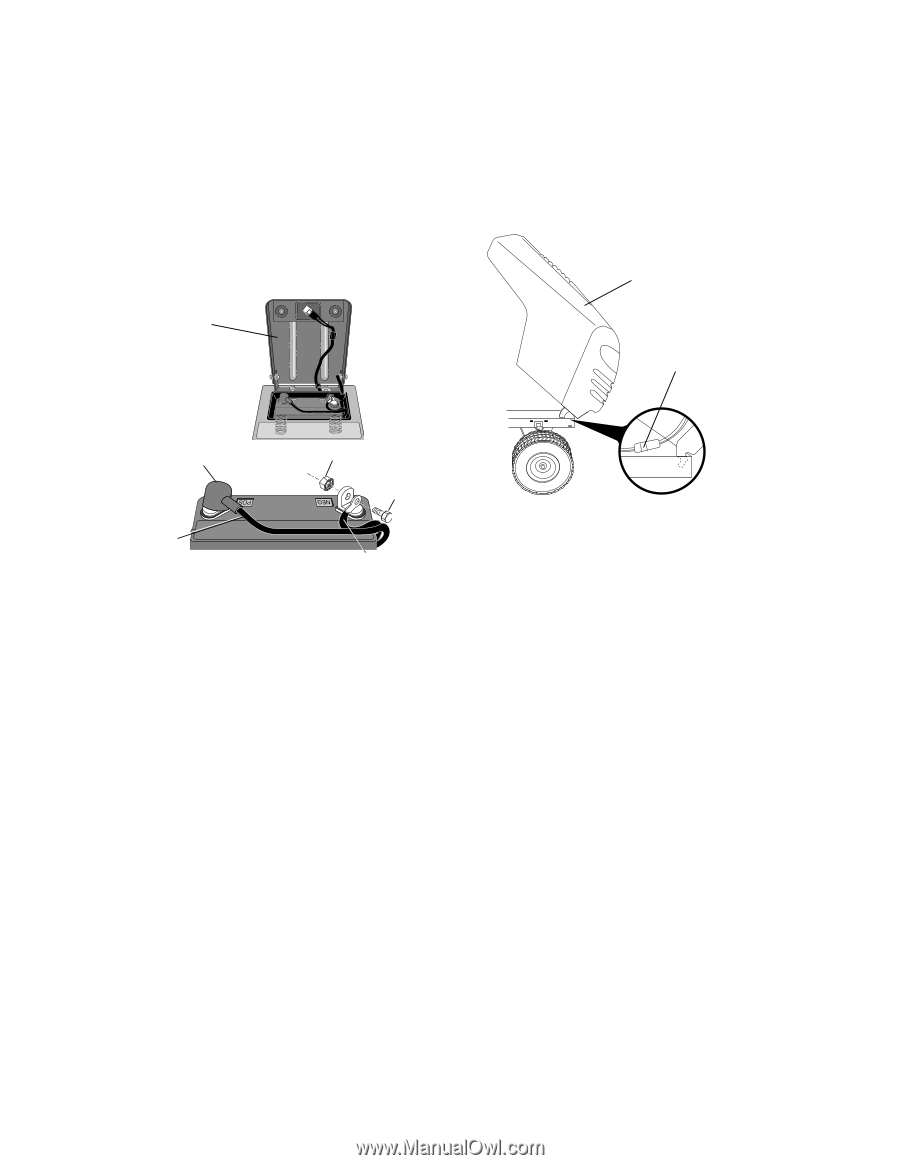
1. Lift seat pan to raised position. 2. Disconnect BLACK battery cable first then RED battery cable and carefully remove battery from tractor. 3. Install new battery with terminals in same position as old battery. 4. First connect RED battery cable to positive (+) terminal with hex bolt and keps nut as shown. Tighten securely. Slide terminal cover over terminal 5. Connect BLACK grounding cable to negative (-) terminal with remaining hex bolt and keps nut. Tighten securely. TO REMOVE HOOD AND GRILL ASSEMBLY 1. Raise hood. 2. Unsnap headlight wire connector. 3. Stand in front of tractor. Grasp hood at sides, tilt toward engine and lift off of tractor. 4. When replacing hood, be sure to reconnect the headlight wire connector. Hood Seat Pan Headlight Wire Connector 02602 Terminal Cover Keps Nut Hex Bolt Positive (Red) 02603 Cable Negative (Black) Cable TO REPLACE HEADLIGHT BULB 1. Raise hood. 2. Pull bulb holder out of the hole in the backside of the grill. 3. Replace bulb in holder and push bulb holder securely back into the hole in the backside of the grill. 4. Close hood. INTERLOCKS AND RELAYS Loose or damaged wiring may cause your tractor to run poorly, stop running, or prevent it from starting. • Check wiring. See electrical wiring diagram in the Repair Parts section. TO REPLACE FUSE Replace with 20 amp automotive-type plug-in fuse. The fuse holder is located behind the dash. 01536 ENGINE TO ADJUST THROTTLE CONTROL CABLE The throttle control has been preset at the factory and adjustment should not be necessary. Check adjustment as described below before loosening cable. If adjustment is necessary, see engine manual: TO ADJUST CARBURETOR The carburetor has been preset at the factory and adjustment should not be necessary. However, minor adjustment may be required to compensate for differences in fuel, temperature, altitude or load. If the carburetor does need adjustment, see engine manual. 24
-
 1
1 -
2
-
3
-
4
-
5
-
6
-
7
-
8
-
9
-
10
-
11
-
12
-
13
-
14
-
15
-
16
-
17
-
18
-
 19
19 -
 20
20 -
 21
21 -
 22
22 -
 23
23 -
 24
24 -
 25
25 -
 26
26 -
 27
27 -
 28
28 -
 29
29 -
30
-
31
-
32
-
33
-
34
-
35
-
36
-
37
-
38
-
39
-
40
-
41
-
42
-
43
-
44
-
45
-
46
-
47
-
48
 |
 |