Poulan 271470 User Manual - Page 8
To Roll Tractor Off Skid - drive belt
 |
View all Poulan 271470 manuals
Add to My Manuals
Save this manual to your list of manuals |
Page 8 highlights
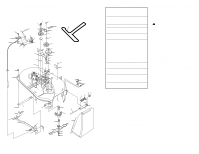
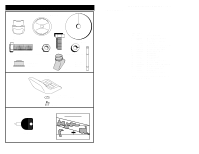
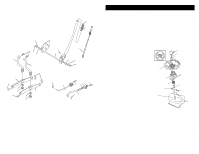
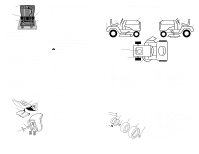
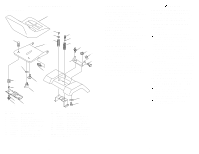
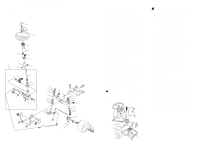
Seat Pan Battery Box Door Terminal Label Terminal INSTALL SEAT Adjust seat before tightening adjustment knob. • Remove adjustment knob and flat washer securing seat to cardboard packing and set aside for assembly of seat to tractor. • Pivot seat upward and remove from the cardboard packing. Remove the cardboard packing and discard. • Place seat on seat pan so head of shoulder bolt is positioned over large slotted hole in pan. • Push down on seat to engage shoulder bolt in slot and pull seat towards rear of tractor. • Pivot seat and pan forward and assemble adjustment knob and flat washer loosely. Do not tighten. • Lower seat into operating position and sit in seat. • Slide seat until a comfortable position is reached which allows you to press clutch/brake pedal all the way down. • Get off seat without moving its adjusted position. • Raise seat and tighten adjustment knob securely. Seat Shoulder Bolt Seat Pan Flat Washer TO ROLL TRACTOR OFF SKID (See Operation section for location and function of controls) • Press lift lever plunger and raise attachment lift lever to its highest position. • Release parking brake by depressing clutch/brake pedal. • Place gearshift lever in neutral (N) position. • Roll tractor forward off skid. • Remove banding holding deflector shield up against tractor. TO DRIVE TRACTOR OFF SKID (See Operation section for location and function of controls) WARNING: Before starting, read, understand and follow all instructions in the Operation section of this manual. Be sure tractor is in a well-ventilated area. Be sure the area in front of tractor is clear of other people and objects. • Be sure all the above assembly steps have been completed. • Check engine oil level and fill fuel tank with gasoline. • Sit on seat in operating position, depress clutch/brake pedal and set the parking brake. • Place gear shift lever in neutral (N) position. • Press lift lever plunger and raise attachment lift lever to its highest position. • Start the engine. After engine has started, move throttle control to idle position. • Depress clutch/brake pedal into full "BRAKE" position and hold. Move gearshift lever to 1st gear. • Slowly release clutch/brake pedal and slowly drive tractor off skid. • Apply brake to stop tractor, set parking brake and place gearshift lever in neutral position. • Turn ignition key to "OFF" position. Continue with the instructions that follow. Adjustment Knob NOTE: You may now roll or drive your tractor off the skid. Follow the appropriate instruction below to remove the tractor from the skid. 8 DECALS 4 1 TRACTOR -- MODEL NUMBER 271470 3 3 7 11 5 8 2 15 KEY PART 1 177109 2 176394 3 171828 4 171829 5 145005 7 171830 8 156867 11 156439 12 Decal Lower Dash Decal Engine Decal Hood Decal Fender Decal Battery Danger Decal Steering Decal, Oper sdl P/L Gear Decal Fender Dnger 13 KEY PART 12 4900J 13 146046 15 136832 - - 138311 - - 177110 - - 177111 Decal, Clutch/Brake Eng Decal V-Belt Dr Sch tractor Decal V-Belt sch Decal Handle Lft Height Adjust (Lift Handle) Owner's Manual, English Owner's Manual, Spanish WHEELS AND TIRES 1 2 5,8 4,10 7 6 KEY PART NO. NO. DESCRIPTION 1 59192 Cap Valve Tire 2 65139 Stem Valve 3 106222X Tire F Ts 15 X 6 0 - 6 Service 4 59904 Tube Front (Service Item Only) 5 106732X427 Rim Asm 6"front White Service 6 278H Fitting Grease (Front Wheel Only) 7 9040H Bearing Flange (front Wheel 3,9 Only) 11 8 106108X427 Rim Asm 8"rear White Service 9 124635X Tire Rear 10 7152J Tube Rear (Service Item Only) 11 104757X428 Cap Axle Blk 1 50 X 1 00 - - 144334 Sealant, Tire ( 10 oz. Tube) NOTE: All component dimensions given in U. S. inches 1 inch = 25.4 mm 41
-
 1
1 -
2
-
 3
3 -
 4
4 -
 5
5 -
 6
6 -
 7
7 -
 8
8 -
 9
9 -
 10
10 -
 11
11 -
 12
12 -
 13
13 -
14
-
15
-
16
-
17
-
18
-
19
-
20
-
21
-
22
-
23
-
24
 |
 |
