Poulan EBV215 User Manual - Page 6
Collection Bag Assembly, Adjusting The Shoulder Strap, On The Collection Bag, How To Convert Unit
 |
View all Poulan EBV215 manuals
Add to My Manuals
Save this manual to your list of manuals |
Page 6 highlights
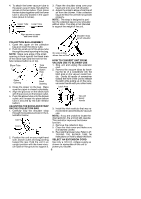
4. To attach the lower vacuum tube to the upper vacuum tube, first align the arrows on the two tubes. Then, press the two tubes together until the lower tube is securely seated in the upper tube (about 3 inches). Upper Tube Lower Tube 3. Place the shoulder strap over your head and onto your left shoulder. 4. Adjust the strap to allow a free flow of air from the blower. If the collection bag is kinked, the unit will not operate properly. NOTE: The strap is designed to position the collection bag on your shoulder without kinks. The strap is not intended to support the weight of the unit. Align arrows on upper and lower tubes Shoulder strap on left shoulder COLLECTION BAG ASSEMBLY 1. Open the zipper on the collection bag and insert the elbow tube. 2. Push the small end of the elbow tube through the small opening in the bag. NOTE: Make sure edge of the small opening is flush against the flared area of the elbow tube and the hole for the tube release button is on top. Elbow Tube Tube Release Button Hole Zipper Opening Small Opening 3. Close the zipper on the bag. Make sure the zipper is closed completely. 4. Align the grooves on the elbow tube with the grooves on the blower outlet. 5. Push the elbow tube onto the blower outlet until it snaps into place (elbow tube is secured by red tube release button). ADJUSTING THE SHOULDER STRAP ON THE COLLECTION BAG 1. Carefully loop the shoulder strap through the buckle as shown in the illustration below. Last In First In 2. Position the unit on your right-hand side, blower outlet and bag pointing toward the rear. Hold the unit in an upright position with the lower vacuum tube on the ground to support it. No kinks in bag allows free air flow HOW TO CONVERT UNIT FROM VACUUM USE TO BLOWER USE 1. Stop unit and unplug the extension cord. 2. Remove the vacuum tubes by insert- ing the tip of a screwdriver into the latch area on the vacuum assist handle. Gently tilt handle of screwdriver toward the front of the unit to release the latch while pulling up on the vacuum assist handle with your other hand. Latch Area Vacuum Assist Handle 3. Install the inlet restrictor that was removed when assembling for vacuum use. NOTE: If you are unable to locate the inlet restrictor, the unit will still operate. This restrictor improves the blower function. 4. Remove the collection bag. 5. Close the inlet cover and make sure it is latched closed. 6. Re-install the blower tube. Refer to AT- TACHING THE BLOWER TUBE for instructions on how to attach this item. SELECT AN EXTENSION CORD Use only a 120 A.C. voltage supply as shown on nameplate of the unit to power your blower. 6
-
 1
1 -
 2
2 -
 3
3 -
 4
4 -
 5
5 -
 6
6 -
 7
7 -
 8
8 -
 9
9 -
 10
10
 |
 |
