ProForm 117 English Manual - Page 7
Operation, Adjustment
 |
View all ProForm 117 manuals
Add to My Manuals
Save this manual to your list of manuals |
Page 7 highlights
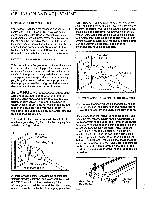
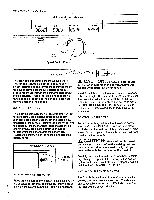
OPERATION AND ADJUSTMENT MAINTENANCE-FREE WALKING BELT Your treadmill features a maintenance-free walking belt coated with PERFORMANT LUBEim, a high-performance lubricant. During the first few hours of use, a small amount of white powder may accumulate on the foot rails and the walking platform. The white powder is high-performance lubricant from the walking belt. Never apply silicone spray or other substances to the walking belt or the walking platform. They will deteriorate the walking belt and cause excessive wear. HOW TO PLUG IN THE POWER CORD This product must be grounded. If it should malfunction or break down, grounding provides a path of least resistance for electric current to reduce the risk of electric shock. This product is equipped with a cord having an equipment-grounding conductor and a grounding plug. Plug the power cord into an appropriate outlet that is properly installed and grounded in accordance with all local codes and ordinances. A DANGER: Improper connection of the equipment-grounding conductor can result in a risk of electric shock. Check with a qualified electrician or serviceman if you are in doubt as to whether the product is properly grounded. Do not modify the plug provided with the product-if it will not fit the outlet, have a proper outlet installed by a qualified electrician. This product is for use on a nominal 120-volt circuit, and has a grounding plug that looks like the plug illustrated in drawing 1 below. 1 00 • Grounded Outlet Box Grounding Plug outlet (drawing 1) can be installed by a qualified electrician. The green-colored rigid ear, lug, or the like extending from the adapter must be connected to a permanent ground such as a properly grounded outlet box cover. Whenever the adapter is used it must be held in place by a metal screw. Some 2-pole receptacle outlet box covers are not grounded. Contact a qualified electrician to determine if the outlet box cover is grounded before using an adapter. 2 0 11 0 Grounded Outlet Box Adapter Grounding Pin Grounding Plug Lug Metal Screw HOW TO CHANGE THE INCLINE OF THE TREADMILL The incline of the treadmill can be changed by raising or lowering the back end. Before changing the incline, remove the safety key and unplug the power cord. Place one foot on the incline leg near the sticker, and grasp the rear roller with both hands. CAUTION: Do not place your hands under the frame or lift on the endcaps. When the back end of the treadmill is in the lowest position, the incline is about 10%. Raise the back end until it clicks into position. The incline will then be about 5%. Raise the back end again until it clicks into position. The incline will then be about 3%. To lower the back end, first raise it past the highest position, and then lower it. CAUTION: Before exercising on the treadmill, push slightly on the back of the treadmill to make sure that the incline leg Is locked in position. Grounding Pin Grounded Outlet A temporary adapter that looks like the adapter illustrated in drawing 2 may be used to connect this plug to a 2-pole receptacle as shown in drawing 2 if a properly grounded outlet is not available. The temporary adapter should be used only until a properly grounded Grasp the Rear Roller incline Leg 7
-
 1
1 -
 2
2 -
 3
3 -
 4
4 -
 5
5 -
 6
6 -
 7
7 -
 8
8 -
 9
9 -
 10
10 -
 11
11 -
 12
12 -
13
-
14
-
15
-
16
 |
 |
