ProForm 1200 Pro Elliptical English Manual - Page 9
the Upper Wire Harness 97. Then, connect
 |
View all ProForm 1200 Pro Elliptical manuals
Add to My Manuals
Save this manual to your list of manuals |
Page 9 highlights
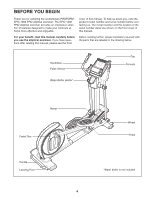
7. While a second person holds the Console (60) 7 near the Upright (6), connect the console wire to the Upper Wire Harness (97). Then, connect the console pulse wire to the Hand Pulse Wire (65). Insert the excess wire downward into the Upright. Tip: Do not pinch the wires during this step. Attach the Console (60) to the Upright (6) with four #8 x 3/4" Screws (78). 60 Pulse Wire 65 Console Wire 97 6 78 Do not pinch the wires during this step 8. Identify the Right Handlebar (31), which is marked with a "Right" sticker, and orient it as 8 shown. Attach the Right Handlebar (31) to the right Upper Body Arm (12) with two 5/16" x 1 1/2" Button Bolts (73) and two 5/16" Locknuts (106). Make sure that the Locknuts are in the hexagonal holes. Repeat this step to attach the Left Handlebar (7) to the left Upper Body Arm (12). 7 73 12 31 106 Hexagonal Holes 12 9
-
 1
1 -
2
-
3
-
 4
4 -
 5
5 -
 6
6 -
 7
7 -
 8
8 -
 9
9 -
 10
10 -
 11
11 -
 12
12 -
 13
13 -
 14
14 -
15
-
16
-
17
-
18
-
19
-
20
-
21
-
22
-
23
-
24
-
25
-
26
-
27
-
28
 |
 |
