ProForm 350s Crosstrainer Treadmill English Manual - Page 7
Right Handrail and from the Wire Harness 42. Feed
 |
View all ProForm 350s Crosstrainer Treadmill manuals
Add to My Manuals
Save this manual to your list of manuals |
Page 7 highlights
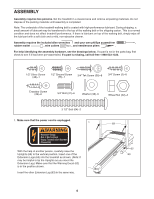
2. With the help of another person, carefully lower the Uprights (69) as shown. (Note: It may be helpful to place your foot on one of the Extension Legs [63] as you tip the Uprights.) Make sure that the Extension Legs remain in the Uprights. Attach each Extension Leg (63) with two 3/4" Tek Screws (58). 2 57 58 Attach four Base Pads (57) with four 3/4" Tek Screws (58) as shown. Note: One replacement Base Pad may 58 be included. If a Base Pad becomes worn and needs to be replaced, use the replacement Base Pad. 57 63 With the help of another person, carefully raise the 58 Uprights (69) to the vertical position. 3. Attach the Storage Latch (29) to the left Upright (69) with two 3/4" Screws (2). Do not overtighten the Screws. 3 29 69 58 57 58 69 57 63 58 2 4. Identify the Right Handrail (72), which has a large hole in the left side. Remove any ties from the bracket on the Right Handrail and from the Wire Harness (42). Feed the Wire Harness up into the bracket on the Right Handrail and out of the large hole in the left side. (Note: It may be helpful to use needlenose pliers to pull the Wire Harness out of the large hole.) Press a Handrail Cap (76) onto the lower end of the Right Handrail as shown. Insert the bracket on the Right Handrail (72) into the top of the Right Upright (69) so the Handrail Cap (76) is resting against the Right Upright. Attach the Right Handrail and the Handrail Cap with three 3/4" Bolts (37) and three Washers (38) as shown. Firmly tighten the indicated Bolt, but do not tighten the other Bolts yet. Attach the Left Handrail (not shown) as described above. Note: There is not a wire harness on the left side. 4 Large Hole Bracket 72 38 37 42 37 38 38 37 Tighten 69 76 7
-
 1
1 -
 2
2 -
 3
3 -
 4
4 -
 5
5 -
 6
6 -
 7
7 -
 8
8 -
 9
9 -
 10
10 -
 11
11 -
 12
12 -
13
-
14
-
15
-
16
-
17
-
18
-
19
-
20
-
21
-
22
 |
 |
