ProForm 380 User Manual - Page 6
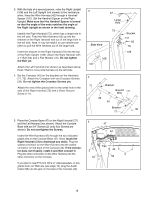
of the Right Upright 108. Attach the Right Handrail
 |
View all ProForm 380 manuals
Add to My Manuals
Save this manual to your list of manuals |
Page 6 highlights
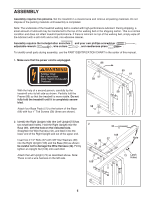
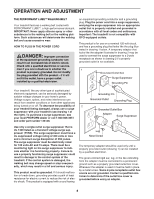
3. With the help of a second person, raise the Right Upright (108) and the Left Upright (not shown) to the vertical position. Feed the Wire Harness (42) through a Handrail Spacer (107). Set the Handrail Spacer on the Right Upright. Make sure that the Handrail Spacer is turned so that the angle of the ends matches the angle of the Right Upright as shown in the inset drawing. Identify the Right Handrail (72), which has a large hole in the left side. Feed the Wire Harness (42) up into the bracket on the Right Handrail and out of the large hole in the left side. Note: It may be helpful to use needlenose pliers to pull the Wire Harness out of the large hole. Insert the bracket on the Right Handrail (72) into the top of the Right Upright (108). Attach the Right Handrail with a 1" Bolt (63) and a Flat Washer (76). Do not tighten the Bolt yet. Attach the Left Handrail (not shown) as described above. Note: There is not a wire harness on the left side. 4. Set the Crossbar (40) on the brackets on the Handrails (71, 72). Attach the Crossbar with two Crossbar Screws (39). Do not tighten the Crossbar Screws yet. Attach the end of the ground wire to the small hole in the side of the Right Handrail (72) with a Silver Ground Screw (111). 3 42 Large Hole 72 Side View 108 107 Bracket 107 63 76 108 4 71 Bracket Ground 111 Wire 39 40 Bracket 39 72 5. Place the Console Base (47) on the Right Handrail (72) 5 and the Left Handrail (not shown). Attach the Console Base with six 3/4" Screws (2) (only four Screws are shown). Do not overtighten the Screws. 47 42 Insert the Wire Harness (42) through the two indicated plastic ties on the Console Base (47). Next, touch the Right Handrail (72) to discharge any static. Plug the widest connector on the Wire Harness into the widest connector on the back of the Console (43). If the connec- tor does not fit easily, rotate it and then connect it. 2 Ties 43 Plug the other connector on the Wire Harness into the 2 other connector on the Console. 72 56 If you plan to use iFIT.com CD's or videocassettes, or programs from our Web site (see page 13), plug the Audio Cable (56) into the jack on the back of the Console (43). 6
-
 1
1 -
 2
2 -
 3
3 -
 4
4 -
 5
5 -
 6
6 -
 7
7 -
 8
8 -
 9
9 -
 10
10 -
 11
11 -
 12
12 -
13
-
14
-
15
-
16
-
17
-
18
-
19
-
20
-
21
-
22
-
23
-
24
-
25
-
26
-
27
 |
 |
