ProForm 4.0 User Manual
ProForm 4.0 Manual
 |
View all ProForm 4.0 manuals
Add to My Manuals
Save this manual to your list of manuals |
ProForm 4.0 manual content summary:
- ProForm 4.0 | User Manual - Page 1
QUESTIONS? If you have questions, or if there are missing or damaged parts, please see the dealer contact information on the back cover of this manual or on the included service card. USER'S MANUAL CAUTION Read all precautions and instructions in this manual before using this equipment. Save this - ProForm 4.0 | User Manual - Page 2
AND ADJUSTMENT 12 HOW TO FOLD AND MOVE THE TREADMILL 23 TROUBLESHOOTING 25 EXERCISE GUIDELINES 28 PART LIST 30 EXPLODED , please see the dealer contact information on the back cover of this manual or on the included service card and order a free replacement decal. Apply the decal in the - ProForm 4.0 | User Manual - Page 3
, or if the treadmill is not working properly. (See TROUBLESHOOTING on page 25 if the treadmill is not working properly.) 15. Read, understand, and test the emergency stop procedure before using the treadmill (see HOW TO TURN ON THE POWER on page 14). 16. Never start the treadmill while you are - ProForm 4.0 | User Manual - Page 4
procedures described in this manual. Never remove the motor hood un- less instructed to do so by an authorized ser- vice representative. Servicing other than the procedures in this manual should be performed by an authorized service representative only. 25. This treadmill is intended for in - ProForm 4.0 | User Manual - Page 5
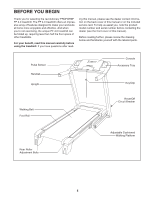
BEGIN Thank you for selecting the revolutionary PROFORM® PF 4.0 treadmill. The PF 4.0 treadmill offers an impressive array of features designed to make your workouts at home more enjoyable and effective. And when you're not exercising, the unique PF 4.0 treadmill can be folded up, requiring less - ProForm 4.0 | User Manual - Page 6
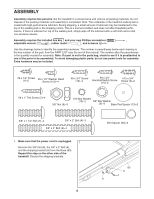
or the shipping carton. This is a normal condition and does not affect treadmill performance. If there is lubricant on top of the walking belt, simply wipe number of the part, from the PART LIST near the end of this manual. The number after the parentheses is the quantity needed for assembly. Note: - ProForm 4.0 | User Manual - Page 7
its left side. Partially fold the Frame (56) so that the treadmill is more stable; do not fully fold the Frame yet. Cut the tie securing the Upright Wire (38) to the Base (83). Locate the tie - ProForm 4.0 | User Manual - Page 8
(77) into the Base (83). 6 79 9 38 77 80 83 6. With the help of a second person, carefully tip the treadmill onto its right side. Partially fold the Frame (56) so that the treadmill is more stable; do not fully fold the Frame yet. Attach a Base Pad (81) to the Base (83) in - ProForm 4.0 | User Manual - Page 9
8. Press a Front Handrail Endcap (97) into the Left 8 Handrail (35). Attach the Front Handrail Endcap with a #8 x 3/4" Handrail Screw (15). Press an Upright Insert (110) into the Left Upright (74). Set the Left Handrail (35) on the Upright Insert. Attach the Left Handrail (35) with two 3/8" x 1 - ProForm 4.0 | User Manual - Page 10
wire harnesses are not pinched. Attach the console assembly with two #8 x 1/2" Screws (1), four #8 x 3/4" Screws (12), and four #8 x 1/2" Washer Head Screws (112). Start all the Screws before tightening any of them. Cut the plastic tie from the Right Handrail (33). See steps 5 and 7. Firmly tighten - ProForm 4.0 | User Manual - Page 11
8 4 16. Make sure that all parts are properly tightened before you use the treadmill. If there are sheets of clear plastic on the treadmill decals, remove the plastic. To protect the floor or carpet, place a mat under the treadmill. Note: Extra hardware may be included. Keep the included hex key in - ProForm 4.0 | User Manual - Page 12
OPERATION AND ADJUSTMENT THE PRE-LUBRICATED WALKING BELT Your treadmill features a walking belt coated with high-performance lubricant. IMPORTANT: Never apply silicone spray or other substances to the walking belt or the walking platform. Such substances will deteriorate the walking belt and - ProForm 4.0 | User Manual - Page 13
ball, see the front cover of this manual. In addition to the cross training workouts, the console features nine classic aerobic workouts. Each workout automatically controls the speed and incline of the treadmill as it guides you through an effective workout. The iFIT monthly challenge helps you - ProForm 4.0 | User Manual - Page 14
mode, designed to be used if the treadmill is displayed in a store. If the workout, reselect the manual mode by pressing either of the Workouts buttons repeatedly until only zeros appears in the displays. 3. Start the walking belt. To start the walking belt, press the Quick Start button, the Speed - ProForm 4.0 | User Manual - Page 15
the treadmill, the displays can show the following workout information: • The elapsed time. • The distance that you have walked or run. • The speed of press the Quick Start button, the Speed increase button, or one of the numbered speed buttons. • The incline setting of the treadmill. • The - ProForm 4.0 | User Manual - Page 16
console. Step onto the foot rails, press the Stop button, and adjust the incline of the treadmill to the lowest setting. The incline must be at the lowest setting or you may damage the treadmill when you fold it to the storage position. Next, remove the key from the console and put - ProForm 4.0 | User Manual - Page 17
the name of the workout and the profile of the speed settings of the workout. 3. Press the Quick Start button to start the workout. A moment after you press the Quick Start button, the treadmill will automatically adjust to the first speed and incline settings of the workout. Hold the handrails and - ProForm 4.0 | User Manual - Page 18
give you instructions to help you perform the exercise. Remove the clip from the waistband of your clothes, step off the treadmill, and prepare of this manual. 5. Continue the cross trainer workout. When you have performed the recommended number of repetitions, step onto the treadmill, slide the - ProForm 4.0 | User Manual - Page 19
the name of the workout and the profile of the speed settings of the workout. 3. Press the Quick Start button to start the workout. A moment after you press the Quick Start button, the treadmill will automatically adjust to the first speed and incline settings of the workout. Hold the handrails and - ProForm 4.0 | User Manual - Page 20
to the accompanying eating guide for details on the challenge. 4. Start the workout. Highlight the words START WORKOUT in the right the treadmill, your heart rate, questions, and instructions. speed of the walking belt, the total distance traveled, and the total workout time. 6. Complete the workout - ProForm 4.0 | User Manual - Page 21
. Note: When you press the button, your current workout will end. 3. Identify yourself as user 1 or the Speed increase button. Press the button below the user number that identifies you. 4. Review your display demo mode, designed to be used if the treadmill is displayed in a store. While the demo - ProForm 4.0 | User Manual - Page 22
are set at the same firmness level. The faster you run on the treadmill, or the more you weigh, the firmer the walking platform should be. rate during your workouts. To purchase the optional chest pulse sensor, call the telephone number on the front cover of this manual. Cushion Adjustor Increase - ProForm 4.0 | User Manual - Page 23
that the latch knob is locked in the storage position. To protect the floor or carpet from damage, place a mat under the treadmill. Keep the treadmill out of direct sunlight. Do not leave the treadmill in the storage position in temperatures above 85° F (30° C). Frame Latch Knob HOW TO MOVE THE - ProForm 4.0 | User Manual - Page 24
USE 1. Hold the upper end of the treadmill with your right hand. Pull the latch knob to the left and hold it. It may be necessary to push the frame forward as you - ProForm 4.0 | User Manual - Page 25
TROUBLESHOOTING Most treadmill problems can be solved by following the steps below. Find the symptom that applies, and follow the steps listed. If further assistance is needed, please see the front cover of this manual. PROBLEM: The power does not turn on SOLUTION: a. Make sure that the power - ProForm 4.0 | User Manual - Page 26
(not shown), reattach the #8 x 2" Screws (not shown), and raise the Top View Uprights. Run the treadmill for a few minutes to check for a correct speed reading. PROBLEM: The incline of the treadmill does not change correctly SOLUTION: a. With the key in the console, press one of the Incline - ProForm 4.0 | User Manual - Page 27
PROBLEM: The walking belt is off-center or slips when walked on SOLUTION Be careful not to overtighten the walking belt. Then, plug in the power cord, insert the key, and run the treadmill for a few minutes. Repeat until the walk- ing belt is centered. b. If the walking belt slips when walked - ProForm 4.0 | User Manual - Page 28
35 or persons with pre-existing health problems. The pulse sensor is not a use your heart rate as a guide to find the proper intensity level. your cardiovascular system, you must perform aerobic exercise, which is activity in your training zone. WORKOUT GUIDELINES Warming up-Start with 5 to 10 minutes - ProForm 4.0 | User Manual - Page 29
SUGGESTED STRETCHES The correct form for several basic stretches is shown at the right. Move slowly as you stretch-never bounce. 1. Toe Touch Stretch Stand with your knees bent slightly and slowly bend forward from 1 your hips. Allow your back and shoulders to relax as you reach down toward - ProForm 4.0 | User Manual - Page 30
below, see the EXPLODED DRAWING near the end of this manual. Key No. Qty. Description Key No. Qty. Description 30 2 31 2 32 1 33 1 34 4 35 1 36 2 37 3 38 1 39 1 40 2 41 1 42 1 43 2 44 1 45 1 46 2 47 2 48 2 49 2 50 Motor Bolt Cushion Stop Reset/Off Circuit Breaker Belt Guide - ProForm 4.0 | User Manual - Page 31
Board Frame/Roller Ground Wire Right Bottom Pulse Plate Latch Endcap Upright Insert Incline Motor Wire #8 x 1/2" Washer Head Screw Console Fan Screw #8 Star Washer Receptacle , M/F 16" White Wire, 2F User's Manual *These parts are not illustrated. Specifications are subject to change without notice. - ProForm 4.0 | User Manual - Page 32
EXPLODED DRAWING A-Model No. PATL40907.0 R1207A 32 25 57 31 30 20 25 49 25 48 1 17 50 40 41 25 46 51 47 27 29 16 17 43 16 16 45 24 18 42 44 58 18 36 24 59 116 30 31 60 57 36 107 16 16 55 25 8 56 47 29 25 27 16 25 43 54 53 49 48 1 25 40 46 8 109 4 116 34 4 - ProForm 4.0 | User Manual - Page 33
EXPLODED DRAWING B-Model No. PATL40907.0 12 R1207A 37 12 61 24 39 65 19 37 70 32 26 69 12 119 37 24 118 117 24 103 24 114 24 114 62 63 66 71 15 72 64 24 67 11 11 19 68 115 11 28 105 11 73 105 33 - ProForm 4.0 | User Manual - Page 34
EXPLODED DRAWING C-Model No. PATL40907.0 110 9 7 111 21 74 6 75 22 104 8 8 7 9 110 38 R1207A 76 77 78 9 8 23 80 82 83 4 8 8 84 13 81 2 14 8 84 81 2 4 4 23 8 77 38 82 81 2 79 52 13 81 2 85 9 6 6 9 80 80 86 34 - ProForm 4.0 | User Manual - Page 35
EXPLODED DRAWING D-Model No. PATL40907.0 R1207A 89 120 90 91 113 113 1 24 101 12 35 98 96 99 88 108 102 1 88 1 106 92 88 87 12 1 88 1 100 97 5 10 15 94 112 1 15 12 1 95 5 10 12 33 112 98 1 93 97 35 - ProForm 4.0 | User Manual - Page 36
cover of this manual) • the name of the product (see the front cover of this manual) • the key service conditions. The frame is warranted for ten (10) years after the date of purchase. The drive motor out of or in connection with the use or performance of the product or damages with respect to any
-
 1
1 -
 2
2 -
 3
3 -
 4
4 -
 5
5 -
 6
6 -
 7
7 -
8
-
9
-
10
-
11
-
12
-
13
-
14
-
15
-
16
-
17
-
18
-
19
-
20
-
21
-
22
-
23
-
24
-
25
-
26
-
27
-
28
-
29
-
30
-
31
-
32
-
33
-
34
-
35
-
36
 |
 |

Serial Number
Decal
Model No. PATL40907.0
Serial No.
CAUTION
Read all precautions and instruc-
tions in this manual before using
this equipment. Save this manual
for future reference.
QUESTIONS?
If you have questions, or if there
are missing or damaged parts,
please see the dealer contact in-
formation on the back cover of
this manual or on the included
service card.
Write the serial number in the space
above for reference.
USER'S MANUAL