ProForm 525 Treadmill English Manual - Page 7
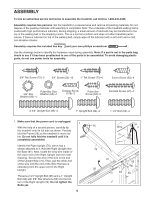
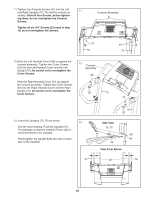
Thread a 2 3/4 Upright Bolt 85 and a 1 Upright
 |
View all ProForm 525 Treadmill manuals
Add to My Manuals
Save this manual to your list of manuals |
Page 7 highlights
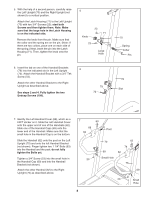
2. Slide a Front Endcap (80) onto the Base (81). Partially tighten a Endcap Screw (108) into the 2 Front Endcap and the Base. Slide a Wheel Housing (86) onto the Base (81). Attach the Wheel Housing with two 1" Tek Screws (77) and a Base Pad (89) as shown. Attach an additional Base Pad (89) to the Base (81) with a 1" Tek Screw (77). 3. With the help of a second person, carefully tip the treadmill onto its right side as shown. 3 Partially fold the Frame (26) so the treadmill is more stable. Do not fully fold the treadmill until it is completely assembled. Hold the Left Upright (70) near the Base (81). Thread a 2 3/4" Upright Bolt (85) and a 1" Upright Bolt (84) with 3/8" Star Washers (83) into the bottom of the Left Upright (70). Do not tighten the Bolts yet. 108 81 80 86 89 77 89 77 81 70 85 84 83 26 4. Slide a Front Endcap (80) onto the Base (81). Partially tighten a Endcap Screw (108) into the Front Endcap and the Base. Slide a Wheel Housing (86) onto the Base (81). Attach the Wheel Housing with two 1" Tek Screws (77) and a Base Pad (89) as shown. Attach an additional Base Pad (89) to the Base (81) with a 1" Tek Screws (77). 4 80 108 84 81 86 77 89 77 89 7
-
 1
1 -
 2
2 -
 3
3 -
 4
4 -
 5
5 -
 6
6 -
 7
7 -
 8
8 -
 9
9 -
 10
10 -
 11
11 -
 12
12 -
13
-
14
-
15
-
16
-
17
-
18
-
19
-
20
-
21
-
22
-
23
-
24
-
25
-
26
-
27
-
28
-
29
-
30
-
31
-
32
 |
 |
