ProForm 540 English Manual
ProForm 540 Manual
 |
View all ProForm 540 manuals
Add to My Manuals
Save this manual to your list of manuals |
ProForm 540 manual content summary:
- ProForm 540 | English Manual - Page 1
or if parts are damaged or missing, PLEASE CONTACT OUR CUSTOMER SERVICE DEPARTMENT DIRECTLY. CALL TOLL-FREE: 1-888-533-1333 Mon.-Fri. 6 a.m.-6 p.m. MST Sat. 8 a.m.-5 p.m. MST ON THE WEB: www.proformservice.com USER'S MANUAL CAUTION Read all precautions and instructions in this manual before using - ProForm 540 | English Manual - Page 2
BEGIN 5 ASSEMBLY 6 OPERATION AND ADJUSTMENT 12 HOW TO FOLD AND MOVE THE TREADMILL 18 MAINTENANCE AND TROUBLESHOOTING 20 CONDITIONING GUIDELINES 22 PART LIST 23 EXPLODED DRAWING 24 ORDERING REPLACEMENT PARTS Back Cover LIMITED WARRANTY Back Cover PROFORM is a registered trademark of ICON - ProForm 540 | English Manual - Page 3
that meets all of the specifications described on page 12. To purchase a surge suppressor, see your local PROFORM dealer or call the tollfree telephone number on the front cover of 16. Never start the treadmill while you are standing on the walking belt. Always hold the handrails while using the - ProForm 540 | English Manual - Page 4
and properly tighten all parts of the treadmill regularly. the treadmill, and before performing the maintenance and adjustment procedures described in this manual. Never remove the motor hood unless instructed to do so by an authorized service representative. Servicing other than the procedures - ProForm 540 | English Manual - Page 5
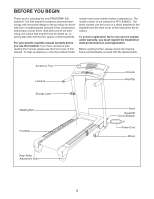
fee for any service needed under warranty, you must register the treadmill at www.proformservice.com/registration. Before reading further, please review the drawing below and familiarize yourself with the labeled parts. Accessory Tray Handrail Storage Latch Console Key/Clip Walking Belt Foot Rail - ProForm 540 | English Manual - Page 6
Star Washer (81)-4 Washer (29)-4 To hire an authorized service technician to assemble the treadmill, call toll-free 1-800-445-2480. Handrail Washer (11)- Assembly requires two persons. Set the treadmill in a cleared area and remove all packing materials; do not dispose of the packing4m" Batoeltri - ProForm 540 | English Manual - Page 7
Upright (53) (the Right Upright [54] has a large hole near the lower end). Hold the Left Upright (53) so that the two small holes are on top as (52) as close to the front of the treadmill as possible, as shown. See drawing 4a. Locate the strap in the lower end of the Right Upright (54). Wrap the - ProForm 540 | English Manual - Page 8
). Open the included packet of 5 grease, and apply grease to both sides of both Frame Spacers. Then, identify the outer side of each Frame Spacer. Hold a Frame Spacer (11) between the Right Upright (54) and the Lift Frame (23), with the outer side of the Frame Spacer facing the Right Upright - ProForm 540 | English Manual - Page 9
with needlenose pliers. Discard the guard. With the help of a second person, hold the Console (91) near the Right Upright (54). Remove the strap from the Wire Harness (39). Connect the Wire Harness to the console wire. Make sure to connect the connectors properly (see drawing 8b). The connectors - ProForm 540 | English Manual - Page 10
(66) and the Hood (65). Be careful not to 65 overtighten the Belly Pan Screws. 20 66 20 12. See the lower drawing. Position the Uprights 12 (53, 54) so that the treadmill Frame (51) is cen- tered between the Uprights. See steps 2, 5, and 6. Firmly tighten the two Colored Patch Frame Bolts - ProForm 540 | English Manual - Page 11
10); start both Latch Screws and then tighten them. Make sure that the large hole in the Latch Housing is on the indicated side. Remove the knob all parts are properly tightened before you use the treadmill. Keep the included hex key in a secure place. The hex key is used to adjust the walking belt ( - ProForm 540 | English Manual - Page 12
OPERATION AND ADJUSTMENT THE PRE-LUBRICATED WALKING BELT Your treadmill features a walking belt coated with highperformance lubricant. IMPORTANT: Never apply silicone spray or other substances to the walking belt or the walking platform. Such substances will deteriorate the walking belt and cause - ProForm 540 | English Manual - Page 13
features designed to make your workouts more effective. When you select the manual mode of the console, you can change the speed and incline of the treadmill with the touch of a button. As you exercise, the console will display continuous exercise feedback. You can even measure your heart rate using - ProForm 540 | English Manual - Page 14
. To restart the walking belt, press the Start button or the Speed increase button. 4 Change the incline of the treadmill as desired. To change the incline of the treadmill, press the Incline increase and decrease buttons. Each time a button is pressed, the incline will change by 0.5%. Note: After - ProForm 540 | English Manual - Page 15
is on when the walking belt stops, the fan will automatically turn off after a few minutes. 8 When you are finished exercising, remove the key from the console. Step onto the foot rails, press the Stop button, and adjust the incline of the treadmill to the lowest setting. The incline must be at the - ProForm 540 | English Manual - Page 16
of the speed settings of the program will scroll across the display. 3 Press the Start button to start the program. A moment after the button is pressed, the treadmill will automatically adjust to the first speed and incline settings of the program. Hold the handrails and begin walking. Each - ProForm 540 | English Manual - Page 17
an "M" for metric kilometers will appear in the lower part of the display. To change the unit of measurement, press the Speed increase button. IMPORTANT: If a "d" appears in the display, the console is in the "demo" mode. This mode is intended to be used only when a treadmill is displayed in a store - ProForm 540 | English Manual - Page 18
TO FOLD AND MOVE THE TREADMILL HOW TO FOLD THE TREADMILL FOR STORAGE Before folding the treadmill, adjust the incline to the lowest position. Next, unplug the power cord. CAUTION: You must be able to safely lift 45 lbs. (20 kg) to raise, lower, or move the treadmill. 1. Hold the metal frame firmly - ProForm 540 | English Manual - Page 19
LOWER THE TREADMILL FOR USE 1. Hold the upper end of the treadmill with your right hand as shown. Using your left hand, pull the latch knob to the left and hold it. Next, lower the frame until it is past the latch pin. Then, release the latch knob. 2. Hold the frame firmly with both hands, and lower - ProForm 540 | English Manual - Page 20
cord is plugged in. c. Remove the key from the console. Reinsert the key into the console. d. If the treadmill still will not run, please see the front cover of this manual. PROBLEM: The displays of the console do not function properly SOLUTION: a. Remove the key from the console and UNPLUG THE - ProForm 540 | English Manual - Page 21
PROBLEM: The walking belt slows when walked on SOLUTION: a. Use only a single-outlet surge suppressor that meets all of the specifications described on page 12. b. If the walking belt is overtightened, treadmill performance may decrease and the walking belt may become damaged. Remove the key and - ProForm 540 | English Manual - Page 22
or individuals with preexisting health problems. uses easily accessible carbohydrate calories for energy. Only after the first few minutes does your body begin to use stored fat calories for energy. If your goal is to burn fat, adjust the speed and incline of the treadmill until your heart rate is - ProForm 540 | English Manual - Page 23
90 1 Power Cord 50 2 Isolator Fastener 91 1 Console 51 1 Frame 92 1 Incline Motor 52 1 Base Nut, Lower 53 1 Left Upright 93 2 Belt Guide 54 1 Right Upright 94 1 5 mm Hex Key 55 1 Rear Roller 95 2 Controller Screw 56 1 Motor Belt 96 1 Releasable Tie 57 1 Electronics Bracket 97 1 Rear - ProForm 540 | English Manual - Page 24
EXPLODED DRAWING A-Model No. PFTL54806.0 R0407A 24 75 27 21 42 60 36 29 25 25 67 44 25 10 64 93 50 78 6 4 25 19 75 27 19 44 21 42 89 104 46 83 16 11 41 19 62 101 41 31 56 25 28 71 19 41 25 68 101 41 76 86 51 10 28 50 78 11 44 16 93 74 55 36 95 61 44 10 29 81 - ProForm 540 | English Manual - Page 25
EXPLODED DRAWING B-Model No. PFTL54806.0 R0407A 47 47 47 65 58 82 2 72 100 40 23 92 30 34 79 98 2 38 44 38 59 34 21 42 42 21 21 95 57 20 66 20 37 20 21 99 87 90 49 25 - ProForm 540 | English Manual - Page 26
EXPLODED DRAWING C-Model No. PFTL54806.0 77 77 88 R0407A 10 10 10 33 10 7 85 102 22 10 10 102 10 5 8 8 10 7 85 102 39 77 5 8 5 77 5 8 24 48 10 21 4 80 53 54 1 11 9 13 32 32 43 43 35 14 2 14 103 2 14 52 11 49 9 63 16 26 39 63 69 45 70 16 69 63 63 84 26 - ProForm 540 | English Manual - Page 27
EXPLODED DRAWING D-Model No. PFTL54806.0 R0407A 91 15 3 12 4 4 4 4 4 4 4 73 4 4 4 27 - ProForm 540 | English Manual - Page 28
MODEL NUMBER of the product (PFTL54806.0) • the NAME of the product (PROFORM 540 treadmill) • the SERIAL NUMBER of the product (see the front cover of this manual) • the KEY NUMBER and DESCRIPTION of the desired part(s) (see the PART LIST and the EXPLODED DRAWING on pages 23 to 27) LIMITED WARRANTY
-
 1
1 -
 2
2 -
 3
3 -
 4
4 -
 5
5 -
 6
6 -
 7
7 -
8
-
9
-
10
-
11
-
12
-
13
-
14
-
15
-
16
-
17
-
18
-
19
-
20
-
21
-
22
-
23
-
24
-
25
-
26
-
27
-
28
 |
 |
USER'S MANUAL
Model No. PFTL54806.0
Serial No.
CAUTION
Read all precautions and instruc-
tions in this manual before using
this equipment. Save this manual
for future reference.
Visit our website at
www.proform.com
new products, prizes,
fitness tips, and much more!
QUESTIONS?
As a manufacturer, we are com-
mitted to providing complete
customer satisfaction. If you
have questions, or if parts are
damaged or missing, PLEASE
CONTACT OUR CUSTOMER
SERVICE DEPARTMENT
DIRECTLY.
CALL TOLL-FREE:
1-888-533-1333
Mon.–Fri. 6 a.m.–6 p.m. MST
Sat. 8 a.m.–5 p.m. MST
ON THE WEB:
www.proformservice.com
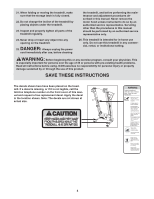
Serial Number
Decal