ProForm 540 English Manual - Page 10
Tighten two Belly Pan Screws 20 into the Belly
 |
View all ProForm 540 manuals
Add to My Manuals
Save this manual to your list of manuals |
Page 10 highlights
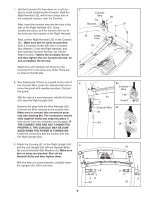
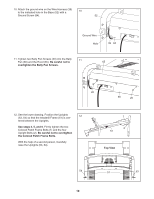
10. Attach the ground wire on the Wire Harness (39) to the indicated hole in the Base (52) with a 10 Ground Screw (84). 52 Ground Wire Hole 39 84 11. Tighten two Belly Pan Screws (20) into the Belly 11 Pan (66) and the Hood (65). Be careful not to 65 overtighten the Belly Pan Screws. 20 66 20 12. See the lower drawing. Position the Uprights 12 (53, 54) so that the treadmill Frame (51) is cen- tered between the Uprights. See steps 2, 5, and 6. Firmly tighten the two Colored Patch Frame Bolts (1) and the four Upright Bolts (2). Be careful not to overtighten the Colored Patch Frame Bolts. With the help of a second person, Carefully raise the Uprights (53, 54). 1 2 51 Top View 54 51 53 10
-
 1
1 -
2
-
3
-
4
-
 5
5 -
 6
6 -
 7
7 -
 8
8 -
 9
9 -
 10
10 -
 11
11 -
 12
12 -
 13
13 -
 14
14 -
 15
15 -
16
-
17
-
18
-
19
-
20
-
21
-
22
-
23
-
24
-
25
-
26
-
27
-
28
 |
 |

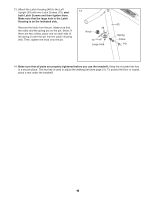
12. See the lower drawing. Position the Uprights
(53, 54) so that the treadmill Frame (51) is cen-
tered between the Uprights.
See steps 2, 5, and 6
. Firmly tighten the two
Colored Patch Frame Bolts (1) and the four
Upright Bolts (2).
Be careful not to overtighten
the Colored Patch Frame Bolts.
With the help of a second person, Carefully
raise the Uprights (53, 54).
12
2
51
1
53
51
54
Top View
10. Attach the ground wire on the Wire Harness (39)
to the indicated hole in the Base (52) with a
Ground Screw (84).
52
39
Ground Wire
10
84
Hole
10
11. Tighten two Belly Pan Screws (20) into the Belly
Pan (66) and the Hood (65).
Be careful not to
overtighten the Belly Pan Screws.
65
20
11
20
66