ProForm 585ex Treadmill Canadian English Manual - Page 9
Calories/Fat Calories
 |
View all ProForm 585ex Treadmill manuals
Add to My Manuals
Save this manual to your list of manuals |
Page 9 highlights
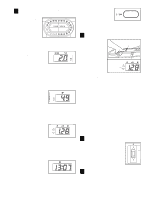
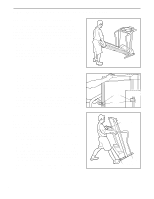
4 Follow your progress with the LED track and the four displays. The LED Track- The LED track represents a distance of 1/4 mile. As you exercise, the indicators around the track will light one at a time until you have completed 1/4 mile. A new lap will then begin. Distance/Laps display-This display shows the distance that you have walked and the number of laps you have completed. The display will change from one number to the other every seven seconds. An "L" will appear in the display when the number of laps is shown. Note: If the KPH indicator beside the Speed display is lit, the distance will be displayed in kilometers; if the indicator is dark, the distance will be displayed in miles. Speed display-This display shows the speed of the walking belt. Note: If the KPH indicator is lit, the speed will be displayed in kilometers per hour; if the KPH indicator is dark, the speed will be displayed in miles per hour. To change the unit of measurement, hold down the Display Reset button for several seconds. Calories/Fat Calories/ Pulse display-This display shows the approximate numbers of calories and fat calories you have burned (see FAT BURNING on page 14). Every seven seconds, the display will change from one number to the other. The F indicator will light when the number of fat calories is shown. Note: This display also shows your pulse when the pulse sensor is used. Time display-This display shows the total time that you have walked since the display was reset. Note: If the walking belt is stopped and no console buttons are pressed for five minutes, the displays will automatically turn off. To light the displays, press the Display Reset button. To reset the displays, press the Display Reset button. The displays will darken for a moment and then light. 5 Measure your pulse, if desired. Stand on the foot rails and place your Pulse Sensor thumb on the pulse sensor as shown. The pulse sensor is pressure-acti- vated-fully press it down. (Do not Indicator press too hard, or the circulation in your thumb will be restricted, and your pulse will not be de- tected.) Next, raise your thumb slightly until the heart-shaped indicator by the Calories/Fat Calories/Pulse display flashes steadily. Hold your thumb at this level. After a few seconds, three dashes will appear in the display and your pulse will be shown. Hold your thumb on the sensor for an- other 15 seconds for the most accurate reading. If the displayed pulse appears to be too high or too low, or if your pulse is not displayed, lift your thumb off the sensor and allow the display to reset. Press down again on the sensor as described above. Make sure that your thumb is positioned as shown, and that you are applying the proper amount of pressure to the pulse sensor. Try the sensor several times until you are familiar with it. Remember to stand still while measuring your pulse. 6 Change the incline of the treadmill, if desired. To change the incline, hold down the top or bottom of the incline control until the desired incline level is reached. 7 When you are finished exercising, stop the walking belt and remove the key. Step onto the foot rails, stop the walking belt, and remove the key from the console. Store the key in a secure place. 9
-
 1
1 -
2
-
3
-
 4
4 -
 5
5 -
 6
6 -
 7
7 -
 8
8 -
 9
9 -
 10
10 -
 11
11 -
 12
12 -
 13
13 -
 14
14 -
15
-
16
-
17
-
18
-
19
 |
 |
