ProForm 800 English Manual - Page 9
of the two Short Pad Tubes 34. Slide the Short
 |
View all ProForm 800 manuals
Add to My Manuals
Save this manual to your list of manuals |
Page 9 highlights
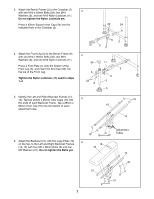
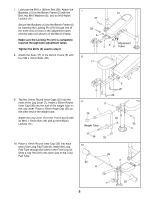
11. Insert two 19mm Round Inner Caps (33) into each of the two Short Pad Tubes (34). Slide the Short Pad Tubes through the holes in the Leg Lever (7). Slide two Leg Pads (22) onto each of the Short Pad Tubes. 11 22 33 34 33 33 7 12. Insert Weight Rest Inserts (20) into the top and bottom of a Weight Rest (19). Slide the Weight 12 Rest onto the right Upright (1). Attach a Large Adjustment Knob (21) to the welded nut on the Weight Rest and tighten it with a wrench. Pull out the Large Adjustment Knob and slide the Weight Rest to the desired height. Snap the Knob into a hole in the Upright and turn it clockwise to secure it in place. Insert a 76mm Round Inner Cap (18) into the top of the right Upright (1). Repeat this step for the left Upright (1). Note: Always place both Weight Rests (19) at the same height for use. 22 18 20 19 21 20 1 13. Make sure that all the bolts and nylon locknuts are properly tightened before using the weight bench. The use of all remaining parts will be explained in Adjusting the Weight Bench, starting on page 10. 9
-
 1
1 -
2
-
3
-
 4
4 -
 5
5 -
 6
6 -
 7
7 -
 8
8 -
 9
9 -
 10
10 -
 11
11 -
 12
12 -
 13
13 -
 14
14 -
15
-
16
-
17
-
18
-
19
 |
 |
