ProForm Lx470 Treadmill English Manual - Page 7
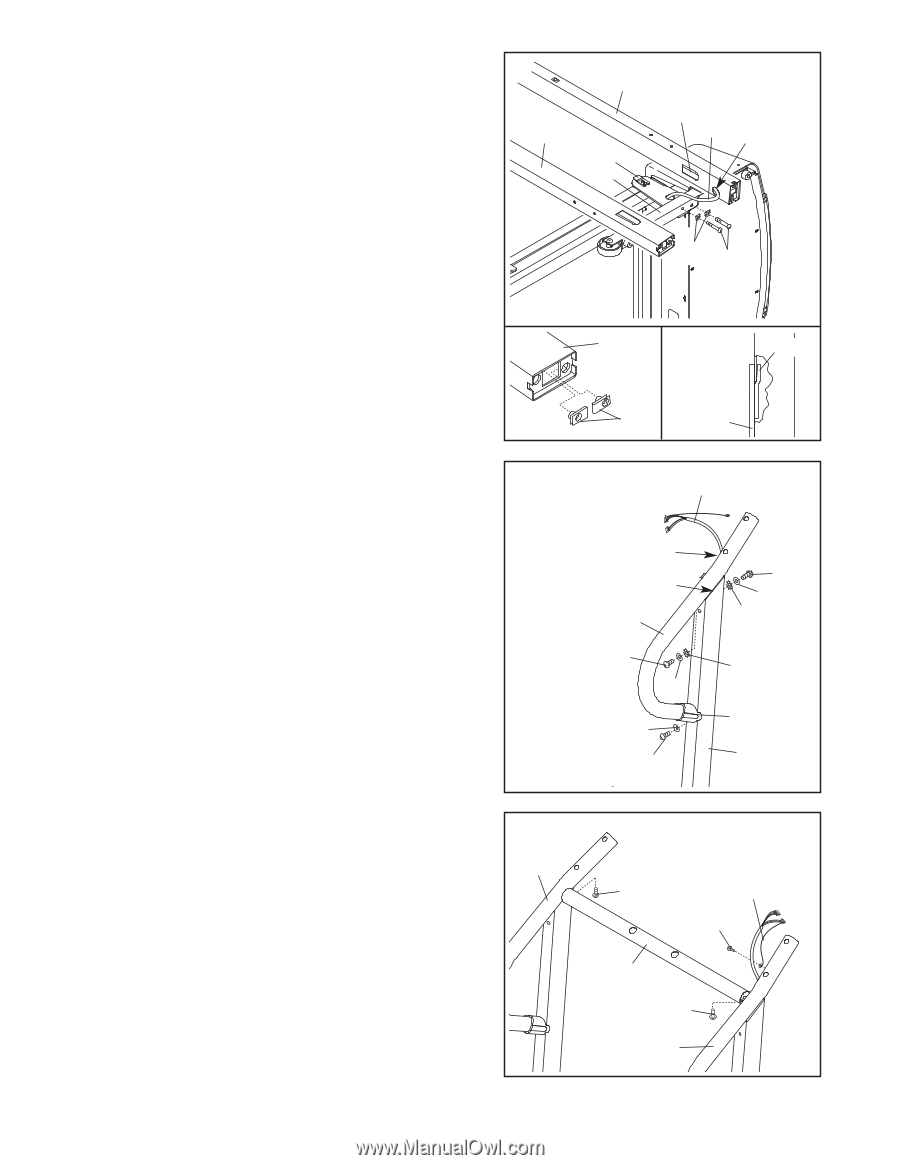
Star Washers 122 into the Base and the Right Upright.
 |
View all ProForm Lx470 Treadmill manuals
Add to My Manuals
Save this manual to your list of manuals |
Page 7 highlights
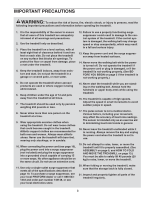
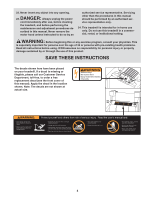
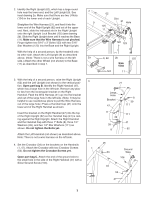
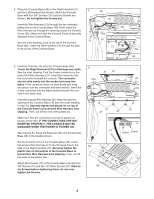
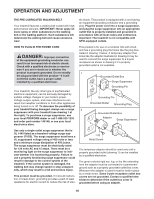
2. Identify the Right Upright (62), which has a large round hole near the lower end, and the Left Upright (9). See inset drawing 2a. Make sure that there are two U-Nuts (124) in the lower end of each Upright. Straighten the Wire Harness (21), and feed it into the lower end of the Right Upright (62) and out of the upper end. Next, slide the indicated slot in the Right Upright onto the right Upright Lock Bracket (125) (see drawing 2b). Slide the Right Upright down until it reaches the Base (11). Make sure that the Wire Harness is not pinched. Finger tighten two 5/16" x 3" Bolts (123) with two 5/16" Star Washers (122) into the Base and the Right Upright. With the help of a second person, tip the treadmill onto its other side. Attach the Left Upright (9) as described above. (Note: There is not a wire harness on the left side.) Attach the other Wheel (not shown) to the Base (11) as described in step 1. 2 9 2a 3. With the help of a second person, raise the Right Upright 3 (62) and the Left Upright (not shown) to the vertical posi- tion. Open part bag B. Identify the Right Handrail (47), which has a large hole in the left side. Remove any plas- tic ties from the rectangular bracket on the Right Handrail. Feed the Wire Harness (21) up into the bracket and out of the large hole in the left side. (Note: It may be helpful to use needlenose pliers to pull the Wire Harness out of the large hole.) Press a Handrail Cap (41) onto the lower end of the Right Handrail as shown. Insert the bracket on the Right Handrail (47) into the top of the Right Upright (62) so the Handrail Cap (41) is resting against the Right Upright. Attach the Right Handrail and the Handrail Cap with three 1" Bolts (8), three 1/4" Washers (39), and two 1/4" Star Washers (111) as shown. Do not tighten the Bolts yet. Attach the Left Handrail (not shown) as described above. Note: There is not a wire harness on the left side. 4 4. Set the Crossbar (34) on the brackets on the Handrails (1, 47). Attach the Crossbar with two Crossbar Screws 1 (53). Do not tighten the Crossbar Screws yet. Open part bag C. Attach the end of the ground wire to the small hole in the side of the Right Handrail (47) with a Silver Ground Screw (104). 62 125 11 Slot 21 Hole 122 123 9, 62 2b 125 Side View 124 11 21 Large Hole Bracket 47 8 39 39 8 8 39 111 111 41 62 Ground 53 Wire 104 34 53 47 7
-
 1
1 -
 2
2 -
 3
3 -
 4
4 -
 5
5 -
 6
6 -
 7
7 -
 8
8 -
 9
9 -
 10
10 -
 11
11 -
 12
12 -
13
-
14
-
15
-
16
-
17
-
18
-
19
-
20
-
21
-
22
-
23
 |
 |