Radio Shack 49-105 User Guide
Radio Shack 49-105 - Color Cameras With Switchbox Manual
 |
UPC - 040293643102
View all Radio Shack 49-105 manuals
Add to My Manuals
Save this manual to your list of manuals |
Radio Shack 49-105 manual content summary:
- Radio Shack 49-105 | User Guide - Page 1
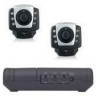
49-105 2 PIR Color Cameras w/ Switchbox Thank you for purchasing your 2 PIR Color Cameras w/ Switchbox from RadioShack. The switchbox enables you to turn your TV into a monitor and the intercom function enables 2-way communication. For lowlight conditions, the compact cameras have built in - Radio Shack 49-105 | User Guide - Page 2
. Specifications are subject to change and improvement without notice. Actual product may vary from the product images in this document. ©2006. RadioShack Corporation. All rights reserved. RadioShack and RadioShack.com are trademarks used by RadioShack Corporation. 49-105 10A06 Printed in China
-
 1
1 -
 2
2
 |
 |

Please read this user’s guide before
installing, setting up and using your new product
www.radioshack.com
Thank you for purchasing your
2 PIR Color Cameras
w/ Switchbox
from
RadioShack
. The switchbox
enables you to turn your TV into a monitor and the
intercom function enables 2-way communication.
For lowlight conditions, the compact cameras have
built in nightvision and automatically switch to black
and white.
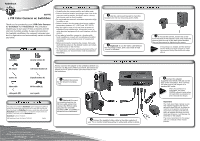
switchbox
security camera (2)
AC adapter
wall mount bracket (2)
screws (4)
drywall anchors (4)
video cable
59-foot cable (2)
cable guide (20)
user’s guide
• Carefully plan the camera position and cable route.
• Select a dust-free location providing a clear view of the
area you want to monitor, and that is not in a strong
light source such as direct sunlight.
• Do not install the camera in a location exposed to high
humidity or rain.
• Select a location for the camera that has an ambient
temperature between -4°F (-20°C) and 122°F (50°C).
• Plan the cable’s route so it is not close to power or
telephone lines, transformers, microwave ovens, or
other electrical equipment that could interfere with the
system.
• If you plan to install the camera in a location with
harsh conditions, consult with a professional installer
and consider using a camera cover or housing (not
included).
• Before permanently mounting the camera, first setup
and hold the camera in the desired location and check
its performance on the monitor.
• To illuminate the camera’s viewing area beyond that of
the nightvision, we recommend a small incandescent
flood lamp.
49-105
2 PIR Color Cameras w/ Switchbox
Always connect the adapter to the switchbox before you
connect it to AC power. When you finish, disconnect the
adapter from AC power before you disconnect it from
the switchbox.
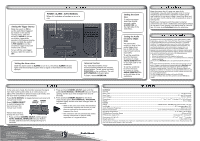
Use the wall mount bracket to mark the
locations for the two mounting screw holes.
(Optional)
To run the video cable behind
the mounting surface, drill a third hole at least
14 mm in diameter.
To mount the camera, loosen the screw
from the base of the camera’s neck, and insert the
camera onto the arm of the wall mount bracket.
Secure the camera by tightening the screw.
If mounting to a drywall, drill the drywall
anchor holes just large enough to insert
the anchors firmly, then follow the steps
above.
NOTE
Position the camera
for the desired recording
view.
(Optional)
Connect
the camera plug into the
59-foot cable socket then
connect the 59-foot cable
plug into the mini-DIN
sockets CAM1 and CAM2 on
the back of the switchbox.
Connect the supplied video cable to the video sockets of
your TV or monitor (matching yellow to yellow and white to white).
Connect the adapter
(supplied) into the DC 15V jack on the
back of the switchbox. Then connect
the other end of the adapter to a
standard AC outlet.
After the connection is
completed, the green
POWER indicator lights when
the switchbox is powered on
and it sounds two beeps.
Important!
You must use a Class 2 power source
that supplies regulated 15V DC and
delivers at least 500 mA. Its center tip
must be set to positive and its plug
must fit the switchbox’s DC15V jack.
Using an adapter that does not meet
these specifications could damage the
switchbox or the adapter.
The correct orientation for this power
unit is in a vertical or floor mount
position.
This product is warranted by
RadioShack
against manufacturing defects in
material and workmanship under normal use for ninety (90) days from the
date of purchase from
RadioShack
company-owned stores and authorized
RadioShack
franchisees and dealers. For complete warranty details and
exclusions, check with your local
RadioShack
store.
RadioShack
Customer Relations
300 RadioShack Circle, Fort Worth, TX 76102
04/04
NOTE