Radio Shack 49-105 User Guide - Page 2
Setting the alarm status, Setting the Trigger Sources, Setting the Audio, Sensitivity Right, - camera
 |
UPC - 040293643102
View all Radio Shack 49-105 manuals
Add to My Manuals
Save this manual to your list of manuals |
Page 2 highlights
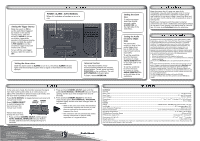
Setting the Trigger Sources Slide the switch to PIR to set the switchbox triggered by motion in the camera viewing areas; slide the switch to AUDIO to set the switchbox triggered by sounds in the camera viewing areas; and slide the switch to PIR+AUDIO to set the switchbox triggered by both motion and sounds. To turn off the auto-trigger function, slide the switch to OFF. setting your system POWER / ALARM / AUTO/MANUAL When lit, indicates a function is on or in use. Setting the alarm status Slide the alarm switch to ALARM to turn it on, the yellow ALARM indicator lights and the switchbox buzzes when a signal is received from the camera sensors. Intercom function Your switchbox enables 2-way communication between the cameras and switchbox. To talk, press and hold INTERCOM on the switchbox. The red AUTO/MANUAL indicator lights. To listen, release INTERCOM. Setting the alarm time To adjust the alarm time from 5 to 30 seconds, rotate ALARM TIME on the right side of the switchbox. Setting the Audio Sensitivity (Right Side) You can set the sensitivity level of the audio trigger from low to high for the input of each camera separately. To set the sensitivity level for the input of camera 1, rotate AUDIO SENSITIVITY 1 on the right side of the switchbox. To set the sensitivity level for the input of camera 2, rotate AUDIO SENSITIVITY 2 on the left side of the switchbox. care and maintenance Keep the system dry; if it gets wet, wipe it dry immediately. Use and store the system only in normal temperature environments. Handle the system gently and carefully. Do not drop it. Keep it away from dust and dirt, and wipe it with a damp cloth occasionally to keep it looking new. Modifying or tampering with the system's internal components can cause a malfunction and might invalidate its warranty. If your system is not performing as it should, take it to your local RadioShack store for assistance. RF emissions information This equipment has been tested and found to comply with the limits for a Class B digital device, pursuant to Part 15 of the FCC Rules. These limits are designed to provide reasonable protection against harmful interference in a residential installation. This equipment generates, uses, and can radiate radio frequency energy and, if not installed and used in accordance with the instructions, may cause harmful interference to radio communications. However, there is no guarantee that interference will not occur in a particular installation. If this equipment does cause harmful interference to radio or television reception, which can be determined by turning the equipment off and on, the user is encouraged to try to correct the interference by one or more of the following measures: • Reorient or relocate the receiving antenna. • Increase the separation between the equipment and receiver. • Connect the equipment into an outlet on a circuit different from that to which the receiver is connected. Consult your local RadioShack store or an experienced radio/TV technician for help. If you cannot eliminate the interference, the FCC requires that you stop using your product. Changes or modifications not expressly approved by RadioShack may cause interference and void the user's authority to operate the equipment. This device complies with Part 15 of the FCC Rules. Operation is subject to the following two conditions: (1) This device may not cause harmful interference, and (2) This device must accept any interference received, including interference that may cause undesired operation. This Class B digital apparatus complies with Canadian ICES-003. Cet appareil numérique de la classe B est conforme à la norme NMB-003 du Canada. scanning In the auto-scan mode, the monitor receives the signal from each camera alternately at an interval you can adjust. The switchbox is preset to auto scan mode, and the scan time is preset to two seconds. Press AUTO/MANUAL to toggle between auto scan and manual-scan mode. AUTO CAMERA Press CAMERA SELECT MANUAL SELECT to switch between the two cameras in the manual scan mode. Follow these steps to change the scan time. 1. Press and hold CAMERA SELECT until the green AUTO/ MANUAL/INTERCOM indicator flashes steadily, and the scan time changes from 2 to 5 seconds. 2. Press and hold CAMERA SELECT again until the green AUTO/MANUAL/ INTERCOM indicator flashes quickly, and the scan time changes from 5 to 10 seconds. 3. Press and hold CAMERA SELECT for the third time until the green AUTO/MANUAL/ INTERCOM indicator lights, and the scan time changes from 10 to 2 seconds. NOTE • While in the auto-scan mode, the switchbox automatically switches the monitor to view the area covered by the camera which triggered the alarm. • The switchbox will not automatically switch camera views while in manual mode, regardless of a triggered alarm. specifications Switchbox Channel...2 Alarm Time...5 to 30 seconds Scan Time...2, 5 and 10 seconds Input Voltage...15V DC 500mA Dimensions...1 7/16 x 5 ½x 3 9/15 inches (37 x 140 x 90 mm) Weight...6.3 oz (180g) Camera Imager ...CMOS sensor, 250,000 pixel, 330 TV lines, 1/3 inch Lens Angle ...90° (viewing angle is 76°) Audio Frequency Response ...300 Hz to 5 KHz Minimum Illumination ...2 lux (without IR Indicator), 0 lux (with IR Indicator) Operating Temperature ...-4° to 122°F (-20° to 50°C) PIR Maximum Detection Range ...24 feet at 25°C PIR Detection Angle (H/V) ...Horizontal 70° / Vertical 45° Dimensions (H x W x D) ...3 1/3 x 2 1/16 x 1 11/16 inches Weight (with wire) ...5.8 oz (165±10 g) Specifications are typical; individual units might vary. Specifications are subject to change and improvement without notice. Actual product may vary from the product images in this document. ©2006. RadioShack Corporation. All rights reserved. RadioShack and RadioShack.com are trademarks used by RadioShack Corporation. 49-105 10A06 Printed in China
-
 1
1 -
 2
2
 |
 |
