Rheem RARL-JEC Installation Instructions
Rheem RARL-JEC Manual
 |
View all Rheem RARL-JEC manuals
Add to My Manuals
Save this manual to your list of manuals |
Rheem RARL-JEC manual content summary:
- Rheem RARL-JEC | Installation Instructions - Page 1
INSTALLATION INSTRUCTIONS AIR-COOLED CONDENSING UNITS (-)ARL-JEC 16 SEER EQUIPPED WITH THE COMFORT CONTROL2 SYSTEM™ Featuring Earth-Friendly R-410A Refrigerant [ ] INDICATES METRIC CONVERSIONS ISO 9001:2000 92-101691-04-01 SUPERSEDES 92-101691-04-00 - Rheem RARL-JEC | Installation Instructions - Page 2
Installing & Servicing R-410A Models 9 4.2 Specifications of R-410A 10 4.3 Quick Reference Guide for R-410-A 10 5.0 REPLACEMENT UNITS 11 6.0 INDOOR COIL 11 6.1 Location 11 7.0 INTERCONNECTING TUBING 11 7.1 Vapor and Liquid Lines 11 7.2 Maximum Length of Lines 12 7.3 Outdoor Unit Installed - Rheem RARL-JEC | Installation Instructions - Page 3
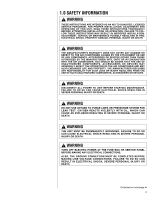
QUALIFIED, LICENSED SERVICE PERSONNEL FOR PROPER INSTALLATION, ADJUSTMENT AND OPERATION OF THIS UNIT. READ THESE INSTRUCTIONS THOROUGHLY BEFORE ATTEMPTING INSTALLATION OR OPERATION. FAILURE TO FOLLOW THESE INSTRUCTIONS MAY RESULT IN IMPROPER INSTALLATION, ADJUSTMENT, SERVICE OR MAINTENANCE POSSIBLY - Rheem RARL-JEC | Installation Instructions - Page 4
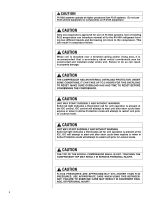
at higher pressures than R-22 systems. Do not use R-22 service equipment or components on R-410A equipment. ! CAUTION Only use is recommended that a secondary sheet metal condensate pan be constructed and installed under entire unit. Failure to do so can result in property damage. ! CAUTION - Rheem RARL-JEC | Installation Instructions - Page 5
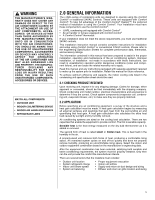
unit equipped with Comfort Control2 • An air handler or furnace equipped with Comfort Control2 • A Comfort Control2 thermostat If your installation does not meet the above requirements, you must use traditional 24VAC controls. This installation instruction manual contains complete instructions - Rheem RARL-JEC | Installation Instructions - Page 6
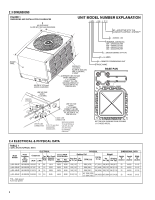
INSTALLATION CLEARANCES AIR ADIRIDSISCCHHARAGERGE ALLOW 6A0LL"OW[16050 [215424 mmm]mCLE]ARCANLCEE ARANCE W UNIT MODEL DESIGN SERIES (R-410A) R = 16 SEER A = REMOTE CONDENSING UNIT TRADE NAME BASE PAN A-00002 SERVICE FITTINGS ARL-JEC ELECTRICAL DATA ELECTRICAL PHYSICAL DIMENSIONAL DATA Model - Rheem RARL-JEC | Installation Instructions - Page 7
Installation Instruction Manual and reference the applicable Engineering Specification Sheet when installing the unit is to be installed in an area where contaminants are likely to be a problem, cannot violate minimum airflow and service access clearances. • Elevating the unit off its slab or base - Rheem RARL-JEC | Installation Instructions - Page 8
equipment horizontally installed in proximity to the unit. Maintain all unit weight evenly and prevent noise and vibration (see Figure 2). NOTE: Do not block drain openings shown in Figure 1. 3.7 Factory-Preferred Tie-Down Method INSTRUCTIONS IMPORTANT: These instructions are intended as a guide - Rheem RARL-JEC | Installation Instructions - Page 9
FIGURE 2 RECOMMENDED ELEVATED INSTALLATION STEP 3: Using basepad as a guide, mark spots on concrete where 4 holes Finish unit assembly per unit's installation instructions. 4.0 REFRIGERANT CONNECTIONS All units are factory charged with Refrigerant 410A. All models are supplied with service valves. - Rheem RARL-JEC | Installation Instructions - Page 10
FIGURE 3 SCREW LOCATIONS TABLE 2 DIMENSIONS MODEL NUMBER (-)ARL-024/036/048/060 L W A B C D 41.5 29.813 15 38 . 4.3 Quick Reference Guide For R-410A • R-410A refrigerant operates at approximately 60% higher pressure (1.6 times) than R-22. Ensure that servicing equipment is designed to - Rheem RARL-JEC | Installation Instructions - Page 11
. IMPORTANT: WHEN REPLACING AN R-22 UNIT WITH AN R-410A UNIT, EITHER REPLACE THE LINE SET OR ENSURE THAT THE EXISTING LINE SET IS THOROUGHLY CLEANED OF ANY OLD OIL OR DEBRIS. 6.0 INDOOR COIL REFER TO INDOOR COIL MANUFACTURER'S INSTALLATION INSTRUCTIONS. IMPORTANT: The manufacturer is not responsible - Rheem RARL-JEC | Installation Instructions - Page 12
up to 150 feet. NOTE: Excessively long refrigerant lines cause loss of equipment capacity. 7.3 Outdoor Unit Installed Above or Below Indoor Coil Use the following guidelines when installing the unit: 1. Expansion Valve Coil: a. The vertical separation cannot exceed the value in Tables 4 and 5. b. No - Rheem RARL-JEC | Installation Instructions - Page 13
*Standard Line Size LIQUID LINE SIZE - OUTDOOR UNIT BELOW INDOOR COIL R-410A System Capacity Model Line Size Connection Size (Inch I.D.) [mm] Line 7.4 Tubing Installation Observe the following when installing correctly sized type "L" refrigerant tubing between the condensing unit and evaporator - Rheem RARL-JEC | Installation Instructions - Page 14
Application Not Recommended *Standard Line Size SUCTION LINE SIZE - OUTDOOR UNIT BELOW INDOOR COIL R-410A System Capacity Model Line Size Connection Size (Inch I.D.) [mm] Line Size (Inch hangers, then straighten the tubing and install permanent hangers. Line must be adequately supported. 14 - Rheem RARL-JEC | Installation Instructions - Page 15
bulb attached. • Braze the tubing between the outdoor unit and indoor coil. Flow dry nitrogen into a service port and through the tubing while brazing. • After . 8.0 COMPRESSOR CRANKCASE HEAT (CCH) CCH is standard on these models due to refrigerant migration during the off cycle that can result in - Rheem RARL-JEC | Installation Instructions - Page 16
wall thermostat off.) 9.0 HARD START COMPONENTS Factory-installed start components are standard on all models. 10.0 HIGH AND LOW PRESSURE CONTROLS 10.0 Evacuation Procedure Evacuation is the most important part of the entire service procedure. The life and efficiency of the equipment is dependent - Rheem RARL-JEC | Installation Instructions - Page 17
recall (See Test Mode/Fault Recall) Red LED (Y1) • Y1 red LED (solid on) indicates Y1 call from thermostat is present ! CAUTION UNIT MAY START SUDDENLY AND WITHOUT WARNING Solid red light indicates a thermostat call for unit operation is present at the ICC control. ICC control will attempt to start - Rheem RARL-JEC | Installation Instructions - Page 18
wire length between the thermostat and indoor unit should not be greater than 100 feet. The wire length between the indoor unit and outdoor unit should not be greater than 125 feet. 11.3 Comfort Control2 System™ ICC Control Operation Installation Verification • 24V AC power on R&C must be present at - Rheem RARL-JEC | Installation Instructions - Page 19
SYSTEM™ CONTROL WIRING FIGURE 5 TYPICAL COMFORT CONTROL2 SYSTEM™ WIRING DIAGRAM Indoor Unit Communicating Thermostat 1 2RC 1 2 R C WIRING INFORMATION Line Voltage -Field Installed - - - - - -Factory Standard Outdoor Unit 1 2 R C • Line voltage must be present at the ICC for the compressor - Rheem RARL-JEC | Installation Instructions - Page 20
the dual 7-segment LEDs followed by a "21". IMPORTANT: This mode of active protection must be manually reset. 2) High Pressure Control Lockout • If the HPC opens three (3) times during the same command for unit operation, the ICC will lockout the compressor to keep it from continuing to operate and - Rheem RARL-JEC | Installation Instructions - Page 21
than 15 seconds for four (4) consecutive starts during the same command for unit operation, the ICC will lockout the compressor to keep it from continuing to by a "04". IMPORTANT: This mode of active protection must be manually reset. 4) Compressor Protector Trip • If ICC detects a protector trip - Rheem RARL-JEC | Installation Instructions - Page 22
by a "07". IMPORTANT: This mode of active protection must be manually reset. Exiting Active Compressor Protection Lockout Three are three methods to reset one (1) second and release Note: The ICC will attempt to start the unit when the TEST button is pressed and released Note: The preferred method of - Rheem RARL-JEC | Installation Instructions - Page 23
COMFORT CONTROL2 SYSTEM™ CONTROL WIRING • When entering FAULT RECALL mode, the ICC will automatically scroll through stored faults on the dual 7-segment LEDs. • Each fault is displayed one time with the top right-hand segment of the dual 7segment display activated between faults. • Each fault is - Rheem RARL-JEC | Installation Instructions - Page 24
below: Dual 7-Segment LEDs Display Code Diagnostic Description 0 - Standby No command for unit operation Status/Possible Cause - Troubleshooting Information Normal operation c - First Stage Cooling Unit has received a command for first stage cooling c c - Anti-short cycle timer (3 minutes - Rheem RARL-JEC | Installation Instructions - Page 25
voltage at R and C is below 18VAC Status/Possible Cause - Troubleshooting Information • Check for damaged, miswired, or wrong run capacitor seconds of compressor operation LL21 - Active Protection Low Pressure Control Trip • Unit has low refrigerant charge • Indoor coil is frozen (cooling mode) • - Rheem RARL-JEC | Installation Instructions - Page 26
LL29 - Active Protection High Pressure Control Trip Status/Possible Cause - Troubleshooting Information • Outdoor coil is dirty (cooling mode) • Outdoor fan properly sized unit. • Replace the sensor • Check sensor is installed correctly on control • Check unit placement - If the outdoor unit is in - Rheem RARL-JEC | Installation Instructions - Page 27
.7 Conventional 24VAC Thermostat Control Wiring The (-)ARL series of heat pumps allow the installer to use conventional 24VAC control wiring and a conventional thermostat for proper unit operation. IMPORTANT: The preferred method of unit installation and operation is with the Comfort Control2 System - Rheem RARL-JEC | Installation Instructions - Page 28
Y1 Y2 G W1 W2 C R Humidistat (-)HPN Air Handler W1 W2 Y1 Y2 R C G ODD (-)ARL Condensing Unit Y Y1 Y/BL Y2 R R BR C W/R L WIRING INFORMATION Line Voltage -Field Installed -Factory Standard *See Section 5.11 for proper DIP switch selection. FIGURE 8 TYPICAL TWO-STAGE THERMOSTAT - Rheem RARL-JEC | Installation Instructions - Page 29
11.9 ICC Control Operation with Conventional Thermostat Wiring Installation Verification • 24V AC power on R&C must be present at the will flash "c" or "C" while the short cycle timer is active and a call for unit operation is received. Flashing lower case c A call for first stage cooling has been - Rheem RARL-JEC | Installation Instructions - Page 30
on the dual 7-segment LEDs followed by a "21". IMPORTANT: This mode of active protection must be manually reset. 2) High Pressure Control Lockout • If the HPC opens three (3) times during the same call for unit operation, the ICC will lockout the compressor to keep it from continuing to operate and - Rheem RARL-JEC | Installation Instructions - Page 31
by a "07". IMPORTANT: This mode of active protection must be manually reset. Exiting Active Compressor Protection Lockout Three are three methods to for one (1) second and release Note: The ICC will attempt to start the unit when the TEST button is pressed and released Note: The preferred method of - Rheem RARL-JEC | Installation Instructions - Page 32
on the dual 7-segment LEDs 2) The compressor will start 3) The compressor will turn off after 5-seconds. Note: Entering TEST mode without a call for unit operation will cause the compressor to run 5-seconds. Fault Recall Mode (TEST and SW2 Buttons) • Enter FAULT RECALL mode by pressing the TEST and - Rheem RARL-JEC | Installation Instructions - Page 33
is important that proper electrical power from a commercial utility is available at the condensing unit contactor. Voltage ranges for operation are shown in Table 7. Install a branch circuit disconnect within sight of the unit and of adequate size to handle the starting current (see Table 1). Power - Rheem RARL-JEC | Installation Instructions - Page 34
unit is factory charged with Refrigerant-410A, the charge must be checked to the charge table attached to the service unit capacity. Excessive indoor airflow increases the possibility of high humidity problems small, they also cause noise. The installers should balance the air distribution system to - Rheem RARL-JEC | Installation Instructions - Page 35
the chart value. 15.3 Charging By Weight For a new installation, evacuation of interconnecting tubing and indoor coil is adequate; otherwise, evacuate the entire system. Use the factory charge shown in Table 1 of these instructions or unit data plate. Note that charge value includes charge required - Rheem RARL-JEC | Installation Instructions - Page 36
installed away from the outdoor unit for better thermostat temperature display. 17.0 TROUBLESHOOTING IMPORTANT: The JEC series units problems but only to guide the technician's troubleshooting. Through a series , indoor air handler and outdoor unit (heat pump or AC). If the communications wires are - Rheem RARL-JEC | Installation Instructions - Page 37
fault and history information. The following tables show all of the available options by unit type. To go down into a menu press Install Config to move back up press the Menu button. See Installation Instructions. 17.2 REPLACEMENT OF COMFORT CONTROL2 SYSTEM™ CONTROL 17.2 BOARD Each control board in - Rheem RARL-JEC | Installation Instructions - Page 38
17.3 Electrical Checks Flow Chart Thermostat call For cooling, no cooling Outdoor Unit Running? Yes No Refer to panel cover/documentation for Fault Code Troubleshooting. Check fault history for other faults. 7-Segment display lit? Yes No Check control voltage (R and C) to control Y1 LED - Rheem RARL-JEC | Installation Instructions - Page 39
17.4 Cooling Mechanical Checks Flow Chart Unit Running? YES NO Pressure problems? Go to Electrical Checks Flow Chart High Head Pressure Low Head Pressure Low Suction Pressure Dirty Outdoor Coil Low on Charge Dirty Filters Inoperative Outdoor - Rheem RARL-JEC | Installation Instructions - Page 40
17.5 General Trouble Shooting Chart ! WARNING DISCONNECT ALL POWER TO UNIT BEFORE SERVICING. CONTACTOR MAY BREAK ONLY ONE SIDE. FAILURE TO SHUT OFF POWER CAN CAUSE ELECTRICAL SHOCK RESULTING IN PERSONAL INJURY OR DEATH. SYMPTOM Unit will not run POSSIBLE CAUSE • Power off or loose electrical - Rheem RARL-JEC | Installation Instructions - Page 41
17.6 Service Analyzer Charts COMPRESSOR OVERHEATING SYMPTOMS High superheat POSSIBLE CAUSE Low charge Faulty Have problem corrected Check system charge Clean coil Replace fan motor Replace fan blade Replace with correct rotation motor Correct installation Check for dryer vent near unit Check for - Rheem RARL-JEC | Installation Instructions - Page 42
(3 phase) POSSIBLE CAUSE Poor evacuation on installation or during service Non-condensibles air Wrong refrigerant Copper tubing cuttings for short in wiring or unit Re-check wiring diagram Wrong unit Power supply problem Wrong unit Power supply problem Wiring undersized Loose connections Check - Rheem RARL-JEC | Installation Instructions - Page 43
out of calibration, Customer misuse CHECK OR REMEDIES Replace crankcase heater Check Piping guidelines Check and adjust charge CHECK OR REMEDIES Review pipe size guidelines Check TEV application CHECK OR REMEDIES Secure the bulb and insulate Relocate bulb Use correct replacement Adjust, if possible - Rheem RARL-JEC | Installation Instructions - Page 44
flooded evaporator Compressor in cold location Any of the causes listed under Symptoms of Problem #2 CHECK OR REMEDIES Recover charge, install filter-drier, evacuate system, recharge Recover charge, install filter-drier, evacuate system, recharge Correct the charge Remove restriction in liquid line - Rheem RARL-JEC | Installation Instructions - Page 45
External equalizer line not connected or line plugged Sensing bulb lost its operating charge Valve body damaged during soldering or by improper installation CHECK OR REMEDIES Ensure air flow is equally distributed through evaporator Check for blocked distributor tubes Ensure blower is moving proper - Rheem RARL-JEC | Installation Instructions - Page 46
46 17.7 Subcooling Calculation 1. Measure the liquid pressure at the liquid line service valve. 2. Convert the liquid line pressure to saturated temperature. See Table 8. CONDITIONING SYSTEM TROUBLESHOOTING TIPS AIR CONDITIONING SYSTEM TROUBLESHOOTING TIPS SYSTEM PROBLEM Overcharge INDICATORS - Rheem RARL-JEC | Installation Instructions - Page 47
18.0 WIRING DIAGRAMS FIGURE 11 WIRING DIAGRAM FOR 2, 3, & 4 TON 47 - Rheem RARL-JEC | Installation Instructions - Page 48
FIGURE 12 WIRING DIAGRAM FOR 5 TON 48 CM 1108
-
 1
1 -
 2
2 -
 3
3 -
 4
4 -
 5
5 -
 6
6 -
 7
7 -
8
-
9
-
10
-
11
-
12
-
13
-
14
-
15
-
16
-
17
-
18
-
19
-
20
-
21
-
22
-
23
-
24
-
25
-
26
-
27
-
28
-
29
-
30
-
31
-
32
-
33
-
34
-
35
-
36
-
37
-
38
-
39
-
40
-
41
-
42
-
43
-
44
-
45
-
46
-
47
-
48
 |
 |

92-101691-04-01
SUPERSEDES 92-101691-04-00
AIR-COOLED CONDENSING UNITS
(-)ARL-JEC 16 SEER
EQUIPPED WITH THE
COMFORT CONTROL
2
SYSTEM™
INSTALLATION INSTRUCTIONS
[ ] INDICATES METRIC CONVERSIONS
ISO 9001:2000
Featuring Earth-Friendly
R-410A Refrigerant