Ricoh 2020D Settings Guide
Ricoh 2020D - Aficio B/W Laser Manual
 |
View all Ricoh 2020D manuals
Add to My Manuals
Save this manual to your list of manuals |
Ricoh 2020D manual content summary:
- Ricoh 2020D | Settings Guide - Page 1
Operating Instructions General Settings Guide Getting Started Combined Function Operations User Tools (System Settings) Troubleshooting Other Functions Entering Text Security Specifications Read this manual carefully before you use this machine and keep it handy for future reference. For safe and - Ricoh 2020D | Settings Guide - Page 2
Introduction This manual contains detailed instructions and notes on the operation and use of this machine. For your safety and benefit, read this manual carefully before using the machine. Keep this manual in a handy place for quick reference. Important Contents of this manual are subject to change - Ricoh 2020D | Settings Guide - Page 3
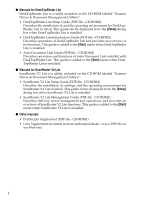
and describes System Settings (paper trays, Key Operator Tools, etc.), and troubleshooting. Refer to this manual for Address Book procedures such as registering fax numbers, e-mail addresses, and user codes. ❖ Network Guide (PDF file - CD-ROM1) Describes procedures for configuring the machine and - Ricoh 2020D | Settings Guide - Page 4
[Start] menu when DeskTopBinder Lite is installed. ❖ Manuals for ScanRouter V2 Lite ScanRouter V2 Lite is a utility included on the CD-ROM labeled "Scanner Driver & Document Management Utilities". • ScanRouter V2 Lite Setup Guide (PDF file - CD-ROM2) Describes the installation of, settings, and the - Ricoh 2020D | Settings Guide - Page 5
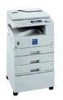
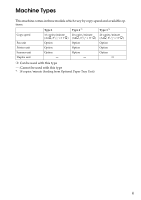
Machine Types This machine comes in three models which vary by copy speed and available options. Copy speed Fax unit Printer unit Scanner unit Duplex unit Type 1 16 copies/minute (A4K, 81/2" × 11"K) Option Option Option - Type 2 *1 20 copies/minute (A4K, 81/2" × 11"K) Option Option Option - - Ricoh 2020D | Settings Guide - Page 6
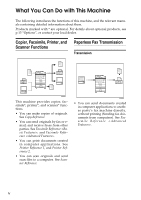
AAI008S This machine provides copier, facsimile*, printer*, and scanner* functions. • You can make copies of originals. See Copy Reference. • You can send originals by fax or email, and receive faxes from other parties. See Facsimile Reference , and Facsimile Reference - Ricoh 2020D | Settings Guide - Page 7
or unauthorized access via the network. See p.97 "Security". Note ❒ This function is only available when the printer/scanner and fax units are installed. ❖ Security Functions • Protecting against unauthorized access via phone lines • Authenticating administrator (setting the key operator code - Ricoh 2020D | Settings Guide - Page 8
. See Network Guide. • You can also use a Web browser to register and manage items such as user codes, fax numbers, and email addresses in the Address Book. See the Web browser's Help. Note ❒ Monitoring and management using a Web browser are only available when the expansion board is installed. vi - Ricoh 2020D | Settings Guide - Page 9
CONTENTS Manuals for This Machine i Machine Types ...iii What You Can Do with This Machine iv Copier, Facsimile, Printer, and Scanner Functions iv Paperless Fax Transmission iv Fax Transmission and Reception through the Internet v Using the Scanner in a Network Environment v Administrating the - Ricoh 2020D | Settings Guide - Page 10
Address Book...43 Registering Destination Information 44 Registering Sender Information 44 User Code (MFP 45 Registering a New User Code 45 Changing a User Code 46 Deleting a User Code 49 Displaying the Counter for Each User Code 52 Printing the Counter for Each User 4. Troubleshooting If Unit - Ricoh 2020D | Settings Guide - Page 11
and Notes 99 Operating Environment 99 For Administrator...99 For User ...99 8. Specifications Main Unit...101 Options ...105 Exposure Glass Cover 105 Auto Document Feeder (ADF 105 Auto Document Feeder capable of scanning both sides of a sheet (ARDF)..........106 Internal Tray 2 (1 bin - Ricoh 2020D | Settings Guide - Page 12
x - Ricoh 2020D | Settings Guide - Page 13
Windows NT® are registered trademarks of Microsoft Corporation in the United States and/or other countries. PostScript® and Acrobat® are a registered trademark of Adobe Systems Incorporated. Bluetooth™ is a trademark of the Bluetooth SIG, Inc. (Special Interest Group) and is used by RICOH Company - Ricoh 2020D | Settings Guide - Page 14
support to the software of the product including the expat, and the product manufacturer makes the initial developer and copyright holder of the expat, free CONNECTION WITH THE SOFTWARE OR THE USE OR OTHER DEALINGS IN THE SOFTWARE. NetBSD 1. Copyright Notice of NetBSD For all users to use this - Ricoh 2020D | Settings Guide - Page 15
materials mentioning features or use of this software must display the following acknowledgment: This product includes software developed by The DAMAGES (INCLUDING, BUT NOT LIMITED TO, PROCUREMENT OF SUBSTITUTE GOODS OR SERVICES; LOSS OF USE, DATA, OR PROFITS; OR BUSINESS INTERRUPTION) HOWEVER - Ricoh 2020D | Settings Guide - Page 16
Work" as defined in MPL 1.1. The application software of this product except for the Sablotron 0.82 as modified is licensed by the product manufacturer under separate agreement(s). d) The source code of the modified code of the Sablotron 0.82 is available at: http://support-download.com/services - Ricoh 2020D | Settings Guide - Page 17
mozilla.org/MPL/MPL-1.1.html. JPEG LIBRARY • The software installed on this product is based in part on the work of the Independent JPEG Group. SASL CMU libsasl Tim the following acknowledgment: "This product includes software developed by Computing Services at Carnegie Mellon University (http://www. - Ricoh 2020D | Settings Guide - Page 18
Data Security, Inc. MD4 Message-Digest Algorithm" in all material mentioning or referencing this software or this function. License is also granted to make and use derivative works provided that such works are identified as "derived from the RSA Data Security, Inc. MD4 MessageDigest Algorithm" in - Ricoh 2020D | Settings Guide - Page 19
section. * The statements above are notes for your safety. Important If this instruction is not followed, paper might be misfed, originals might be damaged, or data to as follows in this manual: • Auto Document Feeder → ADF • Auto Document Feeder capable of scanning both sides of a sheet → ARDF 7 - Ricoh 2020D | Settings Guide - Page 20
for developing and turns off 1 minute after finishing the last copy or print job. In this manual, the Off mode is called the Auto Off mode. For details about how to change the interval between last job and Auto Off mode, see p.32 "Auto Off Timer". • Sleep mode (Fax, printer, or scanner installed - Ricoh 2020D | Settings Guide - Page 21
when you turn on the operation switch or the main power switch, press the {Clear Modes} key, or the machine resets itself automatically. To change Duplex Priority mode, see Copy Reference. Specifications Copier only Low Power mode Sleep mode Off mode Power consumption 40 W Default inter - Ricoh 2020D | Settings Guide - Page 22
10 - Ricoh 2020D | Settings Guide - Page 23
1. Getting Started Guide to Components 1 2 3 4 5 7 8 10 11 9 12 13 6 1. Exposure glass cover The indicator lights when paper is delivered to internal tray 2. If internal tray 2 has not been installed, the indicator does not light. See p.13 "External Options". Note ❒ When paper larger than A3 - Ricoh 2020D | Settings Guide - Page 24
of the machine. 8. On indicator Lights when the operation switch is 12. Paper tray Load paper here. turned on, and goes off when the switch is turned off. 13. Paper tray unit (optional) See p.13 "External Options". Type 1 Type 2 Type 3 1. Bypass tray Use to copy onto OHP transparencies - Ricoh 2020D | Settings Guide - Page 25
They will feed in automatically. This document feeder can be used for two-sided originals. 4. Internal tray 2 (1 bin tray) If you select this Internal tray 2 can only be installed for Type 2 and 3 (MFP). 5. Paper tray unit (1-tray type) Holds 500 sheets. 6. Paper tray unit (2-tray type) Holds up to - Ricoh 2020D | Settings Guide - Page 26
the printer and scanner functions. C Parallel port IEEE 1284 interface board Allows you to connect to an IEEE 1284 cable. D IEEE 1394 interface board Allows you to connect to an IEEE 1394 cable. E IEEE 802.11b wireless LAN board Allows you to install a wireless LAN interface. F Bluetooth unit - Ricoh 2020D | Settings Guide - Page 27
to activate the copy function. 6. {Printer} key Press to activate the printer function. 7. Indicators Display errors and machine status. h: Error indicator. See Network Guide and see p.85 "x Clearing Misfeeds". B: Load Paper indicator. See Copy Reference. D: Add Toner indicator. See Copy Reference - Ricoh 2020D | Settings Guide - Page 28
Photo)]. When the original type is select- 1 Stops a job in progress, such as scanning turn the power on. The On indicator lights. To turn the power off, press again. 27. {Start} key Press to start copying, printing, or scanning Printer Reference 1 and Printer Reference 2 20. Copier function - Ricoh 2020D | Settings Guide - Page 29
set as the default screen when the machine is turned on. When instruction "press [100%]" appears in this manual, press the left selection key. • When the instruction "press [R/E]" appears in this manual, press the centre selection key. • When the instruction "press [Auto R/E]" appears in this manual - Ricoh 2020D | Settings Guide - Page 30
Getting Started Common key operations The following keys are common to all screens: 1 ❖ Key list [Cancel] [Exit] [Stop] [Yes] [Stop] Deletes a selected function or entered values, and then the previous display returns. The previous display returns. Stops a job in progress. Acknowledges a - Ricoh 2020D | Settings Guide - Page 31
switch modes in any of the following situations: • When scanning a fax message for transmission • During immediate transmission • When accessing User Tools • During On hook dialing for fax transmission • While scanning an original ❒ The copying screen is displayed as default when the power is turned - Ricoh 2020D | Settings Guide - Page 32
Combined Function Operations -System Reset The machine returns automatically to its initial condition when the job is finished, after a certain period of time has elapsed. This function is called "System Reset". 2 Note ❒ You can change the System Reset time. See p.32 "System Auto Reset Timer". - Ricoh 2020D | Settings Guide - Page 33
Display mode] is set to first priority. ❒ You can specify the output tray where documents are delivered. For details about how to specify the output tray for each function, see the following descriptions: • p.29 "Output: Copier (copier)" • p.29 "Output: Facsimile (facsimile)" • p.29 "Output: Printer - Ricoh 2020D | Settings Guide - Page 34
Priority". Mode after you select Copy Facsimile Printer Scanner Print Transmission Recep- 2 tion Using the control panel Scanning Printing after the current job is finished. ×...means that you must manually start another job after the current job is finished (i.e., these functions cannot be - Ricoh 2020D | Settings Guide - Page 35
see Network Guide. For details about parallel interface, see Printer Reference 2. ❖ General Features (See p.28 "General Features".) Panel Tone Copy Count Display Function Priority Print Priority Output: Copier Output: Facsimile Output: Printer Display Contrast Key Repeat Measurement Unit Default - Ricoh 2020D | Settings Guide - Page 36
Auto Reset Timer Scanner Auto Reset Timer Set Date Set Time Default (MFP) 60 sec. 30 sec. 60 sec. - - Default (Copier only) 1 min. 1 min. 60 sec. ❖ Interface Settings • For details about network settings, see Network Guide. • For details about parallel interface, see Printer Reference 2. ❖ File - Ricoh 2020D | Settings Guide - Page 37
Menu (System Settings) ❖ Key Operator Tools (See p.34 "Key Operator Tools".) Default (MFP) Default (Copier only) User Code Management Copier Off Off Facsimile Off Scanner Off Printer Auto Program Key Counter Management All Off Off Key Operator Code Extended Security Off 3 Off - Ricoh 2020D | Settings Guide - Page 38
. See p.27 "Quitting User Tools". ❒ Any changes you make with User C Select the menu using {U} or {T}, and then press the {OK} key. Tools remain in effect even if the main power switch or operation switch is turned off, or the {Clear Modes} key is pressed. Changing Default Settings Note ❒ If - Ricoh 2020D | Settings Guide - Page 39
Quitting User Tools A Press the {User Tools/Counter} key. On Hook Dial Pause/ Redial AAH011S Accessing User Tools (System Settings) 3 27 - Ricoh 2020D | Settings Guide - Page 40
to be displayed immediately after the operation switch is turned on, or when System Reset mode is turned on. Note ❒ Default: Copier ❖ Print Priority Set the print priority for each mode. Reference p.21 "Multi-Access" Note ❒ Default: Display mode ❒ When [Interleave] is selected, the current print - Ricoh 2020D | Settings Guide - Page 41
Change with User Tools ❖ Output: Copier (copier) You can specify a tray to which documents are delivered. Note ❒ Default: Internal tray 1 ❖ Output: Facsimile (facsimile) You can specify a tray to which documents are delivered. Note ❒ Default: Internal tray 2 ❖ Output: Printer (printer) 3 You - Ricoh 2020D | Settings Guide - Page 42
User Tools (System Settings) Tray Paper Settings ❖ Tray Paper Size: Tray size of the paper loaded in the paper tray, a misfeed might occur because the correct paper size was not detected. Note ❒ Default: • Tray 1 • Metric version: 81/2" × 11"L • Inch version: A4L • Tray 2 • Metric version: A5L ( - Ricoh 2020D | Settings Guide - Page 43
Can Change with User Tools Reference p.88 Copier (copier) You can specify the tray to supply paper for output. Note ❒ Default: Tray 1 ❖ Paper Tray Priority: Facsimile (facsimile) You can specify the tray to supply paper for output. Note ❒ Default: Tray 1 ❖ Paper Tray Priority: Printer (printer - Ricoh 2020D | Settings Guide - Page 44
the selected time elapsed. Note ❒ Default: 1 min. ❒ The time can be set from 1 to 240 minutes, using the number key. ❒ Energy Saver may not work when error messages appear. ❒ The machine automatically prints any fax or printer data received while in Energy Saver mode. ❖ System Auto Reset Timer The - Ricoh 2020D | Settings Guide - Page 45
Auto Reset Timer Specify the time to elapse before copier modes reset. Note ❒ If [Off] is selected, the machine does not automatically switch to the user code entry screen. ❒ Default: On, 60 sec. ❒ The time can be set from 10 to 999 seconds, using the number keys. ❖ Facsimile Auto Reset Timer - Ricoh 2020D | Settings Guide - Page 46
for users. User codes must be registered for user code management. See p.45 "User 3 Code (MFP)". Note ❒ Default: Copier/Off, Facsimile/Off, Scanner/Off, Printer/Auto Program ❒ By using [Auto Program] for the printer, you can keep a print log for each user code entered from the driver. ❖ Key - Ricoh 2020D | Settings Guide - Page 47
You Can Change with User Tools ❖ Extended Security Specify whether or not to use the security function. Note ❒ Default : Off ❒ You Display/Print Counter Displays the number of prints for each function (Total, Copier, Facsimile, Printer, A3/DLT, and Duplex). • Print Counter List Prints out a - Ricoh 2020D | Settings Guide - Page 48
or {T}, and then press the {OK} key. E Press [Print]. 3 F Press the {Start} key. G Press the {User Tools/Counter} key. ❖ Counter per User Code Allows you to view and print the numbers of prints accessed with user codes, and to set those values to 0. Note ❒ Press {U} and {T} to show all the numbers - Ricoh 2020D | Settings Guide - Page 49
, sender's password, Program Group 3 • User code User code, available functions • Registration number • [Delete] Deletes a user information. Note ❒ You can register up to 150 users. ❒ You can also register and manage data in the Address Book, using SmartDeviceMonitor for Admin (printer option - Ricoh 2020D | Settings Guide - Page 50
User Tools (System Settings) ❖ Address Book: Print List You can print the destination list registered in the Address Book. • Destination List Prints the destination list registered in the Address Book. • Group Destination List Prints the group destination list registered in the Address Book. • - Ricoh 2020D | Settings Guide - Page 51
(For machine with copier function only) User Code (For machine with copier function only) Register user codes to restrict copier functions to certain users, and check on their use of copier functions: D Select [Program/Change User Code] using {U} or {T}, and then press the {OK} key. Registering - Ricoh 2020D | Settings Guide - Page 52
then press the {OK} key. C Select [Key Operator Tools] using {U} or {T}, and then press the {OK} key. Note ❒ When you select the user code from the User Code List, press [List]. Select the user code you want to change using {U} or {T}, and then press the {OK} key twice. D Select [Program/Change - Ricoh 2020D | Settings Guide - Page 53
Code (For machine with copier function only) F Select [Per User Code] or [All User Codes] using {U} or {T}, and then press the {OK} key. Displaying the Counter for Each User Code You can check the counter for each user code. A Press the {User Tools/Counter} key. B Select [System Settings] using - Ricoh 2020D | Settings Guide - Page 54
{OK} key. E Select [Print] using {U} or {T} and then press the {OK} key. F Press the {Start} key. The counter list prints out. G Press the {User Tools/Counter} key. E Select [Clear] using {U} or {T}, and then press the {OK} key. A confirmation message appears. F Press [Yes]. The "Counter has been - Ricoh 2020D | Settings Guide - Page 55
Address Book Address Book Registering user information, such as • Sender's Password fax numbers and e-mail addresses, in the Address Book allows you to man- Reference age them together. p.44 "When using the scanner function" Important ❒ Address Book data is stored in memory. It can be lost - Ricoh 2020D | Settings Guide - Page 56
in the From field of the e-mail. Reference p.45 "User Code (MFP)" • E-mail Settings Register the e-mail address. You can use it as the sender address when sending scan files by email using the scanner function. Also, the sender address automatically appears in the From field of the e-mail. Reference - Ricoh 2020D | Settings Guide - Page 57
check their use of each function: • Copier Registering a New User Code A Press the {User Tools/Counter} key. • Facsimile • Scanner • Printer On Hook Dial 3 Note ❒ The number of copies scanned in using the scanner function is Pause/ Redial counted for each user code. This al- lows you to - Ricoh 2020D | Settings Guide - Page 58
keys and the Quick Dial keys, and then press the {OK} key. K Press the {OK} key. The "Programmed" message appears, and then the "Address Book" display returns. L Press the {User Tools/Counter} key. Reference For details about entering text, see p.95 "Entering Text". H Press [UserCode]. Changing - Ricoh 2020D | Settings Guide - Page 59
then press the {OK} key. Searching to select a registered user code by name A Press [Search]. User Code (MFP) D Press the {OK} key. E Select the keys, and then press the {OK} key. Searching to select a registered user code from Destination List A Press [Search]. B Select [Display Destination List - Ricoh 2020D | Settings Guide - Page 60
key. D Press the {OK} or {#} key. Searching to select a registered user code by fax number A Press [Search]. B Select [Search by Fax No.] using key. Searching to select a registered user code by e-mail address A Press [Search]. B Select [Search by E-mail Address] using {U} or {T}, and then press - Ricoh 2020D | Settings Guide - Page 61
OK} key. H Press [UserCode]. K Press the {OK} key. The "Programmed" message appears, and then the "Address Book" display returns. L Press the {User Tools/Counter} key. Deleting a User Code A Press the {User Tools/Counter} key. B Select [System Settings] using {U} or {T}, and then press the {OK} key - Ricoh 2020D | Settings Guide - Page 62
number you want to delete using the number keys or the Quick Dial keys, and then press the {OK} key. Searching to select a registered user code by name A Press [Search]. 3 B Select [Search by Name] using {U} or {T}, and then press the {OK} key. C Enter the characters of the destination you - Ricoh 2020D | Settings Guide - Page 63
press the {OK} key. D Press the {OK} key. Searching to select a registered 3 user code by e-mail address A Press [Search]. B Select [Search by E-mail Address] using {U} or {T}, and then press the {OK} key. C Enter the e-mail address of the destination you want to delete using the number keys and - Ricoh 2020D | Settings Guide - Page 64
Display] using {U} or {T}, and then press the {OK} key. J Press the {OK} key. The "Programmed" message appears, and then the "Address Book" display returns. K Press the {User Tools/Counter} key. F Select the function you want to display the counter for using {U} or {T}, and then press the {OK} key - Ricoh 2020D | Settings Guide - Page 65
Code You can print out the counter made under each user code using [Print Counter], [Transmission Counter], or [Scanner Counter]. A Press the {User Tools/Counter} key. B Select [System Settings] using {U} or {T}, and then press the {OK} key. C Select [Key Operator Tools] using {U} or {T}, and then - Ricoh 2020D | Settings Guide - Page 66
] using {U} or {T}, and then press the {OK} key. C Select [Key Operator Tools] using {U} or {T}, and then press the 3 {OK} key. D Select [Counter per User Code] using {U} or {T}, and then press the {OK} key. E Select [Clear] using {U} or {T}, and then press the {OK} key. To clear the counter - Ricoh 2020D | Settings Guide - Page 67
when sending by e-mail using fax functions. ❖ International TX mode When setting the International TX mode to [On], the machine transmits more carefully by reducing transmission speed. However, communication time increases. D Select [Address Book Management] using {U} or {T}, and then press the {OK - Ricoh 2020D | Settings Guide - Page 68
name when selecting a fax destination. ❒ You can register the user code after the user name. For details, see p.45 "User Code (MFP)". Reference For details about entering text, see p.95 "Entering Text". To set the International TX mode A Press [Option]. B Select [On] or [Off] using {U} or {T}, and - Ricoh 2020D | Settings Guide - Page 69
and then the "Address Book" display returns. A Select [On] or [Off] using {U} or {T}, and then press the {OK} M Press the {User Tools/Counter} key it is connected to a pulse dialing line (for example: to use a special service on a tone dialing line). A Press [Tone]. B Enter the number you want to - Ricoh 2020D | Settings Guide - Page 70
User Tools (System Settings) B Select [Search by Name] using {U} or {T}, and then press the {OK} key. C Enter the characters of the des- 3 tination you want to - Ricoh 2020D | Settings Guide - Page 71
{T }, and then press the {OK} key. C Enter the user code of the destination you want to change using the number keys, destination by e-mail address A Press [Search]. B Select [Search by E-mail Address] using {U} or {T}, and then press the {OK} key. C Enter the e-mail address of the destination you - Ricoh 2020D | Settings Guide - Page 72
(System Settings) D Press the {OK} key. L Press the {OK} key. The "Programmed" message appears, and then the "Address Book" display returns. M Press the {User Tools/Counter} key. E Select the destination you want to change, and then press Deleting a Registered Fax the {OK} key. Destination - Ricoh 2020D | Settings Guide - Page 73
A Press [Search]. B Select [Display Destination List] using {U} or {T}, and then press the {OK} key. D Press the {OK} key. Searching to select a registered fax destination by user code A Press [Search]. B Select [Search by User Code] us- ing {U} or {T }, and then press the {OK} key. 61 - Ricoh 2020D | Settings Guide - Page 74
the user code of the destination you want delete using the number keys, and then press the {OK} or {#} key. E Select the destination you want to delete using {U} or {T}, and then press the {OK} key. 3 D Press the {OK} or {#} key. Searching to select a registered fax destination by e-mail address - Ricoh 2020D | Settings Guide - Page 75
the {Clear/Stop} key, and then press the {OK} key. K Press the {Cancel} key. L Press the {OK} key. The "Programmed" message appears, and then the "Address Book" display returns. M Press the {User Tools/Counter} key. Fax Destination 3 63 - Ricoh 2020D | Settings Guide - Page 76
if you register "User (Desti- 3 nation) Name" for the e-mail destination. • You can register e-mail destinations as a group. • You can use the e-mail address as the sender address when sending scan files in scanner mode. If you do this, set a sender's password on the sender address to prevent use - Ricoh 2020D | Settings Guide - Page 77
can use the user name when selecting an address to send to. ❒ You can register the user code after the user name. For details, see p.45 "User Code (MFP } key. Registering a sender's password Note ❒ You can stop sender's names be- ing accessed by setting a sender's password. ❒ This function is not - Ricoh 2020D | Settings Guide - Page 78
keys, and then press the {OK} key. B Enter the sender's password using the number keys, and Searching to select a registered 3 then and then the "Address Book" display returns. M Press the {User Tools/Counter} key. Changing a Registered E-mail Destination A Press the {User Tools/Counter} key. - Ricoh 2020D | Settings Guide - Page 79
{OK} or {#} key. D Press the {OK} key. 3 Searching to select a registered e-mail destination by user code A Press [Search]. B Select [Search by User Code] using {U} or {T }, and then press the {OK} key. C Enter the user code of the destination you want change using the number keys, and then press - Ricoh 2020D | Settings Guide - Page 80
User Tools (System Settings) Searching to select a registered e-mail destination by fax number A Press number keys, and then press the {OK} key. D Press the {OK} key. C Enter the e-mail address of the destination you want to change using the number keys and the Quick Dial keys, and then press the - Ricoh 2020D | Settings Guide - Page 81
E-mail Destination 3 the {OK} key. K A When using the e-mail address as Press the {User Tools/Counter} key. a sender, select [On] using {U} or {T}, and Quick Dial keys, and then press the {OK} key. M Enter the sender's password us- ing the number keys, and then press the {OK} key. Searching to - Ricoh 2020D | Settings Guide - Page 82
User Tools (System Settings) C Enter the characters of the destination you want to delete using the number keys and the Quick Dial keys, and then press - Ricoh 2020D | Settings Guide - Page 83
{T }, and then press the {OK} key. C Enter the user code of the destination you want delete using the number keys, and destination by e-mail address A Press [Search]. B Select [Search by E-mail Address] using {U} or {T}, and then press the {OK} key. C Enter the e-mail address of the destination you - Ricoh 2020D | Settings Guide - Page 84
{OK} key. L Press the {Cancel} key. M Press the {OK} key. The "Programmed" message appears, and then the "Address Book" display returns. N E Select the destination you Press the {User Tools/Counter} key. want to delete using {U} or {T}, and then press the {OK} 3 key. G Press the {OK} key - Ricoh 2020D | Settings Guide - Page 85
to a group to easily control registered fax, e-mail and folders for each group. To group destinations, the groups must be Note ❒ You can register up to 10 groups. 3 Registering a New Group A Press the {User Tools/Counter} key. E Select [Program/Change] using {U} or {T}, and then press the {OK} - Ricoh 2020D | Settings Guide - Page 86
OK} key. Registering a Destination to a Group 3 A Press the {User Tools/Counter} key. Reference For details about entering text, B Select Operator Tools] using {U} or {T}, and then press the {OK} key. D Select [Address Book Management] using {U} or {T}, and then press the {OK} key. E Select [ - Ricoh 2020D | Settings Guide - Page 87
L Press the {OK} key. The "Programmed" message appears, and then the "Address Book" display returns. M Press the {User Tools/Counter} key. Deleting a Destination from a Group A Press the {User Tools/Counter} key. B Select [System Settings] using {U} or {T}, and then press the {OK} key. C Select [Key - Ricoh 2020D | Settings Guide - Page 88
and then press the {OK} key. Searching to select a destination registered in a group by user code A Press [Search]. B Select [Search by User Code] using {U} or {T }, and then press the {OK} key. C Enter the user code of the destination you want to delete using the number keys, and then press the - Ricoh 2020D | Settings Guide - Page 89
want to delete using {W}, and then press the {OK} key. K Press the {Cancel} key. L Press the {OK} key. The "Programmed" message appears, and then the "Address Book" display returns. M Press the {User Tools/Counter} key. 77 - Ricoh 2020D | Settings Guide - Page 90
(System Settings) Displaying the Destinations Registered in Groups A Press the {User Tools/Counter} key. B Select [System Settings] using {U} or {T}, and then press the {OK} key. 3 C Select [Key Operator Tools] using {U} or {T}, and then press the {OK} - Ricoh 2020D | Settings Guide - Page 91
to a Group C Select the group you want to display using {U} or {T}, and then press the {OK} key. Changing a Group Name A Press the {User Tools/Counter} key. B Select [System Settings] using {U} or {T}, and then press the {OK} key. C Select [Key Operator Tools] using Searching to select - Ricoh 2020D | Settings Guide - Page 92
User Tools (System Settings) C Enter the characters of the destination you want to change using the number keys and the Quick Dial text, see p.95 "Entering Text". H Press the {OK} key. The "Programmed" message appears, and then the "Group" display returns. I Press the {User Tools/Counter} key. 80 - Ricoh 2020D | Settings Guide - Page 93
Deleting a Group A Press the {User Tools/Counter} key. B Select [System Settings] using {U} or {T}, and then press the {OK} key. C Select [Key Operator Tools] using {U} or {T}, and then press the {OK} - Ricoh 2020D | Settings Guide - Page 94
User Tools (System Settings) C Select the group you want to delete using {U} or {T}, and then press the {OK} key. 3 Press the {OK} key. A confirmation message appears. G Press [Yes]. The "Deleted." message appears, and then the "Group" display returns. H Press the {User Tools/Counter} key. 82 - Ricoh 2020D | Settings Guide - Page 95
appear, follow the instructions displayed. Note ❒ For further "Troubleshooting", refer to the other manuals for this machine. See p.i "Manuals for This Machine". Problem Causes Solutions "Please wait." appears. This message appears Wait for the machine to get ready. when you turn on the oper - Ricoh 2020D | Settings Guide - Page 96
Troubleshooting Problem Causes Solutions The main power indicator continues blinking and does not turn side up, and bypass tray with the print side down. Misfeeds occur frequently. The tray's side fences may Check the side for duplex in copier mode or with the printer printing. driver. [Off] - Ricoh 2020D | Settings Guide - Page 97
paper. Important ❒ When clearing misfeeds, do not turn off the power switch. If you do, your If paper misfeeds occur repeatedly, contact your service representative. Note ❒ More than one misfeed paper inside the right cover. ❒ When the machine instructs you to reset originals, reset them in the - Ricoh 2020D | Settings Guide - Page 98
Troubleshooting 4 86 - Ricoh 2020D | Settings Guide - Page 99
x Clearing Misfeeds 4 87 - Ricoh 2020D | Settings Guide - Page 100
Troubleshooting Changing the Paper Size Preparation Be sure to select the paper size with User Tools and the paper size selector. If you do not, misfeeds might occur. See p.30 "Tray Paper Size: Tray 1-4". Reference For details about paper sizes - Ricoh 2020D | Settings Guide - Page 101
paper size. ZENY390E F Push the metal plate down. Important ZENY320E 4 ❒ When setting small quantities of copy paper, be careful not to squeeze in the side fence too much or paper will not feed in properly. I Press down the lock button. ZENY300E G Square the paper and set it in the tray - Ricoh 2020D | Settings Guide - Page 102
Troubleshooting Changing the Paper Size in the Optional Paper Tray Unit E While pressing the release lever, adjust the side fences. A Make sure the paper tray is not in use. B Pull out the paper tray until it stops. Note ❒ Remove any remaining copy paper. 4 C F While - Ricoh 2020D | Settings Guide - Page 103
Important ❒ When setting small quantities of copy paper, be careful not to squeeze in the side fence too much or paper will not feed in properly. H Press down the lock button. I Adjust the tray size to the new pa- per size - Ricoh 2020D | Settings Guide - Page 104
Troubleshooting 4 92 - Ricoh 2020D | Settings Guide - Page 105
/Counter} key. Changing the Language You can change the language used on the display. English is set as default. A Press the {User Tools/Counter} key. On Hook Dial Pause/ Redial AAH011S B Select [Counter] using {U} or {T}, and then press the {OK} key. On Hook Dial Pause/ Redial AAH011S B - Ricoh 2020D | Settings Guide - Page 106
Other Functions 5 94 - Ricoh 2020D | Settings Guide - Page 107
6. Entering Text Entering Text This section describes how to enter characters. When you enter a character, it appears at the cursor position. If there is a character already at the cursor position, the newly entered character appears before it. Available Characters • Alphabetic characters - Ricoh 2020D | Settings Guide - Page 108
Entering Text Entering letters A Press the {Shift} key to switch be- tween uppercase and lowercase. B Select the desired symbol using the cursor keys, and then press the {OK} key. Search Check Job Destination Destination Information 01 ABC 05 MNO 09 YZ 13 02 03 DEF 06 GHI 07 PQR 10 @@.. - Ricoh 2020D | Settings Guide - Page 109
through the network. To protect documents from such intrusion, not only can passwords be administrating document security using an access code. See p.34 "Key Operator Code". Extended Security Function Note ❒ When the Extended Security function is on, delivery server settings cannot be changed. Turn - Ricoh 2020D | Settings Guide - Page 110
Security A Press the {User Tools/Counter} key. On Hook Dial Pause/ Redial AAH011S B Select [System Settings] using {U} or {T}, and [On] using {U} or {T}, and then press the {OK} key. The"Programmed"message appears, and then the "User Tools" display returns. F Press the {User Tools/Counter} key. 98 - Ricoh 2020D | Settings Guide - Page 111
for Admin is not available when the Extended Security function is on. • User code is a function to help manage the use of the machine. It is not to protect confidential documents from others. See p.45 "User Code (MFP)". For User • Before scanning originals using the scanner function - Ricoh 2020D | Settings Guide - Page 112
Security 7 100 - Ricoh 2020D | Settings Guide - Page 113
8. Specifications Main Unit ❖ Configuration: Desktop ❖ Photosensitivity type: OPC drum ❖ Original scanning: One-dimensional solid scanning system through CCD ❖ Copy process: Dry electrostatic transfer system ❖ Development: Dry two-component magnetic brush development system ❖ Fusing: Heating roll - Ricoh 2020D | Settings Guide - Page 114
Specifications • Bypass (custom size): Vertical: 90 - 305 mm, 3.5" - 12.0" Horizontal: 148 - 1,260 mm, 5.8" - 49.6" • Duplex unit: A3L - A5KL, 11" × 90 g/m2, 16 - 24 lb • Bypass tray: 52 - 162 g/m2, 14 - 43 lb • Duplex unit: 64 - 90 g/m2, 20 - 24 lb ❖ Non-reproduction area: • Leading edge: 2 ± 1.5 - Ricoh 2020D | Settings Guide - Page 115
than 1,280 W *1 Main unit with the optional ARDF, fax unit, printer/scanner unit, and paper tray unit. ❖ Dimensions (W × D • Sound pressure level *2 Main unit only Complete system *3 Stand-by 26 The Complete system consists of a main unit with full options installed. ❖ Weight: Type 1: 35 kg - Ricoh 2020D | Settings Guide - Page 116
Specifications ❖ Duplex unit (Type 3 only) • Paper size: A3L, B4JISL, A4KL, B5JISKL, A5KL, 11" × 17"L, 81/2" × 14"L, 8 1/2" × 13"L, 8 1/4" × 13"L, 8" × 13"L, 8 1/2" × 11"KL, 7 1/4" × 10 1/2" KL, 8KL, 16KKL • Paper weight: 64 - 90 g/m2 (20 - 24 lb) 8 104 - Ricoh 2020D | Settings Guide - Page 117
ADF mode ❖ Original size: • A3L - A5KL • 11" × 17"L - 51/2" × 81/2"KL ❖ Original weight: • One-sided originals: 52 - 105 g/m2 (14 - 28 lb) ❖ Number of originals to be set: • 30 sheets (80 g/m2, 20 lb) ❖ Maximum power consumption: • less than 25 W (power is supplied from the main unit.) ❖ Dimensions - Ricoh 2020D | Settings Guide - Page 118
Specifications Auto Document Feeder capable of scanning both sides of a sheet (ARDF) ❖ Original size: • A3L - A5KL • 11" × 17"L - 51/2" × 81/2"KL ❖ Original weight: • One-sided originals: 40 - 128 g/m2 (11 - 34 lb) • Two-sided originals: 52 - 105 g/m2 (14 - 28 lb) (Duplex) ❖ Number of originals - Ricoh 2020D | Settings Guide - Page 119
: 222 × 478 × 104 mm Tray: 335 × 390 × 26 mm ❖ Weight: 2 kg (4 lb) or less Note ❒ Specifications are subject to change without notice. Paper Tray Unit (1-tray type) ❖ Paper weight: 60 - 105 g/m2 (16 - 28 lb.) ❖ Paper size: A3L, B4 JISL, A4KL, B5 JISKL, A5L, 11" × 17"L, 81/2" × 14"L, 81/2" × 13 - Ricoh 2020D | Settings Guide - Page 120
Specifications Paper Tray Unit (2-tray type) ❖ Paper weight: 60 - 105 g/m2 (16 - 28 lb.) ❖ Paper size: A3L, B4 JISL, A4KL, B5 JISKL ❖ Dimensions (W × D × H): 550 × 520 × 271 mm, 21.7" × 20.5" × 10.7" ❖ Weight: 25 kg (55 lb) or less Note ❒ Specifications are subject to change without notice. 8 108 - Ricoh 2020D | Settings Guide - Page 121
KL, 51/2" × 81/2"K, 8KL *3 , 16KKL *4 Paper weight 60 - 90 g/m2, 16 - 24 lb Paper capacity 250 sheets *1 Paper tray unit (optional) Note ❒ You can specify the paper size with the user tools or the paper size selector. See p.88 "Changing the Paper Size". A3L , B4JISL , A4KL , B5JISKL , A5L , 11 - Ricoh 2020D | Settings Guide - Page 122
Specifications Bypass Standard tray Sizes Metric version Inch version Paper weight A3L , B4JISL A4KL, Important ❒ If you use damp or curled paper, a misfeed might occur. In such a case, try turning over the paper stack in the paper tray. If there is no improvement, change to copy paper with - Ricoh 2020D | Settings Guide - Page 123
Copy Paper Reference To add paper, see Copy Reference. To change the paper size, see p.88 "Changing the Paper Size". Unusable Paper R CAUTION: • Do not use aluminum foil, carbon paper, - Ricoh 2020D | Settings Guide - Page 124
Specifications Paper Storage Note ❒ When storing paper, the following precautions should always be followed: • Do not store paper where it will be exposed to direct sunlight. • - Ricoh 2020D | Settings Guide - Page 125
reset timer, 32 copier, 33 facsimile, 33 scanner, 33 B Bypass tray, 12 C Changing a group name, 79 Changing a registered e-mail destination, 66 Changing a registered fax destination, 57 Changing a User Code, 46 Changing a user code, 40 Changing default settings, 26 Changing modes, 19 Changing the - Ricoh 2020D | Settings Guide - Page 126
73 Registering sender information, 44 Right cover, 12 S Security, 97 Set date, 33 Set time, 33 Settings you can change with user tools, 28 Specifications, 101 Symbols, 96 System Auto Reset Timer, 32 System reset, 20 T Timer settings, 32 Tray paper settings, 30 Tray paper size, 30 Troubleshooting, 83 - Ricoh 2020D | Settings Guide - Page 127
U Unusable paper, 111 User code (for machine with copier function only), 39 User Code Management, 34 User code (MFP), 45 User Tools Menu (System Settings), 23 V Ventilation holes, 11 115 - Ricoh 2020D | Settings Guide - Page 128
116 - Ricoh 2020D | Settings Guide - Page 129
Declaration of Conformity "The Product complies with the requirements of the EMC Directive 89/336/EEC and its amending directives and the Low Voltage Directive 73/23/EEC and its amending directives." In accordance with IEC 60417, this machine uses the following symbols for the main power switch: a - Ricoh 2020D | Settings Guide - Page 130
Operating Instructions General Settings Guide GB GB B259-6500
-
 1
1 -
 2
2 -
 3
3 -
 4
4 -
 5
5 -
 6
6 -
 7
7 -
8
-
9
-
10
-
11
-
12
-
13
-
14
-
15
-
16
-
17
-
18
-
19
-
20
-
21
-
22
-
23
-
24
-
25
-
26
-
27
-
28
-
29
-
30
-
31
-
32
-
33
-
34
-
35
-
36
-
37
-
38
-
39
-
40
-
41
-
42
-
43
-
44
-
45
-
46
-
47
-
48
-
49
-
50
-
51
-
52
-
53
-
54
-
55
-
56
-
57
-
58
-
59
-
60
-
61
-
62
-
63
-
64
-
65
-
66
-
67
-
68
-
69
-
70
-
71
-
72
-
73
-
74
-
75
-
76
-
77
-
78
-
79
-
80
-
81
-
82
-
83
-
84
-
85
-
86
-
87
-
88
-
89
-
90
-
91
-
92
-
93
-
94
-
95
-
96
-
97
-
98
-
99
-
100
-
101
-
102
-
103
-
104
-
105
-
106
-
107
-
108
-
109
-
110
-
111
-
112
-
113
-
114
-
115
-
116
-
117
-
118
-
119
-
120
-
121
-
122
-
123
-
124
-
125
-
126
-
127
-
128
-
129
-
130
 |
 |

Operating Instructions
General Settings Guide
Read this manual carefully before you use this machine and keep it handy for future reference. For safe and correct use, be sure to read the Safety
Information in the "Copy Reference" before using the machine.
Getting Started
Combined Function Operations
User Tools (System Settings)
Troubleshooting
Other Functions
Entering Text
Security
Specifications