Ricoh 406117 Setup Guide
Ricoh 406117 - Aficio SP C210 Color Laser Printer Manual
 |
UPC - 026649061172
View all Ricoh 406117 manuals
Add to My Manuals
Save this manual to your list of manuals |
Ricoh 406117 manual content summary:
- Ricoh 406117 | Setup Guide - Page 1
® USB Windows® Parallel Installing the Drivers & Software Quick Setup Guide SP C210SF Before you can use the machine, you must set up the hardware and install the software. Please read this "Quick Setup Guide" for the correct setup procedure and installation instructions. Step 1 Setting Up - Ricoh 406117 | Setup Guide - Page 2
or serious injury. Caution Indicates a potentially hazardous situation which, if instructions are not followed, may result in minor or moderate injury or damage not compatible with the machine. Note User's Guide Indicates notes and useful tips to Indicates reference to the User's remember when - Ricoh 406117 | Setup Guide - Page 3
Document Output Support Flap Quick Setup Guide CD-ROM User's Guide OPC Belt Cartridge AC Power Cord Telephone Line Cord Toner Cartridges ( cable at this time. Connecting the interface cable is done during the software installation process. ■ USB interface cable Please make sure you use a USB 2.0 - Ricoh 406117 | Setup Guide - Page 4
telephone keys 6 Dial Pad 9 Navigation keys 12 Shift key For the details of the control panel, see "Control panel overview" in Chapter 1 of the User's Guide. ■ This machine is heavy and weighs approximately 76.7 lb (34.8 kg). To prevent injuries, use at least two people to lift the machine. ■ When - Ricoh 406117 | Setup Guide - Page 5
Install the Toner cartridges 4 2. Remove the protective parts of the Fusing Unit 5 3. Install the OPC Belt Cartridge 6 4. Load Paper in the Paper Tray 7 5. Install Language 11 10. Setting the LCD Contrast 11 Step 2 Installing the Drivers & Software Supplied CD-ROM "Multi-Function Suite 12 For - Ricoh 406117 | Setup Guide - Page 6
the interface cable. Connecting the interface cable is done when installing the driver. 1 Remove the protective tape. 5 Carefully pull the protective part out of the machine. 2 Open the front cover. 6 Rock the toner cartridge 3 to 4 times. Front cover 3 Remove the protective part. 7 Pull - Ricoh 406117 | Setup Guide - Page 7
Setting Up the machine Windows® USB Windows® Parallel 8 Install the toner cartridge by sliding it into the correct guide. Match the cartridge color label to the corresponding label on the machine. 2 Remove the protective parts of the Fusing Unit 1 Open the back cover (1) and - Ricoh 406117 | Setup Guide - Page 8
Step 1 Setting Up the machine 3 Install the OPC Belt Cartridge 4 Put the OPC belt cartridge into the machine guides with the flat side facing you. Do NOT touch the green surface of the OPC belt cartridge or expose it to bright room light or - Ricoh 406117 | Setup Guide - Page 9
. Maximum paper mark 2 While pressing the paper guide release lever, slide the adjusters to fit the paper size. Check that the guides are firmly in the slots. Paper guide 5 Put the paper tray firmly back in the machine. Output paper tray support flap Paper guide 3 Fan the stack of paper well to - Ricoh 406117 | Setup Guide - Page 10
Step 1 Setting Up the machine 5 Install the Power Cord and Phone Line Do not connect the more details, see "Connecting an external telephone answering device (TAD)" in Chapter 3 of the User's Guide. Warning ■ The machine must be grounded using a 3-prong plug. ■ Since the machine is grounded - Ricoh 406117 | Setup Guide - Page 11
Two Three Four key time times times times 2 A B C 2 3 D E F 3 4 G H I 4 5 J K L 5 6 M N O 6 7 P Q R S 8 T U V 8 9 W X Y Z For more details, see "Entering Text" in Appendix B of the User's Guide. 7 Press Stop/Exit. Windows® Network For Network Users 9 - Ricoh 406117 | Setup Guide - Page 12
If the call is not a fax, the machine will ring for you to pick up the call. Manual You control the phone line and must answer every call yourself. Yes External TAD Your external telephone answering . to select the mode. For more details, see "Receiving a fax" in Chapter 6 of the User's Guide. 10 - Ricoh 406117 | Setup Guide - Page 13
. -OR- Press to decrease the contrast. Press Menu/Set. 5 Press Stop/Exit. Windows NT® 4.0 Parallel Windows® Network For Network Users Go to Next page to install the drivers & software 11 - Ricoh 406117 | Setup Guide - Page 14
Suite and multifunction drivers. Install Optional Applications You can install additional Multi-Function Suite software utilities. Documentation*1 View the User's Guide and other documentation in PDF format (Viewer included). Multi-Function Suite includes Printer Driver, Scanner Driver, ScanSoft - Ricoh 406117 | Setup Guide - Page 15
Setting Up the machine Windows® USB Windows® Parallel Windows NT® 4.0 Parallel Step 2 Installing the Drivers & Software Follow the instructions on this page for your operating system and interface cable. USB Interface Cable Users Go to page 14 (For Windows® 98/98SE/Me/2000 Professional/ - Ricoh 406117 | Setup Guide - Page 16
Step 2 Installing the Drivers & Software For USB Interface Cable Users (For Windows® 98/98SE/Me/2000 Professional/XP) Make sure that you have completed the instructions from Step 1 "Setting Up the machine" on pages 4 - 11. Please close any applications running before installing the Multi-Function - Ricoh 406117 | Setup Guide - Page 17
the drivers will automatically start. The screens appear one after another. Please wait, it will take a few seconds for all the screens to appear. DO NOT try to cancel any of the screens during this installation. 0 When the On-Line Registration screen is displayed, follow the on-screen instructions - Ricoh 406117 | Setup Guide - Page 18
to restart your computer. (After restarting the computer, for Windows® 2000 Professional/XP, you must be logged on with Administrator rights.) The Multi-Function Suite, Printer Driver and Scanner driver have been installed and the installation is now complete. 16 - Ricoh 406117 | Setup Guide - Page 19
Setting Up the machine Windows® USB Installing the Drivers & Software Windows® Parallel For Parallel Interface Cable Users (For Windows® 98/98SE/Me/2000 Professional/XP) Make sure that you have completed the instructions from Step 1 "Setting Up the machine" on pages 4 - 11. Please close any - Ricoh 406117 | Setup Guide - Page 20
of the drivers will automatically start. The screens appear one after another. DO NOT try to cancel any of the screens during this installation. A When the On-Line Registration screen is displayed, follow the on-screen instructions. We recommend that you connect the machine directly to your - Ricoh 406117 | Setup Guide - Page 21
Follow the instructions on the screen. (For Windows® 2000 Professional/XP, you must be logged on with Administrator rights.) D For Windows® 2000 Professional users, if the Digital Signature Not Found dialog boxes appear, click Yes to install the drivers. The Multi-Function Suite, Printer driver and - Ricoh 406117 | Setup Guide - Page 22
Step 2 Installing the Drivers & Software For Windows NT® Workstation Version 4.0 Users Make sure that you have completed the instructions from Step 1 "Setting Up the machine" on pages 4 - 11. Please close any applications running before installing the Multi-Function Suite. 1 Turn off and unplug - Ricoh 406117 | Setup Guide - Page 23
on-screen instructions. A When the following screen appears, click Finish and wait as the PC restarts Windows® and continues the installation. (You must be logged on with Administrator rights.) The Multi-Function Suite, Printer driver and Scanner driver have been installed and the installation is - Ricoh 406117 | Setup Guide - Page 24
Step 2 Installing the Drivers & Software For Network Interface Cable Users (For Windows® 98/98SE/Me/NT/2000 Professional/XP) Make sure that you have completed the instructions from Step 1 "Setting Up the machine" on pages 4 - 11. 1 Turn off and unplug the machine from AC outlet. 2 Connect the - Ricoh 406117 | Setup Guide - Page 25
-screen instructions. The Multi-Function Suite, Network Printer driver, Network Scanner driver have been installed and the installation is now complete. ■ For Network installations, the Repair Multi-Function Suite selection from the main menu is not supported. ■ Network Scanning is not supported in - Ricoh 406117 | Setup Guide - Page 26
manage devices from other manufacturers whose products support SNMP (Simple Network Management Protocol). 1 Insert the supplied CD-ROM into your CD-ROM drive. The opening screen will appear automatically. Follow the on-screen instructions. 2 Click the Install Optional Applications icon on the main - Ricoh 406117 | Setup Guide - Page 27
then click the OK button. 5 The address information will be saved to the machine. For more information on network administration, please see the Network User's Guide in the programs menu. Windows® Parallel Windows NT® 4.0 Parallel Windows® Network For Network Users 25 - Ricoh 406117 | Setup Guide - Page 28
supplied by us. When you expand the total memory capacity to 576 MB, install the following type of memory module. Module Type: SO-DIMM (Small Outline Dual be indicated on the LCD. Toner Cartridges Waste Toner Pack LP Toner Cassette Type 140 / Type 140LY Waste Toner Bottle Type 140 Black, Cyan, - Ricoh 406117 | Setup Guide - Page 29
in the U.S. and other countries. PaperPort and OmniPage are registered trademarks of Nuance Communications Inc. Each company whose software title is mentioned in this manual has a Software License Agreement specific to its proprietary programs. All other brand and product names mentioned in this - Ricoh 406117 | Setup Guide - Page 30
EN USA G157-3005 - Ricoh 406117 | Setup Guide - Page 31
User's Guide Read this manual carefully before you use this machine and keep it handy for future reference. For safe and correct use, be sure to read the Important Information in this manual before using the machine. - Ricoh 406117 | Setup Guide - Page 32
Quick Reference Guide Sending Faxes Automatic Transmission 1 If it is not illuminated in blue, press (Fax). 2 Load your document. 3 Enter the fax number using One-Touch, Speed-Dial, - Ricoh 406117 | Setup Guide - Page 33
Using Search 1 If it is not illuminated in blue, press (Fax). 2 Load your document. 3 Press Search/Speed Dial, and then enter the first letter of the name you're looking for. 4 Press or to search the memory. 5 Press Black Start. ▲ ▲ Making copies Single copy 1 Press blue. (Copy) to illuminate - Ricoh 406117 | Setup Guide - Page 34
Information Using this Guide 1-1 Finding information 1-1 Symbols used in this Guide 1-1 How to access the complete User's Guide 1-2 To view lines 3-3 Two-line phone system 3-3 Converting telephone wall outlets 3-4 Installing machine, external two-line TAD and two-line telephone 3-4 Multi - Ricoh 406117 | Setup Guide - Page 35
from the ADF 5-1 Sending a fax from the scanner glass 5-1 Canceling a fax in progress 5-2 Dual Access 5-2 Sending a fax manually 5-3 Manual transmission 5-3 Sending a fax at the end of a conversation 5-3 Out of Memory message 5-3 Broadcasting ...5-4 Additional Sending Operations 5-5 Sending - Ricoh 406117 | Setup Guide - Page 36
Tel mode only 6-7 7 Dialing and phone options How to dial...7-1 Manual dialing 7-1 One-Touch Dialing 7-1 Speed-Dialing 7-1 Search ...7-2 Fax Redial codes and credit card numbers 7-6 Tone or Pulse 7-6 Phone line services 7-6 Distinctive Ring 7-6 Caller ID...7-8 8 Remote Fax Options Fax - Ricoh 406117 | Setup Guide - Page 37
and FCC Notices These notices are in effect on models sold and used in the United States only A-1 Federal Communications Commission (FCC) Declaration of Conformity (USA only A-2 vi - Ricoh 406117 | Setup Guide - Page 38
safety instructions A-4 Choosing a location A-6 To use the machine safely A-7 Trademarks...A-10 B Menu and Features On-screen programming B-1 Menu table...B-1 Memory storage B-1 Menu keys ...B-2 Menu Table...B-3 Copy options key B-14 Entering Text ...B-15 C Troubleshooting and routine - Ricoh 406117 | Setup Guide - Page 39
Type 1000 D-1 Memory Unit Type C (64/128/256 MB D-3 Installing additional memory D-3 E Specifications Product description E-1 General ...E-1 Print media...E-2 Fax...E-3 Copier ...E-4 Scanner ...E-5 Printer ...E-6 Interfaces ...E-6 Computer requirements E-7 Consumable items E-8 Network (LAN - Ricoh 406117 | Setup Guide - Page 40
Section I 1. General Information 2. Loading paper and documents 3. Setup 4. Security features General SECTION I GENERAL - Ricoh 406117 | Setup Guide - Page 41
will be able to find information about a specific feature or operation by checking the Index at the back of this Guide. Symbols used in this Guide Throughout this Guide you will see special symbols alerting you to important warnings, notes and actions. Special fonts identify keys you should press - Ricoh 406117 | Setup Guide - Page 42
Click the documentation you want to read. • Quick Setup Guide: Setup and Software Installation Instructions • User's Guide (3 manuals): User's Guide for stand-alone operations, Software User's Guide and Network User's Guide • PaperPort® User's Guide: Document Management Software How to find Scanning - Ricoh 406117 | Setup Guide - Page 43
Chapter 1 Control panel overview 1 One-Touch Keys These 8 keys give you instant access to 16 previously stored numbers. 2 Shift To access One-Touch numbers 9 to 16, hold down Shift as you press the One-Touch key. 3 Copy keys (Temporary settings): Enlarge/Reduce Lets you reduce or enlarge copies - Ricoh 406117 | Setup Guide - Page 44
data saved in the machine's memory if you enter the four-digit password. (For details about using this feature, see Chapter 1 in the Software User's Guide on the CD-ROM.) @ Liquid Crystal Display (LCD) Displays messages on the screen to help you set up and use your machine. A Fax and telephone - Ricoh 406117 | Setup Guide - Page 45
line? If you have Voice Mail on the phone line where you will install your new machine, there is a strong possibility that Voice Mail and the service, which is called "Distinctive Ring", and they are very satisfied with it. (See Distinctive Ring on page 7-6.) Another way to avoid possible problems - Ricoh 406117 | Setup Guide - Page 46
General Information Fax tones and handshake When someone is sending a fax, the fax machine sends fax calling tones (CNG tones). These are quiet, intermittent beeps every 4-seconds. You'll hear them after you dial and press Black Start and they will continue for about 60 seconds after dialing. - Ricoh 406117 | Setup Guide - Page 47
105 g/m2) into the optional lower tray unit. It may cause paper jams. Type and size of paper The machine loads paper from the installed standard paper or 80 g/m2). The maximum capacity is 1.76 in. (44 mm) paper height. The names for the paper trays in the machine driver and this Guide are as follows - Ricoh 406117 | Setup Guide - Page 48
to 250 sheets (20 lb or 80 g/m2) Up to 530 sheets (20 lb or 80 g/m2) Thick/Thicker paper Up to 40 sheets (44 lb or 165 g/m2) Up to 1.76 in. (44 mm) paper specifications are suitable for this machine. Basis weight (lb (g/m2)) Thickness (µm) Roughness (sec.) Stiffness (cm3/100) Grain direction - Ricoh 406117 | Setup Guide - Page 49
used in a color laser machine. ■ Preprinted paper must use inks that can withstand the temperature of the machine's fusing process (392 is coated or has a chemical finish ■ that is damaged, creased or folded ■ that exceeds the recommended weight specification in this guide ■ service agreement. 2 - 3 - Ricoh 406117 | Setup Guide - Page 50
Loading paper and documents Envelopes Most envelopes will be suitable for your machine. However, some envelopes will have feed and print-quality problems because of the way they have been made. A suitable envelope should have edges with straight, well-creased folds and the leading edge should not - Ricoh 406117 | Setup Guide - Page 51
you use any of the types of envelopes listed above, they may damage your machine. This damage is not covered under any our warranty or service agreement. Figure 2 Figure 3 2 - 5 - Ricoh 406117 | Setup Guide - Page 52
stick to the OPC belt or rollers and cause jams and print quality problems. No adhesive should be exposed between the labels. Labels should be exceed the paper weight specifications described in this User's Guide. Labels and transparencies exceeding this specification may not feed Service. 2 - 6 - Ricoh 406117 | Setup Guide - Page 53
Chapter 2 Printable area The edges of the paper that cannot be printed on are shown below. Portrait 1 2 4 3 For all available paper sizes 1 0.17 in. (4.2 mm) 2 0.17 in. (4.2 mm) 3 0.17 in. (4.2 mm) 4 0.17 in. (4.2 mm) Landscape 1 2 4 3 For all available paper sizes 1 0.17 in. (4.2 mm) 2 0.17 - Ricoh 406117 | Setup Guide - Page 54
manually set the paper size in the Small Paper setting. (See Paper Size on page 3-9.) ■ If your application software supports not support it, you can set the paper size in the printer driver or the paper guide release lever, slide the adjusters to fit the paper size. Check that the guides are firmly - Ricoh 406117 | Setup Guide - Page 55
before you use the machine. Output paper tray support flap Note When you put paper in the paper tray, please remember the following: ■ Check that the paper is flat in the tray and below the maximum paper mark, and that the paper guides are touching the sides of the paper stack. ■ The - Ricoh 406117 | Setup Guide - Page 56
. Use standard 20 lb (80 g/m2) paper and always fan the pages before cardboard, newspaper or fabric. ■ Make sure documents written with ink are completely dry. ■ Documents to be faxed must be from paper guides to fit the width of 2 your documents. 3 Unfold the ADF document output support flap. - Ricoh 406117 | Setup Guide - Page 57
Chapter 2 Using the scanner glass You can use the scanner glass to fax, copy or scan pages of a book or one page at a time. Documents can be up to 8.5 in. (215.9 mm) wide and 11 in. (297 mm) long. Note To use the scanner glass, the ADF must be empty. 1 Lift the document cover. 2 Using the document - Ricoh 406117 | Setup Guide - Page 58
3 Setup Date and Time When the machine is not in use it will display the date and time. If you set up the Station ID the date and time displayed by your machine will be printed on every fax you send. If there is a power failure, you may have to reset the date and time. No other settings will be - Ricoh 406117 | Setup Guide - Page 59
If the Station ID has already been programmed, the LCD will ask you to press 1 to make a change or 2 to exit without changing. NOTICE (For USA) The Telephone Consumer Protection Act of 1991 makes it unlawful for any person to use a computer or electronic device to send any message via a telephone - Ricoh 406117 | Setup Guide - Page 60
. Press Menu/Set. 3 Press Stop/Exit. Phone line settings Tone and Pulse dialing mode Your machine comes set for Tone dialing service. If you have Pulse dialing service (rotary), you need to change the dialing mode. 1 Press Menu/Set, 0, 4. Initial Setup 4.Tone/Pulse 2 Press ▲ or ▼ to select Pulse (or - Ricoh 406117 | Setup Guide - Page 61
the telephone company. You can change the wall outlets from one RJ14 jack to two RJ11 jacks. Or, you can have an RJ11 wall outlet installed and slave or jump one of the phone numbers to it. The third way is the easiest: Buy a triplex adapter. You can plug a triplex adapter - Ricoh 406117 | Setup Guide - Page 62
a PBX (Private Branch Exchange), we suggest that you contact the company that installed your telephone system and ask them to connect the machine for you. It is operator, it is recommended that the Receive Mode be set to Manual. All incoming calls should initially be regarded as telephone calls. - Ricoh 406117 | Setup Guide - Page 63
for the fax "handshake". Make sure you carefully follow the instructions in this guide for recording your outgoing message. We do not recommend using the If You Subscribe to your Telephone Company's Distinctive Ring Service: You may connect an external TAD to a separate wall jack only if - Ricoh 406117 | Setup Guide - Page 64
Code for people sending manual faxes. For example: "After the beep, leave a message or send a fax by pressing 51 and Start." Ecology 1.Toner Save 2 Press ▲ 3 Press Stop/Exit. Note We do not recommend Toner Save for printing photo or gray scale images. Note We recommend beginning your OGM with an - Ricoh 406117 | Setup Guide - Page 65
Chapter 3 Sleep Time Setting the Sleep Time reduces power consumption by turning off the fuser inside the machine while it is idle. You can choose how long the machine is idle (from 00 to 99 minutes) before it goes into sleep mode. The timer is automatically reset when the machine receives a Fax or - Ricoh 406117 | Setup Guide - Page 66
Setup Paper settings Paper Type To get the best print quality, set the machine for the type of paper you are using. 1 Press Menu/Set, 1, 2. General Setup 2.Paper Type -OR- If you have the optional paper tray, Press Menu/Set, 1, 2, 1 to set the paper type for Tray#1 or Menu/Set, 1, 2, 2 to set the - Ricoh 406117 | Setup Guide - Page 67
Chapter 3 Volume Settings Ring Volume You can turn the ring Off or you can select the ring volume level. 1 Press Menu/Set, 1, 4, 1. Volume 1.Ring 2 Press ▲ or ▼ to select Low, Med, High or Off. Press Menu/Set. 3 Press Stop/Exit. -OR- You can adjust the ring volume when your machine is idle - Ricoh 406117 | Setup Guide - Page 68
you have already set the password, you will not need to set it, again. ■ If you forget the Setting Lock password, please call Customer Service. 4 1 Press Menu/Set, 1, 8, 2. Security 2.Setting Lock 2 Enter a four-digit number for the password. Press Menu/Set. The LCD shows Verify: 3 Re-enter the - Ricoh 406117 | Setup Guide - Page 69
Chapter 4 Changing the Setting Lock password 1 Press Menu/Set, 1, 8, 2. 2 Press ▲ or ▼ to select Set Password. Press Menu/Set. 3 Enter the registered four-digit password. Press Menu/Set. 4 Enter a four-digit number for the new password. Press Menu/Set. 5 If the LCD shows Verify:, re-enter the new - Ricoh 406117 | Setup Guide - Page 70
you have already set the password, you will not need to set it, again. ■ If you forget the Memory Security password, please call Customer Service. 1 Press Menu/Set, 1, 8, 1. 4 Security 1.Mem Security 2 Enter a four-digit number for the password. Press Menu/Set. The LCD shows Verify: 3 Re-enter the - Ricoh 406117 | Setup Guide - Page 71
Chapter 4 Changing the Memory Security password 1 Press Menu/Set, 1, 8, 1. 2 Press ▲ or ▼ to select Set Password. Press Menu/Set. 3 Enter the registered four-digit password. Press Menu/Set. 4 Enter a four-digit number for the new password. Press Menu/Set. 5 If the LCD shows Verify:, re-enter the - Ricoh 406117 | Setup Guide - Page 72
Section II Fax & Telephone 5. Sending a fax 6. Receiving a fax 7. Dialing and phone options 8. Remote Fax Options 9. Printing reports 10. Polling SECTION II FAX & TELEPHONE - Ricoh 406117 | Setup Guide - Page 73
5 Sending a fax How to Fax Entering Fax mode Before sending faxes or changing fax send or receiving settings, make sure (Fax) is illuminated in blue. If it is not, press (Fax) to enter Fax mode. The default setting is Fax mode. Sending a fax from the ADF This is the easiest way to send a - Ricoh 406117 | Setup Guide - Page 74
5 Place the next page on the scanner glass. Set Next Page Then Press Set Press Menu/Set. The machine starts scanning the page. (Repeat Steps 4 and 5 for each additional page.) Note If the memory is full and you are faxing a single page, it will be sent in real time. Sending a fax Canceling a fax in - Ricoh 406117 | Setup Guide - Page 75
Chapter 5 Sending a fax manually Manual transmission Manual transmission lets you hear the dialing, ringing and fax-receiving tones while sending a fax. 1 If it is not illuminated in blue, press (Fax). 2 Load your - Ricoh 406117 | Setup Guide - Page 76
include Groups, One-Touch, Speed-Dial numbers and up to 50 manually dialed numbers in the same broadcast. Press Menu/Set between each of . 3 Enter a number using One-Touch, Speed-Dial, a Group number, Search or manual dialing using the dial pad. Press Menu/Set after each number. 4 After you have - Ricoh 406117 | Setup Guide - Page 77
Chapter 5 Additional Sending Operations Sending faxes using multiple settings When you send a fax you can choose any combination of these settings: cover page, contrast, resolution, overseas mode, delayed fax timer, polling transmission or real time transmission. 1 If it is not illuminated in blue, - Ricoh 406117 | Setup Guide - Page 78
3 Press ▲ or ▼ to select the resolution you want. Press Menu/Set. Note You can choose four different resolution settings for black & white faxes. Standard Fine S.Fine Photo Suitable for most typed documents. Good for small print and transmits a little slower than Standard resolution. Good for - Ricoh 406117 | Setup Guide - Page 79
Chapter 5 Sending in real time for the next fax only 1 If it is not illuminated in blue, press (Fax). 2 Press Menu/Set, 2, 2, 5. Setup Send 5.Real Time TX 3 Press ▲ or ▼ to select Next Fax:On (or Next Fax:Off). Press Menu/Set. Note In Real Time Transmission, the automatic redial feature does not - Ricoh 406117 | Setup Guide - Page 80
Sending a fax Delayed Faxing During the day you can store up to 50 faxes in the memory to be sent within 24 hours. These faxes will be sent at the time of day you enter in Step 4. 1 If it is not illuminated in blue, press (Fax). 2 Load your document. 3 Press Menu/Set, 2, 2, 3. Setup Send 3.Delayed - Ricoh 406117 | Setup Guide - Page 81
the receiving party's machine. Your Cover Page includes the name or number stored in the One-Touch or Speed-Dial memory. If you are dialing manually, the name is not shown on the Cover Page. The Cover Page shows your Station ID and the number of pages you are sending. (See - Ricoh 406117 | Setup Guide - Page 82
Composing your own comments You can set up two comments of your own. 1 If it is not illuminated in blue, press (Fax). 2 Press Menu/Set, 2, 2, 8. Setup Send 8.Coverpage Msg 3 Press ▲ or ▼ to choose 5 or 6 for your own comment. Press Menu/Set. 4 Use the dial pad to enter your customized comment. Press - Ricoh 406117 | Setup Guide - Page 83
Chapter 5 Using a printed cover page If you prefer to use a printed cover page that you can write on, you can print the sample page and attach it to your fax. 1 If it is not illuminated in blue, press (Fax). 2 Press Menu/Set, 2, 2, 7. Setup Send 7.Coverpg Setup 3 Press ▲ or ▼ to select Print Sample. - Ricoh 406117 | Setup Guide - Page 84
EXT jack of your machine. The External TAD setting works only with an external answering machine. Ring Delay does not work in this setting. Manual (manual receive) (with an external or extension telephone only) You control the phone line and must answer every call yourself unless you are using the - Ricoh 406117 | Setup Guide - Page 85
or ▼ to select Fax Only, Fax/Tel, External TAD or Manual. Press Menu/Set. 3 Press Stop/Exit. Current Receive Mode 12/10 subscribe to the telephone company's Distinctive Ring service, keep the Ring Delay setting of 4. ( machine answers (00 - 04). Press Menu/Set. (If you select 00, the line won't ring at all - Ricoh 406117 | Setup Guide - Page 86
Receiving a fax F/T Ring Time (Fax/Tel mode only) If you set the Receive Mode to Fax/Tel, you'll need to decide how long the machine will signal you with its special pseudo/double-ring when you have a voice call. (If it's a fax call, the machine receives the fax.) This pseudo/double-ring happens - Ricoh 406117 | Setup Guide - Page 87
Chapter 6 Printing a reduced incoming fax (Auto Reduction) If you choose On, the machine automatically reduces an incoming fax to fit on one page of Letter or A4 size paper. The machine calculates the reduction ratio by using the page size of the fax and size of the paper in your tray. 1 If it is - Ricoh 406117 | Setup Guide - Page 88
Receiving a fax Changing the remote codes The preset Fax Receive Code is 51. The preset Telephone Answer Code is #51. If you want to, you can replace them with your own codes. 1 If it is not illuminated in blue, press (Fax). 2 Press Menu/Set, 2, 1, 4. Setup Receive 4.Remote Codes 3 Press ▲ or ▼ to - Ricoh 406117 | Setup Guide - Page 89
Time (Fax/Tel mode only) on page 6-3.) If you answer a call and no one is on the line, you should assume that you're receiving a manual fax. ■ Press 51 and wait for the chirp or until the machine's LCD displays Receiving, and then hang up. You can also use the Easy - Ricoh 406117 | Setup Guide - Page 90
For Fax/Tel mode only When the machine is in Fax/Tel mode, it will use the F/T Ring Time (pseudo or double-ringing) to alert you to pick up a voice call. Lift the external telephone's handset, and then press Hook to answer. Using the remote codes If you hear the fax machine double-ringing when you - Ricoh 406117 | Setup Guide - Page 91
7 Dialing and phone options How to dial You can dial in any of the following ways. Manual dialing Press all of the digits of the fax number. Speed-Dialing Press Search/Speed Dial, #, and then the three-digit Speed-Dial number. (See - Ricoh 406117 | Setup Guide - Page 92
. (See Storing One-Touch Dial numbers on page 7-3 and Storing Speed-Dial numbers on page 7-4.) To search numerically Fax Redial If you are sending a fax manually and the line is busy, press Redial/Pause, and then press Black Start to try again. If you want to make a second call to the - Ricoh 406117 | Setup Guide - Page 93
Chapter 7 Storing numbers You can set up your machine to do following types of easy dialing: One-Touch, Speed-Dial and Groups for Broadcasting faxes. When you dial a quick-dial number, the LCD shows the number and the name, if you stored it. Note If you lose electrical power, the quick-dial numbers - Ricoh 406117 | Setup Guide - Page 94
Dialing and phone options Storing Speed-Dial numbers You can store Speed-Dial numbers, so that when you dial you will only have to press a few keys (Search/Speed Dial, #, the three-digit number, and Black Start). The machine can store 200 Speed-Dial numbers. 1 Press Menu/Set, 2, 3, 2. Set Quick- - Ricoh 406117 | Setup Guide - Page 95
Chapter 7 Setting up Groups for Broadcasting Groups, which can be stored on a One-Touch key or a Speed-Dial location, allow you to send the same fax message to many fax numbers by pressing only a One-Touch key and Black Start or Search/Speed Dial, #, the three-digit location and Black Start. First, - Ricoh 406117 | Setup Guide - Page 96
of the number with manual dialing using the service, but need to send Tone signals (for example, for telephone banking), follow the instructions below. If you have Touch Tone service service. Phone line services Your machine supports the Distinctive Ring and Caller ID subscriber telephone services - Ricoh 406117 | Setup Guide - Page 97
service before you program the machine to work with it. Do you have Voice Mail? If you have Voice Mail on the phone line that you will install your . Some ring patterns cannot be registered. The ring patterns below are supported by your machine. Register the one your telephone company gives you. - Ricoh 406117 | Setup Guide - Page 98
/Exit. Note If you turn off Distinctive Ring, the machine will stay in Manual receive mode. You will need to set the Receive Mode again. (See To feature lets you use the Caller ID subscriber service offered by many local telephone companies. This service displays the telephone number, or name if it - Ricoh 406117 | Setup Guide - Page 99
Chapter 7 ▲ Viewing Caller ID List Caller ID memory stores information for up to thirty calls. When the thirty-first call comes in, information about the first call is erased. You can scroll through Caller ID information to review those calls made to your machine. 1 Press Menu/Set, 2, 0, 3. - Ricoh 406117 | Setup Guide - Page 100
fax at your machine so you will have a copy. This is a safety feature in case there is a power failure before the fax is forwarded or a problem at the receiving machine. The machine can store faxes up to 60 hours if there is a power failure. 5 Press Stop/Exit. 8 8 - 1 - Ricoh 406117 | Setup Guide - Page 101
Chapter 8 Programming your pager number When Paging is selected, your machine dials the pager number you've programmed, and then dials your Personal Identification Number (PIN). This activates your pager so you will know that you have a fax message in the memory. 1 Press Menu/Set, 2, 5, 1. Remote - Ricoh 406117 | Setup Guide - Page 102
-FAX Receiving software running on your PC. (For details, see PC-FAX receiving in the Software User's Guide on the CD-ROM.) If you select Backup Print:On the machine will also print the fax. 1 Fax Receive is on. 8 ■ PC Fax Receive is not supported when the machine is connected on a network. 8 - 3 - Ricoh 406117 | Setup Guide - Page 103
Chapter 8 Changing Remote Fax Options If received faxes are left in your machine's memory when you change to another remote fax option, the LCD will ask you the following message: Erase All Fax? 1.Yes 2.No -OR- Print All Fax? 1.Yes 2.No ■ If you press 1, faxes in the memory will be erased or - Ricoh 406117 | Setup Guide - Page 104
times, if you enter an invalid command. 8 5 Press 9 0 to reset the machine when you've finished. 6 Hang up. Note If your machine is set to Manual mode and you want to use the remote retrieval features, you can access your machine by waiting about 2 minutes after it starts ringing, and then - Ricoh 406117 | Setup Guide - Page 105
Chapter 8 Remote commands Follow the commands below to access features when you are away from the machine. When you call the machine and enter your Remote Access Code (3 digits followed by ), the system will give two short beeps and you must enter a remote command. Remote commands Operation - Ricoh 406117 | Setup Guide - Page 106
Remote Fax Options Retrieving fax messages You can call your machine from any touch tone telephone or fax machine and have your fax messages sent to a fax machine. 1 Dial your fax number. 2 When your machine answers, immediately enter your Remote Access Code (3 digits followed by ). If you hear one - Ricoh 406117 | Setup Guide - Page 107
9 Printing reports Fax reports Fax reports (Transmission Verification and Fax Journal) can be printed automatically and manually. Transmission Verification Report You can use the Transmission Verification Report as proof that you sent a fax. This report lists the time and date of transmission - Ricoh 406117 | Setup Guide - Page 108
Additional reports Following reports are available: 1.Transmission Prints a Transmission Verification Report for your last transmission. 2.Help List Prints the Help List so you can see at-a-glance how to quickly program your machine. 3.Quick-Dial Lists names and numbers stored in the One-Touch and - Ricoh 406117 | Setup Guide - Page 109
10 Polling Polling Operation Polling is the process of retrieving faxes from another fax machine. You can use your machine to 'poll' other machines, or you can have someone poll your machine. Everyone who is involved in Polling needs to set up their fax machines for Polling. When someone polls your - Ricoh 406117 | Setup Guide - Page 110
Polled Transmit Polled Transmit is when you set up your machine to wait with a document so another fax machine can call and retrieve it. Setup for Polled Transmit 1 If it is not illuminated in blue, press (Fax). 2 Load your document. 3 Press Menu/Set, 2, 2, 6. Setup Send 6.Polled TX 4 Press ▲ or ▼ - Ricoh 406117 | Setup Guide - Page 111
Section III 11. Making copies Copy SECTION III COPY - Ricoh 406117 | Setup Guide - Page 112
' 11 Making copies How to copy You can use your machine as a copier, making up to 99 copies at a time. Entering Copy mode Before making copies, make sure that (Copy) is illuminated in blue. If it is not, - Ricoh 406117 | Setup Guide - Page 113
same size, Auto will allow your machine to take paper from Tray #2 if Tray #1 is out of paper. To change the default setting follow the instructions below: Auto allows your machine to choose the paper from the optional Tray#2 when paper is out in Tray#11 or when the size of - Ricoh 406117 | Setup Guide - Page 114
the copy quality you want (Auto, Text or Photo). Press Menu/Set. 6 Press Black Start or Color Start. To change the default setting follow the instructions below: 1 Press Menu/Set, 3, 1. Copy 1.Quality 2 Press ▲ or ▼ to select Auto, Text or Photo. Press Menu/Set. 3 Press Stop/Exit. 11 - Ricoh 406117 | Setup Guide - Page 115
Enlarging or reducing the image copied You can select the following enlargement or reduction ratios. Custom(25-400%) allows you to enter a ratio from 25% to 400%. Press 100% Enlarge/Reduce 104% EXE→ LTR 141% A5→ A4 200% Custom(25-400%) 50% 70% 78% LGL→ LTR 83% LGL→ A4 85% LTR→ EXE 91% - Ricoh 406117 | Setup Guide - Page 116
Chapter 11 Making N in 1 copies or a poster (page layout) You can reduce the amount of copies by using the N in 1 copy feature. This allows you to copy two or four pages onto one page, allowing you to save paper. It is also possible to create a poster. When you use the Poster feature your machine - Ricoh 406117 | Setup Guide - Page 117
When using the ADF, insert document face up in the direction shown below. 2 in 1 (P) 2 in 1 (L) Making copies Poster(3 x 3) You can make a poster size copy of a photograph. 4 in 1 (P) 4 in 1 (L) When using the scanner glass, place document face down in the direction shown below. 2 in 1 (P) 2 in - Ricoh 406117 | Setup Guide - Page 118
copy. -OR- Press ▼ to make a darker copy. Press Menu/Set. 6 Press Black Start or Color Start. To change the default setting follow the instructions below: 1 Press Menu/Set, 3, 2. Copy 2.Brightness 2 Press ▲ to make a lighter copy. -OR- Press ▼ to make a darker copy. Press Menu/Set. 3 Press Stop - Ricoh 406117 | Setup Guide - Page 119
-OR- Press ▼ to decrease the contrast. Press Menu/Set. 6 Press Black Start or Color Start. To change the default setting follow the instructions below: 1 Press Menu/Set, 3, 3. Copy 3.Contrast 2 Press ▲ to increase the contrast. -OR- Press ▼ to decrease the contrast. Press Menu/Set. 3 Press Stop - Ricoh 406117 | Setup Guide - Page 120
either criminal or civil liability. This memorandum is intended to be a guide rather than a complete listing of every possible prohibition. In case of Deposit ■ Internal Revenue Stamps (canceled or uncanceled) ■ Selective Service or draft papers ■ Passports ■ United States/Canadian Postage Stamps ( - Ricoh 406117 | Setup Guide - Page 121
connected to a computer (for example, Printing and Scanning). ■ Printing (For Windows®, see Chapter 1 in the Software User's Guide on the CD-ROM.) ■ Scanning (For Windows®, see Chapter 2 in the Software User's Guide on the CD-ROM.) ■ ControlCenter2 (For Windows®, see Chapter 3 in the Software User - Ricoh 406117 | Setup Guide - Page 122
Section V Appendixes A. Important information B. Menu and Features C. Troubleshooting and routine maintenance D. Optional accessories E. Specifications F. Glossary SECTION V APPENDIXES - Ricoh 406117 | Setup Guide - Page 123
See installation instructions for installation of this equipment does not disable your alarm equipment. If you have questions about what will disable alarm equipment, call your telephone company or a qualified installer. If you are not able to solve a problem with your machine, call Customer Service - Ricoh 406117 | Setup Guide - Page 124
before servicing, modifying or installing the equipment. ■ This equipment may not be used on coin service lines provided USA only) Responsible Party: Ricoh Corporation Address: 5 Dedrick Place, West Caldwell, NJ 07006 Telephone number: 973-882-2000 declares, that the products Product Name: SP C210SF - Ricoh 406117 | Setup Guide - Page 125
power, consult a qualified electrician. Disconnect device This product must be installed near an AC power outlet that is easily accessible. In case of 1 laser product under the U.S. Department of Health and Human Services (DHHS) Radiation Performance Standard according to the Radiation Control for - Ricoh 406117 | Setup Guide - Page 126
manual may result in hazardous invisible radiation exposure. Internal laser radiation Max. Radiation Power 5 mW Wave Length 780 - 800 nm Laser Class Class 3B Important information Important safety instructions 1 Read all of these instructions a built-in installation unless proper ventilation - Ricoh 406117 | Setup Guide - Page 127
USA servicing to Service Personnel authorized by us under the following conditions: • When the power cord is damaged or frayed. • If liquid has been spilled into the product. • If the product has been exposed to rain or water. • If the product does not operate normally when the operating instructions - Ricoh 406117 | Setup Guide - Page 128
Important information Choosing a location Place your machine on a flat, stable surface that is free of vibration and shocks. Put the machine near a telephone wall jack and a standard, grounded AC power outlet. Choose a location where the temperature remains between 50°F and 90.5°F (10°C and 32.5°C) - Ricoh 406117 | Setup Guide - Page 129
Chapter A To use the machine safely Please keep these instructions for later reference and read them before attempting any maintenance. ICMAPUOTRIOTNANT There are high voltage electrodes inside the machine. Before you clean the inside of - Ricoh 406117 | Setup Guide - Page 130
off the power switch and unplug the machine from the AC power outlet. Call your dealer or Customer Service. ■ Do not put consumable items such as the toner cartridges and the waste toner pack into a fire. Some consumable items can be flammable under certain conditions. ■ Do not look directly at the - Ricoh 406117 | Setup Guide - Page 131
the machine horizontal when you carry it. ■ Use caution when installing or modifying telephone lines. Never touch telephone wires or terminals unplug the cords during a lightning storm. WARNING IMPORTANT SAFETY INSTRUCTIONS When using your telephone equipment, basic safety precautions should always - Ricoh 406117 | Setup Guide - Page 132
the U.S. and other countries. PaperPort and OmniPage are registered trademarks of Nuance Communications Inc. Each company whose software title is mentioned in this manual has a Software License Agreement specific to its proprietary programs. All other brand and product names mentioned in this User - Ricoh 406117 | Setup Guide - Page 133
offer. Since your programming is done on the LCD, we have created step-by-step on-screen instructions to help you program your machine. All you need to do is follow the instructions as they guide you through the menu selections and programming options. Menu table The Menu table that begins on page - Ricoh 406117 | Setup Guide - Page 134
Menu keys Access the menu Go to the next menu level Accept an option Scroll through the current menu level Go back to the previous menu level or forward to the next menu level Exit the menu .... Menu and Features You can access the menu mode by pressing Menu/Set. When you enter the menu, the LCD - Ricoh 406117 | Setup Guide - Page 135
Chapter B Menu Table Select & Set Select & Set to accept to exit Main Menu 1. General Setup Submenu Menu Selections Options Descriptions Page 1. Mode Timer - 5 Mins 2 Mins 1 Min 30 Secs 0 Sec Off Sets the time to return to 3-8 Fax mode. 2. Paper Type 1. Tray#1 Thin Sets the type of - Ricoh 406117 | Setup Guide - Page 136
Select & Set Select & Set to accept to exit Main Menu Submenu Menu Selections Options Descriptions Page 1. General Setup (Continued) 5. Auto Daylight 6. Ecology - On Off 1. Toner Save On Off Changes for Daylight 3-1 Savings Time automatically. Increases the page yield 3-7 of the - Ricoh 406117 | Setup Guide - Page 137
to accept to exit Main Menu 2. Fax Submenu 1. Setup Receive (In Fax mode only) 2. Setup Send (In Fax mode only) Menu Selections Options 1. Ring Delay 04 03 02 01 00 2. F/T Ring Time 70 Secs 40 Secs 30 Secs 20 Secs 3. Easy On Receive Off 4. Remote Codes On( 51, #51) Off 5. Auto - Ricoh 406117 | Setup Guide - Page 138
Menu and Features Select & Set Select & Set to accept to exit Main Menu Submenu Menu Selections Options Descriptions Page 2. Fax (Continued) 2. Setup Send 4. Batch TX On (In Fax mode Off only) (Continued) Combines delayed faxes 5-8 to the same fax number at the same time of day into - Ricoh 406117 | Setup Guide - Page 139
Chapter B Select & Set Select & Set to accept to exit Main Menu 2. Fax (Continued) Submenu 4. Report Setting 5. Remote Fax Opt (Backup print for Fax Forward/PC Fax Receive) 6. Remaining Jobs Menu Selections Options Descriptions Page 1. Transmission On On+Image Off Off+Image Initial setup - Ricoh 406117 | Setup Guide - Page 140
) 0. Miscellaneous 1. Compatibility High Normal Basic Adjusts the Equalization C-20 for transmission problems. 2. Distinctive Off Set (On) Uses the Telephone 7-8 Company's Distinctive Ring subscriber service to register the ring pattern with the machine. 3. Caller ID Display# Print - Ricoh 406117 | Setup Guide - Page 141
Chapter B Select & Set Select & Set Main Menu 4. Printer Submenu 1. Test Print 2. Reset Printer Menu Selections Options - - - - 3. Calibration - Calibrate Reset 5. Print 1. Transmission - - Reports 2. Help lists and reports. Page See Software User's Guide on the CD-ROM 9-2 B - 9 - Ricoh 406117 | Setup Guide - Page 142
-255]. [000-255]. [000-255]. [000-255] You can choose the BOOT method that best suits your needs. Enter the IP address. See Network User's Guide on the CD-ROM 3. Subnet Mask [000-255]. [000-255]. [000-255]. [000-255] Enter the Subnet mask. 4. Gateway [000-255]. [000-255]. [000-255 - Ricoh 406117 | Setup Guide - Page 143
Address 2. SMTP Server (60 characters) [000-255]. [000-255]. [000-255]. [000-255] Enter the mail address. Enter the SMTP server address. See Network User's Guide on the CD-ROM 3. POP3 Server [000-255]. [000-255]. [000-255]. [000-255] Enter the POP3 server address. 4. Mailbox Name (Up to 20 - Ricoh 406117 | Setup Guide - Page 144
data. Displays a warning that the size of the E-mail document is larger than 1 MB. The document will not be sent. See Network User's Guide on the CD-ROM Sends notification messages. Relays a document to another fax machine. Registers the Domain name. Prints the Relay Broadcast Report. Selects - Ricoh 406117 | Setup Guide - Page 145
- Fax Only You can choose the 6-1 Fax/Tel receive mode that best External TAD suits your needs. Manual - - Puts the date and time on 3-1 the LCD and in headings of faxes you send. - LCD language for your Setup country. Guide Note The factory settings are shown in Bold. B - 13 - Ricoh 406117 | Setup Guide - Page 146
Menu and Features Copy options key Use the Options key to quickly set the following copy settings temporarily for the next copy. After you choose each setting by pressing Menu/Set, the LCD shows Set temporarily. Press Black Start or Color Start when you have finished choosing settings. Press - Ricoh 406117 | Setup Guide - Page 147
Chapter B ▲ ▲ Entering Text When you are setting certain menu selections, such as the Station ID, you may need to type text into the machine. Most number keys have three or four letters printed above the keys. The keys for 0, # and do not have printed letters because they are used for special - Ricoh 406117 | Setup Guide - Page 148
Troubleshooting IMPORTANT For technical help, you must call the country where you bought the machine. Calls must be made from within that country. Error messages As with any sophisticated office product, errors may occur. If this happens, your machine identifies the problem the toner cartridges - Ricoh 406117 | Setup Guide - Page 149
Manual to another mode. Set Distinctive Ring to Off. See Turning off Distinctive Ring on page 7-8. Near Waste Toner The waste toner pack is nearly full. Replace the waste toner pack. (See Replacing the waste toner pack on page C-32.) No OPC Belt The OPC belt cartridge is not installed. Install - Ricoh 406117 | Setup Guide - Page 150
(See Advanced tab in the Software User's Guide on the CD-ROM.) -OR- Clear the faxes from the memory. (See Out of Memory message on page 5-3.) -OR- Add more memory. (See Installing additional memory on page D-3.) (See Paper jams on page C-7.) Call Customer Service to replace the 120K kit. Replace the - Ricoh 406117 | Setup Guide - Page 151
Chapter C ERROR MESSAGES ERROR MESSAGE CAUSE Unable to Init. The machine has a mechanical (Initialize) problem. Unable to Print Unable to Scan Waste Toner Full The waste toner pack is full. ACTION Turn off the machine's power switch and then turn it on again. If the error message continues - Ricoh 406117 | Setup Guide - Page 152
Troubleshooting and routine memory to your PC. 1 Press Stop/Exit. 2 Make sure you have installed Multi-Function Suite on your PC, and then turn on PC Fax Receiving details about PC Fax Receive, see PC-FAX software in the Software User's Guide on the CD-ROM.) 3 Make sure you have set PC Fax Receive - Ricoh 406117 | Setup Guide - Page 153
Chapter C Document jams If the document is jammed, follow the steps below. Document is jammed in the top of the ADF unit 1 Take out any paper from the ADF that is not jammed. 2 Open the ADF cover. 3 Pull the jammed document out to the left. Document is jammed under the document cover 1 Take out - Ricoh 406117 | Setup Guide - Page 154
to find the jammed paper. C B A1 A2 Troubleshooting and routine maintenance CAUTION The fusing unit and the Check where the jam is and follow the instructions on the next few pages to remove the thoroughly. After you have followed the instructions, the machine will resume printing automatically - Ricoh 406117 | Setup Guide - Page 155
of the jammed paper. It might stain your hands or clothes. ■ Remove the jammed paper carefully to prevent spreading toner. ■ Take care not to stain your hands and clothes. Wash toner stains immediately with cold water. ■ Never touch the transfer roller. ■ If the paper in the paper tray is creased - Ricoh 406117 | Setup Guide - Page 156
CAUTION These paper jams are near the fusing roller, which is extremely hot during operation. Remove the paper carefully. 1 Open the back cover. Troubleshooting and routine maintenance 3 If the paper is caught in the registration roller (1), remove the jammed paper by holding it with both hands and - Ricoh 406117 | Setup Guide - Page 157
Chapter C Paper Jam C Paper Jam C 2 Remove the jammed paper by pulling it out slowly. If paper has passed behind the back cover and there is a paper jam where the paper comes out, follow the steps below: 1 Open the back cover and release the fusing unit pressure release levers. 3 Reset the fusing - Ricoh 406117 | Setup Guide - Page 158
the copy looks good, the problem is probably not your machine. Check the chart below and follow the troubleshooting tips. DIFFICULTY Printing or 7-6.) Check all line cord connections. Check power cord connection. Send a manual fax by pressing Hook or by lifting the handset of the external phone - Ricoh 406117 | Setup Guide - Page 159
feature on a single phone line with your machine, it may create a problem sending or receiving faxes. For Example: Your machine handles the Caller ID subscriber service. However, if you subscribe to Call Waiting or some other custom service and its signal comes through the line while your machine is - Ricoh 406117 | Setup Guide - Page 160
See the Quick Setup Guide). -OR- • The correct printer driver has been installed and selected. -OR- • Check to see if the LCD is showing an error message. (See Error messages on page C-1.) -OR- • The machine is online. Click Start and then Printers and Faxes. Select 'SP C210SF' and right-click. Make - Ricoh 406117 | Setup Guide - Page 161
in the application and in the printer driver are the printing. same. Machine does not print from Adobe Illustrator Try to reduce the print resolution. (See Advanced tab in the Software User's Guide on the CD-ROM.) -OR- Add more memory. See Installing additional memory on page D-3. When using - Ricoh 406117 | Setup Guide - Page 162
problem occurs when making copies or printing received faxes, turn off Toner Save mode in the machine's menu settings. (See Toner Save on page 3-7.) Set Toner Save mode to off in the Advanced tab in the printer driver. (See Advanced tab in the Software User's Guide your service representative. Your - Ricoh 406117 | Setup Guide - Page 163
the recommendation. If the problem does not appear on the test print, please check driver settings and the interface cables as the problem may not lie with the the toner cartridges are installed properly. ■ Shake the toner cartridges gently. ■ Check that the transfer roller is installed properly. - Ricoh 406117 | Setup Guide - Page 164
Troubleshooting guide and the exit roller. (See Cleaning to prevent paper jams on page C-22.) ■ If the problem continues, identify the color and replace that toner cartridge. (See Replacing a toner toner cartridge is installed properly. ■ Replace the toner cartridge. (See Replacing a toner cartridge - Ricoh 406117 | Setup Guide - Page 165
toner cartridges are installed properly. ■ Check that the toner cartridges are not empty. (See Toner empty message on page C-29.) ■ Perform the calibration. (Menu/Set, 4, 3) ■ Adjust the color by using the custom setting in the driver , and then check that the problem is solved. ■ Check that the - Ricoh 406117 | Setup Guide - Page 166
Troubleshooting and toner cartridges are installed properly. ■ Check that the OPC belt cartridge is installed properly. ■ Identify the color causing the problem and replace the toner cartridge. (See Replacing a toner or the printer driver. (See the Software User's Guide on the CD-ROM.) C C - 19 - Ricoh 406117 | Setup Guide - Page 167
the modem speed to 9600 bps. Unless interference is a recurring problem on your phone line, you may prefer to use it only feature is not available. Routine maintenance IMPORTANT If toner scatters and your hands or clothes get dirty, Paper guides of the paper tray ■ Registration roller ■ Paper pick - Ricoh 406117 | Setup Guide - Page 168
Cleaning the outside of the machine Troubleshooting and routine maintenance 2 Wipe the outside of the machine with a soft cloth to remove dust. IMPORTANT ■ Use neutral detergents. Cleaning with volatile liquids such as - Ricoh 406117 | Setup Guide - Page 169
parts inside the machine, use a clean, dry soft, lint-free cloth. Do not use Isopropyl alcohol. ■ If your clothes are smeared with toner, wipe off the toner with a dry cloth. Immediately wash your clothes in cold water to avoid stains. ■ Never touch or clean the transfer roller because print quality - Ricoh 406117 | Setup Guide - Page 170
the power cord from the AC power outlet. Open the back cover of the machine. Troubleshooting and routine maintenance CAUTION ■ Be careful you do not break the actuator while cleaning transfer roller unit and the transfer roller guide with a dry soft, lint-free cloth to prevent paper jams. C C - 23 - Ricoh 406117 | Setup Guide - Page 171
Chapter C 4 Clean the exit roller. This will help to prevent paper jams at the paper exit and dirt from appearing on your printouts. 3 Open the inside cover so that it latches under the scanner unit. 5 Close the back cover. 6 Plug the machine's power cord back into the AC power outlet first, and - Ricoh 406117 | Setup Guide - Page 172
to avoid damaging the belt. 7 Open the front cover of the machine. Troubleshooting and routine maintenance 0 Open the laser glass cover. A Clean the surface of C not try to push or lock the new toner cartridge in. It must rest loosely in the guide rails. D Close the front cover and the inside - Ricoh 406117 | Setup Guide - Page 173
, Yellow)2 message on page C-29. ■ Type 140LY 5,000 pages (Black)2 3,000 pages (Cyan, Magenta, Yellow)2 Waste toner pack 12,000 images See Waste toner pack full message on page C-31. Waste Toner Bottle Type 140 The following are maintenance messages that appear on the LCD in the Ready mode - Ricoh 406117 | Setup Guide - Page 174
Toner Bottle Type 140 Replace OPC Belt Replace 120K Kit Replace PF Kit2 OPC belt cartridge 60,000 images See C-33. (Continuously printed) Photo Conductor Unit Type 140 Transfer belt cleaner 120,000 pages2 Transfer roller Paper pick-up roller Separator pad Transfer belt Call Customer Service - Ricoh 406117 | Setup Guide - Page 175
pages for Black and approx. 6,600 pages for Cyan, Magenta and Yellow Letter/A4-size single-sided pages at about 5% coverage. Note ■ The amount of toner used varies depending on how much print is on the page and the print density setting. ■ If you change the print density setting for lighter - Ricoh 406117 | Setup Guide - Page 176
of a OPC belt cartridge. Warranty coverage does not apply to problems caused by the use of third-party toner or third-party toner cartridges. ■ Wait to unpack the toner cartridge until immediately before you install it in the machine. If a toner cartridge is left unpacked for a long period of time - Ricoh 406117 | Setup Guide - Page 177
the tape labeled REMOVE and the orange protective cover from the new toner cartridge. 2 Pull out the used toner cartridge. 3 Take the new toner cartridge out of the box. IMPORTANT Handle the toner cartridge carefully. If toner scatters on your hands or clothes, immediately wipe or wash it off - Ricoh 406117 | Setup Guide - Page 178
is closed. Note that each color cartridge is individually keyed to prevent improper installation. Match each cartridge color label to the same color label on the machine. Troubleshooting and routine maintenance Waste toner pack After you have printed approximately 12,000 images at 5% coverage, you - Ricoh 406117 | Setup Guide - Page 179
the lower right hand side of the machine. Be careful not to spill the toner. 3 Take the cap off the new waste toner pack, and put the cap on the used waste toner pack. Note ■ When you discard the used waste toner pack, place it in the plastic bag included with the replacement waste - Ricoh 406117 | Setup Guide - Page 180
runs out, the following message appears on the LCD. When you see this message, you must replace the OPC belt cartridge: Replace OPC Belt Troubleshooting and routine maintenance 4 To release the lock, push the green belt cartridge lock levers on both sides inwards. IMPORTANT ■ Do not touch the - Ricoh 406117 | Setup Guide - Page 181
the new OPC belt cartridge. Do not touch the green part of the OPC belt cartridge. 8 Put the new OPC belt cartridge into the machine guides with the flat side facing you. 0 Close the inside cover, and then close the scanner unit. A Turn the machine's power switch back on. Reset the - Ricoh 406117 | Setup Guide - Page 182
Troubleshooting and routine maintenance Machine Information Checking the Serial Numbers You can view the of a part will be accurate only if you have reset that part's life counter when you installed a new part. It will not be accurate if you have reset that part's life counter during the life of - Ricoh 406117 | Setup Guide - Page 183
of extra paper (20 lb (80 g/m2)). You can put Letter, A4, B5 (JIS and ISO) or Executive size (176 x 250 to 215.9 x 297 mm) paper in this tray. How to install the lower tray unit CAUTION ■ This the machine flat. To avoid spills, you must first remove the toner cartridges and waste toner pack. D - 1 - Ricoh 406117 | Setup Guide - Page 184
handholds at the bottom four corners of the machine. Check that the pins are properly inserted into the machine. Check that the connector is inserted. 7 Install the two stopper fittings on the right and left hand sides of the lower tray unit. Optional accessories 8 Cover the gap on the right hand - Ricoh 406117 | Setup Guide - Page 185
the paper tray of the optional lower tray unit. This might cause paper jams. Memory Unit Type C (64/128/256 MB) The memory board is installed on the main controller board inside the machine. When you add the optional memory board, it increases the performance for both copy and print operations - Ricoh 406117 | Setup Guide - Page 186
damaged by even a small amount of static electricity. Do not touch the memory chips or the board surface. Wear an antistatic wrist strap when you install or remove the board. If you do not have an antistatic wrist strap, keep touching the bare metal on the machine. 7 Press the SO-DIMM - Ricoh 406117 | Setup Guide - Page 187
Put the side cover back on by sliding it into the guide rails, and then secure it with the screw. 0 Reconnect telephone line cord. Turn on the machine's power switch. Note To check that you have installed the SO-DIMM properly, you can print the User Settings listing that shows the current memory - Ricoh 406117 | Setup Guide - Page 188
Memory Capacity ADF (automatic document feeder) Paper Tray Printer Type Print Method LCD (Liquid Crystal Display) Power - 30°C) Humidity: 50% - 70% Paper: 20 lb (80 g/m2) Letter 250 Sheets (20 lb (80 g/m2)) Laser Electrophotography by semiconductor laser beam scanning 16 characters x 2 lines 120V AC - Ricoh 406117 | Setup Guide - Page 189
Chapter E Weight Noise Temperature Humidity With OPC belt/Toner cartridges: 76.7 lb (34.8 kg) Operating: LWAd = 6.7 bels or less Standby: LWAd = - 55 lb (60 - 210 g/m2) 17 - 24 lb (64 - 90 g/m2) for ADF Maximum paper tray capacity: Up to 250 sheets of 20 lb (80 g/m2) plain paper or up to 50 - Ricoh 406117 | Setup Guide - Page 190
Size Scanning Width Printing Width Gray Scale Polling Types Contrast Control Resolution One-Touch in. (208 mm) Max. 8.2 in. (208 mm) 256 levels Standard, Sequential Automatic/Light/Dark (manual setting) • Horizontal 203 dot/inch (8 dot/mm) • Vertical Standard - 98 line/inch (3.85 line/mm - Ricoh 406117 | Setup Guide - Page 191
Chapter E Copier Color/Black Document Size Copy Speed First Copy Multiple Copies Reduce/Enlarge Resolution Color/Black ADF Width: 5.8 to 8.5 in. (147.3 to 215.9 mm) ADF Height: 5.8 - Ricoh 406117 | Setup Guide - Page 192
Specifications Scanner Color/Black TWAIN Compliant WIA Compliant Color Depth Resolution Document Size Scanning Width Gray Scale Color/Black Yes (Windows® 98/98SE/Me/2000 Professional/XP/Windows NT® Workstation Version 4.0) Yes (Windows® XP)1 48 bit color processing (Input) 24 bit color - Ricoh 406117 | Setup Guide - Page 193
Chapter E Printer Emulations Printer Driver Resolution Print Quality Print Speed First Print Printing System for Windows® Windows® 98/98SE/Me/2000 Professional/XP/Windows NT® Workstation Version 4.0 driver supporting native compression mode and bi-directional capability 600 x 600 dpi (Max. 2400 - Ricoh 406117 | Setup Guide - Page 194
PC Software Functions Computer Platform & Operating System Version Supported PC Software Functions PC Interface Minimum Processor Minimum Recommended RAM RAM Available Hard Disk Space for for Drivers Applications 98, 98SE USB, Parallel, Ethernet Me Windows® Operating NT® Workstation - Ricoh 406117 | Setup Guide - Page 195
Bottle Type 140) OPC Belt Life Expectancy (Photo Conductor Unit Type 140) Starter Toner Cartridges Black: Approx. 1,500 pages1 Yellow, Cyan and Magenta: Approx. 1,500 pages1,2 Replacement Toner Cartridges Black: Approx. 10,000 pages1 (Type 140) Approx. 5,000 pages1 (Type 140 LY) Yellow, Cyan and - Ricoh 406117 | Setup Guide - Page 196
Specifications Network (LAN) LAN Support for Protocols You can connect your machine TELNET, SNMP, HTTP, TFTP Included Utilities: BRAdmin Professional (Windows®) Note SMTP/POP3 E-mail Services are required for Internet Fax. 1 Network Scanning is not available for Windows NT® Workstation Version - Ricoh 406117 | Setup Guide - Page 197
send the same fax message to more than one location. Caller ID A service purchased from the telephone company that lets you see the number (or name) at a specified time later that day. Distinctive Ring A subscriber service purchased from the telephone company that gives you another phone number on - Ricoh 406117 | Setup Guide - Page 198
It is used for small print and graphs. Gray scale The shades of gray available for copying and faxing photographs machine when you do not have the User's Guide with you. Journal Period The pre-programmed time date and time when the machine is idle. Manual fax When you lift the handset of your - Ricoh 406117 | Setup Guide - Page 199
Chapter F One-Touch Keys on the machine's control panel where you can store numbers for easy dialing. You can store a second number on each key if you press Shift and the One-Touch key together. Out of Paper Reception Receives faxes into the machine's memory when the machine is out of paper. - Ricoh 406117 | Setup Guide - Page 200
Super Fine resolution 203 x 392 dpi. Best for very small print and line art. TAD (telephone answering device) You can connect an external device or answering machine to the EXT. jack of your machine. Telephone Answer Code (for Fax/Tel mode only) When the machine answers a voice call, it pseudo/ - Ricoh 406117 | Setup Guide - Page 201
Date and Time 3-1 Delayed Batch Transmission 5-8 Dialing a pause 7-3 access codes and credit card numbers 7-6 automatic fax redial 7-2 Groups 5-4 manual 7-1 One-Touch 7-1 Speed-Dial 7-1 Distinctive Ring 7-6 setting ring pattern 7-8 turning off 7-8 Dual Access 5-2 E Easy Receive 6-5 ECM - Ricoh 406117 | Setup Guide - Page 202
receiving faxes 6-7 Ring Delay 6-2 Telephone Answer Code 6-6 FCC notices A-1 G Gray scale E-3, E-5 Groups for Broadcasting 7-5 H HELP LCD messages B-1 using menu keys M Machine information C-35 Maintenance, routine C-20 replacing OPC belt cartridge C-33 toner cartridges C-28, C-29 waste - Ricoh 406117 | Setup Guide - Page 203
dialing 7-1 receive 6-1 Manual transmission 5-3 Memory adding SO-DIMM (option D-3 installing D-3 Memory Security 4-3 Memory Storage B-1 Menu Table B-1 Mode, Poster 11-5 Power failure B-1 G - 3 Print difficulties C-11 drivers E-6 fax from memory 6-6 paper jams C-7 quality 2-1, 3-9, C- - Ricoh 406117 | Setup Guide - Page 204
for next fax 5-5 Ring Delay, setting 6-2 S Safety Instructions A-4, A-7 Setting Lock 4-1 Sleep Time 3-8 Speed-Dial changing Transparency 2-6 Tray use, setting copy 11-2 fax 6-3 Troubleshooting C-1 document jam C-6 if you are having difficulty incoming 3-10 W Waste toner pack C-31 G - 4 - Ricoh 406117 | Setup Guide - Page 205
EQUIPMENT ATTACHMENT LIMITATIONS (Canada only) NOTICE This product meets the applicable Industry Canada technical specifications. NOTICE The Ringer Equivalence Number is an indication of the maximum number of devices allowed to be connected to a telephone interface. The termination on an interface - Ricoh 406117 | Setup Guide - Page 206
User's Guide EN USA G157-3105 - Ricoh 406117 | Setup Guide - Page 207
Software User's Guide Read this manual carefully before you use this machine and keep it handy for future reference. For safe and correct use, be sure to read the Important Information in "User's Guide" before using the machine. - Ricoh 406117 | Setup Guide - Page 208
® 1 Printing Using the printer driver 1-1 Printing a document 1-1 Manual Duplex Printing 1-2 Simultaneous scanning, printing and faxing 1-2 Printer operation key 1-2 Job Cancel ...1-2 Secure Print key 1-3 Test Print ...1-4 Restoring default printer settings 1-4 Calibration ...1-5 Status - Ricoh 406117 | Setup Guide - Page 209
Using the Scan key (For USB or Parallel cable users 2-12 Scan to E-mail 2-12 Scan to Image 2-13 Scan to OCR ...2-13 Scan to File ...2-13 Using ScanSoft® PaperPort® 9.0SE and OmniPage® OCR 2-14 Viewing items 2-15 Organizing your items in folders 2-15 Quick links to other applications 2-16 - Ricoh 406117 | Setup Guide - Page 210
4 Network Scanning Before using Network Scanning 4-1 Network License 4-1 Configuring Network Scanning 4-2 Using the Scan key 4-4 Scan to E-mail (PC 4-4 Scan to E-mail (E-mail server 4-5 Scan to Image ...4-6 Scan to OCR ...4-6 Scan to File ...4-7 5 Remote Setup Remote Setup...5-1 6 PC-FAX - Ricoh 406117 | Setup Guide - Page 211
Section I Windows® 1 Printing 2 Scanning 3 ControlCenter2 4 Network Scanning 5 Remote Setup 6 PC-FAX software Windows® XP in this document represents Windows® XP Professional. - Ricoh 406117 | Setup Guide - Page 212
and envelopes. (See the User's Guide for information about the Paper Tray and Recommended paper.) 1 From your application, select the Print command. If any other printer drivers are installed on your computer, select SP C210SF (XXX)* Printer as your printer driver from the Print or Print Settings - Ricoh 406117 | Setup Guide - Page 213
application software does not support your custom paper size, Manual Duplex Printing The machine prints all the even-numbered pages on one side of the paper first. Then, the Windows® driver instructs when copying or fax receiving has finished. Printer operation key Job Cancel To cancel the current - Ricoh 406117 | Setup Guide - Page 214
. After the document is printed, the data will be cleared from the memory. To use this function, you need to set your password in the printer driver dialog box. (See Device Options on page 1-15 or Accessories tab on page 1-19.) 1 1 Press Secure Print. Note The LCD displays No Data! if there - Ricoh 406117 | Setup Guide - Page 215
Color Start or Black Start. 1 3 Press Stop/Exit. Note If the problem appears on the printout, see Improving the print quality in the User's Guide. Restoring default printer settings You can return the machine's printer settings to the default settings. Fonts and macros loaded to the machine - Ricoh 406117 | Setup Guide - Page 216
Reset. 3 Press Menu/Set. 4 Press 1 to select Yes. Note If an error message is displayed, press Stop/Exit and try again. For more information, see Troubleshooting and routine maintenance in the User's Guide. 1 - 5 - Ricoh 406117 | Setup Guide - Page 217
empty or paper jam. 1 Turning on the status monitor 1 Click SP C210SF (XXX)* Printer located in the Start/All Programs/Multi-Function Suite SP C210SF/Status Monitor on your computer. The Status Monitor window will appear. *(Select SP C210SF Printer if you are using a parallel cable or if you are - Ricoh 406117 | Setup Guide - Page 218
Date & Time*1 ■ Color Calibration*1 *1 These settings are not available with the BR-Script 3 driver. Accessing the printer driver settings 1 Select Print from the File menu in your application software. 2 Select SP C210SF (USB) Printer (If you are using a USB interface, then USB will be in the - Ricoh 406117 | Setup Guide - Page 219
, you must select the optional Tray 2 in the Accessories tab. For more information, see Accessories tab on page 1-19. Auto Select allows the printer driver to select a suitable tray for Paper Size automatically. 4 Click the OK button to apply your selected settings. To return to the default settings - Ricoh 406117 | Setup Guide - Page 220
Printing Paper Size From the drop-down box select the Paper Size you are using. Multiple Page The Multiple Page selection can reduce the image size of a page allowing multiple pages to be printed on 1 one sheet of paper or enlarging the image size for printing one page on multiple sheets of - Ricoh 406117 | Setup Guide - Page 221
Printing Media Type You can use the following types of media in your machine. For the best print quality, select the type of media that you wish to use. Plain Paper Thin Paper Thick Paper Thicker Paper 1 Transparencies Recycled Paper Note When using ordinary plain paper or recycled paper (20 - Ricoh 406117 | Setup Guide - Page 222
Printing Advanced tab 12345 1 Change the tab settings by selecting one of the following icons: 1 Print Quality 2 Duplex 3 Watermark 4 Page Setting 5 Device Options Note To return to the default settings, click the Default button. 1 - 11 - Ricoh 406117 | Setup Guide - Page 223
match the monitor color. Vivid/Text The color of all elements are adjusted to become vivid color. Suitable for Graphics and Text. Auto The printer driver automatically selects the Color Mode type. Improve Gray Color You can improve the image quality of shaded areas by ticking the Improve Gray Color - Ricoh 406117 | Setup Guide - Page 224
Printing Duplex The printer driver supports manual duplex printing. Manual Duplex Check the Manual Duplex box. In this mode, the machine 1 prints all the even numbered pages first. Then the printer driver stops and shows the instructions required to re-install the paper. When you click OK - Ricoh 406117 | Setup Guide - Page 225
Enter the file name and location of your bitmap image in the File box, or Browse for the file location. You can also set the scaling size of the image. ■ Position Use this setting if you want to control the position of the Watermark on the page. 1 - 14 - Ricoh 406117 | Setup Guide - Page 226
can change the print size of your document with the Scaling feature. 1 ■ Check Off if you want to feature for your page setting. Device Options You can set the following Printer Function modes in this tab: ■ Secure Print ■ Toner Save Mode ■ Quick Print Setup ■ Status Monitor ■ Administrator (For - Ricoh 406117 | Setup Guide - Page 227
, print appears lighter. The default setting is Off. Note We do not recommend Toner Save Mode for printing photo or gray scale images. Quick Print Setup The Quick Print Setup feature allows you to quickly select driver settings. To view settings, simply click your mouse button on the task tray icon - Ricoh 406117 | Setup Guide - Page 228
Printing Administrator (For Windows® 98/98SE/Me Users Only) The Administrator selection permits the Copy, Scaling, Color/Mono and Watermark features to be locked and password protected. 1 Note Record your password and keep it in a safe place for future reference. If - Ricoh 406117 | Setup Guide - Page 229
the machine is in. This setting helps you to improve color density by letting the printer driver use the color calibration data stored in your machine. Get device data If you click this button, the printer driver will attempt to get the color calibration data from your machine. Use calibration data - Ricoh 406117 | Setup Guide - Page 230
Detect The Auto Detect function tries to find any installed optional accessories and then shows those accessories in the printer driver. When you click the Auto Detect button, options that are installed on the machine will be listed. You can manually add or remove options. Note Auto Detect function - Ricoh 406117 | Setup Guide - Page 231
drivers are installed. A TWAIN compliant scanner driver (see Scanning a document using the TWAIN driver on page 2-1) and a Windows Imaging Acquisition (WIA) driver (see Scanning a document using the WIA driver of other software applications that support TWAIN scanning. These applications include - Ricoh 406117 | Setup Guide - Page 232
® 9.0SE) to scan a document. Note 2 The instructions for scanning in this Guide are for when you use ScanSoft® PaperPort® 9.0SE. Parallel cable use SP C210SF USB cable use SP C210SF USB LAN cable use SP C210SF LAN If you are using Windows® XP, select TW-SP C210SF, not WIA-SP C210SF. 4 Click Scan - Ricoh 406117 | Setup Guide - Page 233
Scanning Scanning a document into the PC You can scan a whole page -OR- Scan a portion of the page after pre-scanning the document. 2 Scanning a whole page 1 Place the document face up in the ADF, or face down on the scanner glass. 2 Adjust the following settings, if required, in the Scanner - Ricoh 406117 | Setup Guide - Page 234
Scanning Pre-Scanning to crop a portion you want to scan The PreScan button is used to preview an image for cropping any unwanted areas from the image. When you are satisfied with the preview, click the Start button in the scanner window to scan the image. 1 Place the document face up in the ADF, - Ricoh 406117 | Setup Guide - Page 235
Scanning Settings in the Scanner window Image Type Select the image type of output from Photo, Web or Text. Resolution and Scan Type will be altered for each default setting. 2 The default settings are: Image Type Photo Web Text Select for scanning photo images. Select for attaching the - Ricoh 406117 | Setup Guide - Page 236
the Scan Type to Black & White for text or line art. Gray Scale: Set the Scan Type to Gray (Error Diffusion) or True Gray for Note The Contrast setting is only adjustable when you have selected one of the gray scale settings. It is not available when Black & White and Color settings are selected as - Ricoh 406117 | Setup Guide - Page 237
Scanning Document Size Set the size to one of the following: ■ A4 210 x 297 mm ■ JIS B5 182 x 257 mm 2 ■ Letter 8 1/2 x 11 in ■ Legal 8 1/2 x 14 in ■ A5 148 x 210 mm ■ Executive 7 1/4 x 10 1/2 in ■ Business Card ■ Photo 4 x 6 in ■ Index Card 5 x 8 in ■ Photo L 89 x 127 mm ■ Photo 2L - Ricoh 406117 | Setup Guide - Page 238
The instructions for scanning in this Guide are for when you use ScanSoft® PaperPort® 9.0SE. The steps for scanning from another application may vary. 2 Select Scan from the File drop-down menu or select the Scan button. The Scan panel appears on the left of the screen. 3 Select WIA-SP C210SF from - Ricoh 406117 | Setup Guide - Page 239
Scanning Scanning a document into the PC There are two ways in which you can scan a whole page. You can either use the ADF (automatic document feeder) or the Flatbed scanner glass. 2 If you would like to scan and then crop a portion of the page after pre-scanning the document, you will need to - Ricoh 406117 | Setup Guide - Page 240
Scanning Pre-Scanning to crop a portion you want to scan using the scanner glass The Preview button is used to preview an image for cropping any unwanted portions from the image. When you are satisfied with the preview, click the Scan button from the scanner window to scan the image. 1 Place the - Ricoh 406117 | Setup Guide - Page 241
Utility is used for configuring the WIA scanner driver for resolutions greater than 1200 dpi and for utility by selecting the Scanner Utility located in the Start/All Programs/Multi-Function Suite SP C210SF/Scanner Settings/Scanner Utility menu. Note If you scan the document at a resolution of - Ricoh 406117 | Setup Guide - Page 242
use the Scan key on the control panel, you must have connected the machine to your Windows® based computer and loaded the appropriate our drivers for your version of Windows®. For details about how to configure the ControlCenter2 buttons to launch the application of your choice using the Scan key - Ricoh 406117 | Setup Guide - Page 243
Scanning Scan to Image You can scan a picture into your graphics application for viewing and editing. You can change the scan configuration. (See Image (example: Microsoft Paint) on page 3-4.) 1 Place the document face up in the ADF, or face down on the scanner glass. 2 2 Press Scan. 3 Press ▲ - Ricoh 406117 | Setup Guide - Page 244
to the basic operations of ScanSoft® PaperPort® 9.0SE. The complete ScanSoft® PaperPort® 9.0SE User's Guide, including ScanSoft® OmniPage® OCR, is in the Documentation located on the CD-ROM. When you install Multi-Function Suite, ScanSoft® PaperPort® 9.0SE and ScanSoft® OmniPage® OCR are - Ricoh 406117 | Setup Guide - Page 245
Scanning Viewing items ScanSoft® PaperPort® 9.0SE provides several ways to view items: Desktop View displays a thumbnail (a small graphic that represents each item in a Desktop or folder). Items in the selected folder appear on the PaperPort® 9.0SE Desktop. You can see PaperPort® 9.0SE items (MAX - Ricoh 406117 | Setup Guide - Page 246
applications with links to PaperPort® 9.0SE. If PaperPort® 9.0SE does not automatically recognize one of the applications on your computer, you can manually create a link using the New Program Link... command. (See PaperPort® 9.0SE in the Documentation section on the CD-ROM for more information - Ricoh 406117 | Setup Guide - Page 247
and ScanSoft® OmniPage® OCR For Windows® 98/98SE/Me and Windows NT® 4.0: Select Start, Settings, Control Panel, Add/Remove Programs and the Install/Uninstall tab. Select PaperPort from the list and click the Add/Remove button. For Windows® 2000 Professional: Select Start, Settings, Control Panel - Ricoh 406117 | Setup Guide - Page 248
software utility that allows you to quickly 3 and easily access your frequently used applications. Using ControlCenter2 eliminates the need to manually launch the specific applications. ControlCenter2 provides the following five categories of operations: 1 Scan directly to a file, E-mail, word - Ricoh 406117 | Setup Guide - Page 249
. You can select the destination application, such as MS Paint, Corel PhotoPaint, Adobe PhotoShop, or any kind of image editing application you have installed on your computer. ■ OCR (Default: MS NotePad) - enables you to scan a page or document, automatically run the OCR application and insert the - Ricoh 406117 | Setup Guide - Page 250
on the machine and print the copies using any of the features of the machine printer driver-OR-you can direct the copy output to any standard printer driver installed on the PC including network printers. 3 You can configure your preferred settings on up to four buttons. PC-FAX These buttons - Ricoh 406117 | Setup Guide - Page 251
ControlCenter2 SCAN This section contains four buttons for Scan to Image, Scan to OCR, Scan to E-mail and Scan to File applications. These four selections can be accessed from ControlCenter2 or from the Scan key on the control panel of the machine. The target application, file type and scan settings - Ricoh 406117 | Setup Guide - Page 252
ControlCenter2 To change the destination application, select the appropriate application from the Target Application pull down list. You can add an application to the list by clicking the Add button. Enter the Application Name (up to 30 characters) and the Application Location. You can also - Ricoh 406117 | Setup Guide - Page 253
When you first start ControlCenter2 a default list of compatible E-mail applications will appear in the drop-down list. If you are having trouble using a custom application with ControlCenter2, you should choose an application from this list. You can also change the other settings used to create - Ricoh 406117 | Setup Guide - Page 254
(*.tif) TIFF Multi-Page - Uncompressed (*.tif) TIFF Multi-Page - Compressed (*.tif) Portable Network Graphics (*.png) PDF (*.pdf) Note Additional file format support is available by scanning to PaperPort® 9.0SE and then use the save as function and choose the file format. (See Using ScanSoft - Ricoh 406117 | Setup Guide - Page 255
box. If you want to scan and then crop a portion of a page after pre-scanning the document, check Show Scanner Interface box. Note For the supported file types, see File attachments on page 3-7. 3 - 8 - Ricoh 406117 | Setup Guide - Page 256
. You can select any kind of image editor application you have installed on your computer as a destination application. Scan to OCR: Scanned You can choose which E-mail application to use if you have more than one installed on your system. You can also select the file type for the attachment and - Ricoh 406117 | Setup Guide - Page 257
ControlCenter2 Customizing a user-defined button To configure a button, right-click on the button, and the configuration window will appear. Please read the following guidelines to configure the button. Scan to Image: 3 In the General tab You can enter up to a 30 character name in the Name for - Ricoh 406117 | Setup Guide - Page 258
ControlCenter2 In the Settings tab You can select Target Application, File Type, Resolution, Scan Type, Document Size, Brightness and Contrast settings. 3 Scan to E-mail: In the General tab You can enter up to a 30 character name in the Name for Custom field. This name will appear as the button name - Ricoh 406117 | Setup Guide - Page 259
ControlCenter2 Scan to File: In the General tab You can enter up to a 30 character name in the Name for Custom field. This name will appear as the button name. Select the type of scan from the Scan Action field. 3 In the Settings tab Select the file format from the File Type pull down list. - Ricoh 406117 | Setup Guide - Page 260
do advanced copy functions such as N-in-1 printing. Before you can use the Copy buttons you must first configure the printer driver by right-clicking on the button. You can enter up to a 30 character name in the Name for Copy field and select the Copy Ratio. - Ricoh 406117 | Setup Guide - Page 261
ControlCenter2 PC-FAX This section allows you to easily open the software for sending or receiving a PC-FAX or edit the address book by clicking the appropriate button. 3 Send The Send button allows you to scan a document and automatically send the image as a fax from the PC using the PC-FAX - Ricoh 406117 | Setup Guide - Page 262
Receive / View Received The PC-FAX Receiving software feature lets you view and store your faxes on your PC. It is automatically installed when you install the Multi-Function Suite. By clicking the Receive button, the PC-FAX receiving software is activated and starts receiving fax data from - Ricoh 406117 | Setup Guide - Page 263
ControlCenter2 DEVICE SETTING In this section you can configure the machine settings by clicking the button. 3 Note When the machine is connected to a network, you cannot use Remote Setup and Quick-Dial function. Remote Setup The Remote Setup button allows you to open the Remote Setup Program window - Ricoh 406117 | Setup Guide - Page 264
settings from the control panel. (Please see the Network User's Guide on the CD-ROM.) 4 Before using Network Scanning Network License SP C210SF includes the PC license for up to 5 Users. This license supports the installation of the Multi-Function Suite including ScanSoft® PaperPort® 9.0SE on - Ricoh 406117 | Setup Guide - Page 265
to your PC during the installation of Multi-Function Suite (see Quick Setup Guide), follow the steps below. 1 For Windows® XP 4 From the Start menu, select Control Panel, Printers and Other Hardware, Scanners and Cameras (or Control Panel, Scanners and Cameras). Right-click the Scanner Device - Ricoh 406117 | Setup Guide - Page 266
Network Scanning 3 Click the Scan To Button tab in the dialog box and enter your PC name in the Display Name field. The machine's LCD displays the name you enter. The default setting is your PC name. You can enter any name that you like. 4 You can avoid receiving unwanted documents by setting 4 - Ricoh 406117 | Setup Guide - Page 267
Network Scanning Using the Scan key Scan to E-mail (PC) When you select Scan to E-mail (PC) your document will be scanned and sent directly to the PC you 4 designated on your network. ControlCenter2 will activate the default E-mail application on the designated PC for addressing to the - Ricoh 406117 | Setup Guide - Page 268
PDF or TIFF for Black and White and PDF or JPEG for color. 4 Note Scan to E-mail (E-mail server) requires SMTP/POP3 mail server support. (See Network User's Guide on the CD-ROM.) 1 Place the document face up in the ADF, or face down on the scanner glass. 2 Press Scan. 3 Press ▲ or - Ricoh 406117 | Setup Guide - Page 269
Network Scanning Scan to Image When you select Scan to Image your document will be scanned and sent directly to the PC you designated on your network. ControlCenter2 will activate the default graphics application on the designated PC. You can change the scan configuration. (See Image (example: - Ricoh 406117 | Setup Guide - Page 270
Network Scanning Scan to File When you select Scan to File you can scan a black and white (or color document) and send it directly to a PC you designate on your network. The file will be saved in the folder and file format that you have configured in ControlCenter2 on the designated PC. You can - Ricoh 406117 | Setup Guide - Page 271
use the Remote Setup application if your machine is connected via a Network. (See Network User's Guide.) From the Start menu, select All Programs, Multi-Function Suite SP C210SF, Remote Setup and then SP C210SF USB or SP C210SF LAN. ■ OK When you click OK, the process of uploading the data to the - Ricoh 406117 | Setup Guide - Page 272
rights. ■ PC-FAX is available in Black & White only. Setting up user information 1 From the Start menu, select All Programs, Multi-Function Suite SP C210SF, PC-FAX Sending, and then select PC-FAX Setup. The PC-FAX Setup dialog box will appear: 2 You must enter this information to create the - Ricoh 406117 | Setup Guide - Page 273
PC-FAX software Sending setup From the PC-FAX Setup dialog box, click the Sending tab. Outside line access If you need to enter a number to access an outside line, enter 6 it here. This is sometimes required by a local PBX telephone system (for example, if you must dial 9, to get an outside - Ricoh 406117 | Setup Guide - Page 274
PC-FAX software Address Book If Outlook® Express is installed on your PC, you can select which address book to use for PC-FAX sending, Address Book or Outlook® Express from the Address Book tab. 6 - Ricoh 406117 | Setup Guide - Page 275
PC-FAX software Setting up a Cover Page From the PC-FAX dialog box, click to access the PC-Fax Cover page setup screen. The PC-FAX Cover Page Setup dialog box will appear: 6 Entering Cover Page Information To From Comment Type the comment you want to add to the cover page. Form Select the cover page - Ricoh 406117 | Setup Guide - Page 276
the Speed-Dial button you want to clear. 2 Click Clear to erase it. Address Book From the Start menu, select All Programs, Multi-Function Suite SP C210SF, PC-FAX Sending, and then click PC-FAX Address Book. The Address Book dialog box will appear: 6 - 5 - Ricoh 406117 | Setup Guide - Page 277
PC-FAX software Setting up a Member in the Address Book In the Address Book dialog box you can add, edit and delete stored information of Members and Groups. 1 In the Address Book dialog box, click the icon to add a Member. The Address Book Member Setup dialog box will 6 appear: 2 In the - Ricoh 406117 | Setup Guide - Page 278
PC-FAX software Editing Member information 1 Select the Member or Group you want to edit. 2 Click the edit icon. 6 3 Change the Member or Group information. 4 Click OK to save your changes. Deleting a Member or Group 1 Select the Member or Group you want to delete. 2 Click the delete icon. 3 - Ricoh 406117 | Setup Guide - Page 279
PC-FAX software Exporting the Address Book You can export the whole Address Book to an ASCII text file (*.csv). Or if you wish, you can select and create a Vcard that will be attached to that Member's outgoing E-mail. (A Vcard is an electronic business card that contains the sender's contact - Ricoh 406117 | Setup Guide - Page 280
PC-FAX software Importing to the Address Book You can import ASCII text files (*.csv) or Vcards (electronic business cards) into your Address Book. To import an ASCII text file: 1 From the Address Book select File, point to Import, and then click Text. 6 -OR- Click Vcard and go to Step 5. 2 - Ricoh 406117 | Setup Guide - Page 281
, Draw or any other application on your PC. 2 From the File menu, select Print. 6 The Print dialog box will appear: 3 Select PC-FAX as your printer, and then click Print. The Facsimile style user interface will appear, if it does not check the user interface selection setting as detailed on page - Ricoh 406117 | Setup Guide - Page 282
, Draw or any other application on your PC. 2 From the File menu, select Print. 6 The Print dialog box will appear: 3 Select PC-FAX as your printer, and then click Print. The Simple style user interface will appear; if it does not check the user interface selection setting as detailed on page - Ricoh 406117 | Setup Guide - Page 283
PC-FAX software PC-FAX receiving The PC-FAX Receiving software feature lets you view and store your faxes on your PC. It is automatically installed when you install the Multi-Function Suite. When this feature is turned on, your machine will receive faxes into memory. Once it has received the fax, it - Ricoh 406117 | Setup Guide - Page 284
PC-FAX software Running PC-FAX Receiving From the Start menu, select All Programs, Multi-Function Suite SP C210SF, PC-FAX Receiving, and then select SP C210SF or SP C210SF USB. The PC-FAX icon will appear on your PC Task bar for this Windows® session. 6 Setting up your PC 1 Right-click the PC - Ricoh 406117 | Setup Guide - Page 285
I Index C ControlCenter2 Windows 3-1 D Drivers Windows® Native Driver 1-8 TWAIN 2-1 WIA 2-8 F Fax Windows® PC-FAX receiving 6-12 PC-FAX sending 6-1 address book 6-5 cover page 6-4 facsimile style 6-10 group 6-6 simple style 6-11 P PaperPort® (Windows®) exporting 2- - Ricoh 406117 | Setup Guide - Page 286
Software User's Guide EN USA G157-3202 - Ricoh 406117 | Setup Guide - Page 287
Network User's Guide Read this manual carefully before you use this machine and keep it handy for future reference. For safe and correct use, be sure to read the Important Information in "User's Guide" before using the machine. - Ricoh 406117 | Setup Guide - Page 288
warnings, cautions, and notes We use the following icon throughout this User's Guide: Notes tell you how you should respond to a situation that may arise . All other terms, brand and product names mentioned in this User's Guide are registered trademarks or trademarks of their respective companies. i - Ricoh 406117 | Setup Guide - Page 289
Setting the IP address and subnet mask 2-3 Using the BRAdmin Professional utility and the TCP/IP protocol to configure your network printer...2-3 BRAdmin Professional utility 2-3 How to configure your machine using the BRAdmin Professional utility 2-3 Using a web browser to change the print/scan - Ricoh 406117 | Setup Guide - Page 290
Overview...4-1 For Windows® 2000/XP users ...4-1 Configuring the standard TCP/IP port 4-2 Printer driver not yet installed 4-2 Printer driver already installed 4-3 For Windows NT® 4.0 users ...4-3 Installing the TCP/IP protocol ...4-3 Installing the Peer-to-Peer software 4-4 Associating to the - Ricoh 406117 | Setup Guide - Page 291
Internet Print: Using a Web Browser to Configure the Print Server 5-4 Internet Print: Installing the BIP software on Windows® 98/Me/2000/XP and Windows NT® 4.0 Panel Key Functions ...7-2 Sending an Internet Fax ...7-2 Manually Entering Text...7-3 Making corrections: ...7-3 Repeating letters: ...7-3 - Ricoh 406117 | Setup Guide - Page 292
installation or from the printer driver of the machine in Windows 8-1 Printing problems...8-3 Print job is not printed...8-3 Protocol-specific troubleshooting Windows® 2000 not working 8-4 Web browser troubleshooting (TCP/IP 8-4 A Appendix A Using services ...A-1 Other ways to set the IP address - Ricoh 406117 | Setup Guide - Page 293
Monitor. The following chart shows what network features and connections are supported by each operating system. Operating Systems Windows® 98/98SE/Me/ server with your operating system: Chapter 2: Configuring your network printer Chapter 3: Front Panel Setup Chapter 4: Network printing from - Ricoh 406117 | Setup Guide - Page 294
Introduction Network function features SP C210SF has the following basic network function. 1 Network printing The print server provides printing services for Windows® 98/98SE/Me/NT®/2000/XP supporting the TCP/IP protocols. Network scanning You can scan documents over the network to your computer ( - Ricoh 406117 | Setup Guide - Page 295
sends and receives data to each device. There is no central server controlling File access or Printer sharing. Windows® Windows® Windows® Switch or Router TCP/IP TCP/IP Network printer (your machine) ■ In a smaller network of 2 or 3 computers, we recommend the Peer-to-Peer printing method - Ricoh 406117 | Setup Guide - Page 296
control the printing of all print jobs. 1 Windows® Windows® Windows® Windows® TCP/IP Also known as "Server" or "Print Server" Network printer (your machine) Network Shared ■ In a larger network, we recommend a Network Shared printing environment. ■ The "Server" or the "Print Server" must use - Ricoh 406117 | Setup Guide - Page 297
Suite Installation or BRAdmin software) or automatically (using a DHCP/BOOTP/RARP server), the Automatic Private IP Addressing (APIPA) protocol will automatically assign an IP address from the range 169.254.1.0 to 169.254.254.255. DNS client The print server supports the Domain Name Service (DNS - Ricoh 406117 | Setup Guide - Page 298
e-mails. IPP 1 The Internet Printing Protocol (IPP Version 1.0) allows you to print documents via the internet. TELNET The print server supports TELNET server for command line configuration. SNMP Simple Network Management Protocol (SNMP) is used to manage network devices including computers - Ricoh 406117 | Setup Guide - Page 299
your network printer Overview Before you can use your machine on your network, you need to install the software and also configure the 2 appropriate TCP/IP network settings on the machine itself. To do this, we recommend that you use the automatic installer on the CD-ROM as this will guide you - Ricoh 406117 | Setup Guide - Page 300
Configuring your network printer Subnet mask Subnet masks restrict network communication. Example: PC1 can talk to PC2 2 PC1 IP Address:192.168.1.2 Subnet Mask: 255.255.255.0 PC2 IP - Ricoh 406117 | Setup Guide - Page 301
Setting the IP address and subnet mask Using the BRAdmin Professional utility and the TCP/IP protocol to configure your network printer 2 BRAdmin Professional utility The BRAdmin Professional utility is designed to allow you to manage your network connected machines in a TCP/IP environment - Ricoh 406117 | Setup Guide - Page 302
address or the print server name) For example: http://192.168.1.2/ (if the printer's IP address is 192.168.1.2.) Note If you have edited the hosts file on can also enter the DNS name of the print server. As the print server supports TCP/IP and NetBIOS names, you can also enter the NetBIOS name of - Ricoh 406117 | Setup Guide - Page 303
▼ to select Auto, Static, RARP, BOOTP or DHCP. 3 Press Menu/Set. 4 Press Stop/Exit. Static mode In this mode the machine's IP address must be manually assigned. Once entered the IP address is locked to the assigned address. Auto mode In this mode, the machine will scan the network for a DHCP - Ricoh 406117 | Setup Guide - Page 304
gateway. In order to use BOOTP to configure the IP address make sure that BOOTP is installed and running on your host computer (it should appear in the /etc/services file on your host as a real service; type man bootpd or refer to your system documentation for information). BOOTP is usually started - Ricoh 406117 | Setup Guide - Page 305
the print server will load its IP address from the BOOTP server when the printer is powered on. 3 DHCP mode Dynamic Host Configuration Protocol (DHCP) is one and register its name with any RFC 1001 and 1002-compliant dynamic name services. Note If you do not want your print server to be configured - Ricoh 406117 | Setup Guide - Page 306
Front Panel Setup Subnet Mask This field displays the current subnet mask used by the machine. If you are not using DHCP or BOOTP to obtain the subnet mask, enter the desired subnet mask. Check with your network manager for the subnet mask to use. 1 Press Menu/Set, 6, 1, 3. 3 2 Select 1 to - Ricoh 406117 | Setup Guide - Page 307
. 5 Press Menu/Set. 6 Press Stop/Exit. Primary WINS Server IP Address This field specifies the IP address of the primary WINS (Windows® Internet Naming Service) server. Secondary WINS Server IP Address This field specifies the IP address of the secondary WINS server. It is used as a backup to the - Ricoh 406117 | Setup Guide - Page 308
Server address. 5 Press Menu/Set. 6 Press Stop/Exit. Primary DNS Server IP Address This field specifies the IP address of the primary DNS (Domain Name Service) server. Secondary DNS Server IP Address This field specifies the IP address of the secondary DNS server. It is used as a backup to the - Ricoh 406117 | Setup Guide - Page 309
Front Panel Setup Setup Internet This menu has five selections: Mail Address, SMTP Server, POP3 Server, Mailbox Name and Mailbox Pwd. As this section requires you to enter a lot of text characters, you may find that it is more convenient to use your favorite web browser to configure these settings - Ricoh 406117 | Setup Guide - Page 310
Front Panel Setup Repeating letters: ▲ If you need to repeat a character, press move the cursor to the right. As you enter the E-mail address, it will appear character by character on the LCD panel. 3 If you specify more than 16 characters, the LCD panel will scroll the name to the left, - Ricoh 406117 | Setup Guide - Page 311
Front Panel Setup Mailbox Name 1 Press Menu/Set, 6, 2, 4. 2 Enter the user account name assigned to the machine that will login to the POP3 Server. 3 3 Press Menu/Set. 4 Press Stop/Exit. Mailbox Pwd 1 Press Menu/Set, 6, 2, 5. 2 Enter the user password assigned to the machine that will login - Ricoh 406117 | Setup Guide - Page 312
Front Panel Setup Setup Mail RX This menu has five selections Auto Polling, Poll Frequency, Header, Del Error Mail and Notification. Auto Polling 3 When set to On the machine automatically checks the POP3 server for new messages. "No Mail" will be displayed if there are no E-mail messages when - Ricoh 406117 | Setup Guide - Page 313
of receipt message to be transmitted to the sending station When the I-Fax has been received. This feature only works on I-Fax machines that support the "MDN" specification. 1 Press Menu/Set, 6, 3, 5. 2 Press ▲ or ▼ to select On or MDN or Off. 3 Press Menu/Set. 4 Press Stop/Exit. Setup Mail TX - Ricoh 406117 | Setup Guide - Page 314
station When the I-Fax has been received. This feature only works on I-Fax machines that support the "MDN" specification. 1 Press Menu/Set, 6, 4, 3. 2 Press ▲ or Broadcast, see Relay Broadcasting on page 7-5 of this User's Guide. Rly Broadcast This function allows the machine to receive a document - Ricoh 406117 | Setup Guide - Page 315
Front Panel Setup Relay Domain You can register the Domain Names (Max.10) that are allowed to request a Relay Broadcast. 1 Press Menu/Set, 6, 5, 2. 3 2 Press ▲ or ▼ to select the Relay Domain (01 - 10). 3 Press Menu/Set. 4 Enter the Relay Domain name for the Domain that is being allowed to - Ricoh 406117 | Setup Guide - Page 316
zone. The time shown is the time difference between your country and Greenwich Mean Time. For example, the Time Zone for Eastern Time in the USA and Canada is GMT-05:00. 1 Press Menu/Set, 6, 6, 2. 2 Press ▲ or ▼ to select the time. 3 Press Menu/Set to accept the selection. 4 Press Stop/Exit - Ricoh 406117 | Setup Guide - Page 317
Front Panel Setup Scan to E-mail (E-mail server) Black and White File Type for Scan to E-mail (E-mail server) You can select the default Black and White file type for the Scan to E-mail (E-mail server) function. 3 1 Press Menu/Set, 6, 7, 1. 2 Press ▲ or ▼ to select PDF or TIFF. 3 Press Menu/ - Ricoh 406117 | Setup Guide - Page 318
Front Panel Setup Printing the Network Configuration List Note Node Name: Node Name appears in the Network Configuration List. The default Node Name is 3 "BRN_xxxxxx" ("xxxxxx" is the last six digits of Ethernet address.). The Network Configuration List prints a report listing all the current - Ricoh 406117 | Setup Guide - Page 319
If you are a Windows® user and want to print using the TCP/IP protocol in a Peer-to-Peer environment, please 4 follow the instructions in this chapter. This chapter explains how to install the network software and the printer driver which you will need to be able to print using your network - Ricoh 406117 | Setup Guide - Page 320
to complete the Wizard. 13 Now that you have configured the port, you must specify which printer driver you wish to use. Select the appropriate driver from the list of supported printers. If you are using a driver supplied with the machine on CD-ROM then select the Have Disk option to browse to the - Ricoh 406117 | Setup Guide - Page 321
Standard TCP/IP Port. Then click the New Port... button. 5 The Standard TCP/IP Port Wizard will start. Follow steps 8 to 12 of Printer driver not yet installed on page 4-2. 6 Close Add Port and Properties dialog box. For Windows NT® 4.0 users Windows NT® 4.0 users can send print job using Peer - Ricoh 406117 | Setup Guide - Page 322
Guide. 2 Select the model name and your language (if necessary), and then click Install Optional Applications. 4 3 Click Network Print Software. 4 Click Next in response to the Welcome message. Follow the on-screen instructions print server. As the print server supports TCP/IP and NetBIOS names, you - Ricoh 406117 | Setup Guide - Page 323
in step 7 of the "Installing Peer-to-Peer Software" section in this chapter) and click Next. 5 Select the desired printer model. If the correct model of the printer and select Yes or No if you want this driver to be default printer, and then click Next. 8 If desired, make the printer shared (so - Ricoh 406117 | Setup Guide - Page 324
already installed the driver from the supplied CD-ROM with the machine Installer and you selected "Peer-to-Peer Network Printer" during the installation then you do not need to install the Network Print Software again. 1 Start the CD-ROM installation menu program according to the Quick Setup Guide - Ricoh 406117 | Setup Guide - Page 325
As the print server supports TCP/IP and NetBIOS printer driver that is already being used, you have the option of either keeping the existing driver (recommended) or replacing it. Select the desired option and click Next. 7 Select the LPR port (the port name you assigned in step 7 of the Installing - Ricoh 406117 | Setup Guide - Page 326
. Enter the IP address of the printer that you wish to print to and click OK. You should now see the port that you have just created in the Print to the following port setting of the printer driver. Other sources of information See Configuring your network printer on page 2-1 to learn how to - Ricoh 406117 | Setup Guide - Page 327
to a printer in Paris. Windows® 2000/XP users can also use this BIP software, but are recommended to use the IPP protocol support that is that the Microsoft Internet Print Services software is installed on the client PC, Internet Information Server (IIS) is installed and running on the server - Ricoh 406117 | Setup Guide - Page 328
modem directly to an Internet Service Provider (ISP), the ISP printer. 5 Note If an E-mail is received that has not been configured to use the BIP virtual port driver, the printer be emailprinter). 2 Make sure that the print server is installed and running with TCP/IP enabled and has a valid IP - Ricoh 406117 | Setup Guide - Page 329
address)). You will be prompted for a password; the default password is "access". Note You can find the node name and MAC address by printing out the machine configuration page. For information on how to print the configuration page on your print server, see Printing the Network - Ricoh 406117 | Setup Guide - Page 330
Web Browser to Configure the Print Server 1 Connect to the printer server IP address using your web browser. 2 When you installation menu program according to the Quick Setup Guide. 2 Select the proper model and Install Optional Applications menu. Then select Network Print Software installation - Ricoh 406117 | Setup Guide - Page 331
Printers and Faxes. 11 Select Add Printer (or Add a Printer for Windows® XP) to begin the printer installation. 12 Click Next when you get the Add Printer printer. If necessary, click Have Disk to load the driver from the CD-ROM. Click Next when you are done. 15 If you have selected a printer driver - Ricoh 406117 | Setup Guide - Page 332
printer. If necessary, click Have Disk to load the driver from the CD-ROM. Click Next when you are done. 5 16 If you have selected a printer driver remote print server to receive BIP print jobs. You have now finished installing the BIP software. If you need to configure another remote print server - Ricoh 406117 | Setup Guide - Page 333
Use the following instructions if you wish to use the IPP printing capabilities of Windows® 2000/XP. 5 Note • You must configure the IP address on your machine before you proceed with this section. If you have not configured the IP address, see Configuring your network printer on page 2-1 first - Ricoh 406117 | Setup Guide - Page 334
list of supported printers, click Have Disk. You will then be asked to insert the driver disk. 10 Click Browse and select the CD-ROM or network share that contains the appropriate printer driver. 11 Now specify the model name of the printer. 12 If the printer driver that you are installing does not - Ricoh 406117 | Setup Guide - Page 335
details, you can simply enter the above text and the printer will still receive and process data. please note the Get More Info option will not display any printer data. If you are using the built in service names that the print server supports, you can also use the following: (However, please note - Ricoh 406117 | Setup Guide - Page 336
programmed into the print server and your computer. 1 To learn how to configure the IP address on your machine, see Configuring your network printer on page 2-1. 2 The default password for print servers is "access". 3 You can use a web browser on most computing platforms, for example, UNIX® users - Ricoh 406117 | Setup Guide - Page 337
-F format. If you wish to send and receive messages to and from your machine, your mail application on the PC must be able to support the MIME format. E-mail Internet Relay Fax (G3 TX) E-mail Internet Internet Fax Relay E-mail Getting Connected Before sending or receiving an Internet Fax - Ricoh 406117 | Setup Guide - Page 338
machine's. However, please note that you cannot use chain dialling for E-mail addresses. Shift + Black Start Used to receive E-mail from the POP3 server manually. Sending an Internet Fax Sending an Internet Fax is the same as sending a normal Fax. If you have already programmed the addresses of the - Ricoh 406117 | Setup Guide - Page 339
Internet FAX Manually Entering Text Press Shift and 1 simultaneously to change into the "alphabet" dialling mode. You can now use the Dial Pad to dial the E-mail address. - Ricoh 406117 | Setup Guide - Page 340
to poll the E-mail server at 10 minute intervals) or you can manually poll the server by pressing the Shift + Black Start button. If your -F format, the following error message will be printed: ATTACHED FILE FORMAT NOT SUPPORTED. FILE NAME:XXXXXX.doc If the received mail is too large, the following - Ricoh 406117 | Setup Guide - Page 341
Windows NT® 4.0 operating system, please inform the PC's owner that they must install some software that can view TIFF-F files. You can use "Microsoft® Imaging" User's Guide supplied with your machine. Please see the User's Guide included with the machine to check that this feature is supported. - Ricoh 406117 | Setup Guide - Page 342
Internet FAX Relay Broadcast from a machine [email protected] [email protected] 123456789 INTERNET 7 [email protected] (fax#123456789) In this example, your machine has an E-mail address of [email protected], you wish to send a document from this machine to another machine in England with an E-mail address - Ricoh 406117 | Setup Guide - Page 343
into the address book as follows: Name: fax#123456789 E-mail Address: [email protected] TX Verification Mail Transmission Verification Mail supports two separate functions. Verification Mail for sending allows you request notification from the receiving station that the I-Fax or E-mail was received - Ricoh 406117 | Setup Guide - Page 344
is opened for reading or is printed the receiving station sends back a notification to the original sending machine or user. The receiving station must support the MDN field in order to be able to send a notification report, otherwise the request will be ignored. Setup Mail (RX) There are three - Ricoh 406117 | Setup Guide - Page 345
Internet FAX Important information on Internet Fax Internet Fax Communication on a LAN system is basically the same as communication via E-mail; however, it is different from Fax communication using standard phone lines. The following is important information for using Internet Fax: 7 ■ - Ricoh 406117 | Setup Guide - Page 346
problems The print server is not found during setup of the network print software installation or from the printer driver of the machine in Windows®. Make sure you have completed the IP address setting of the print server according to Chapter 2 or Chapter 3 of this User's Guide before installing - Ricoh 406117 | Setup Guide - Page 347
Troubleshooting 2 Check to see if there is any LED activity. The print Network Configuration List and check if the settings such as IP address settings are correct for your network. The problem may be the result of mismatched or duplicate IP address. Verify that the IP address is correctly loaded - Ricoh 406117 | Setup Guide - Page 348
problem may troubleshooting If you are having trouble printing on a Windows® 98/98SE/Me, Windows NT® 4.0 or later Peer-to-Peer network (LPR method), check the following: 1 Make sure that the LPR Port driver is correctly installed printer driver properties. You may find that during the installation - Ricoh 406117 | Setup Guide - Page 349
2000/XP to use Port 80 to communicate with the print server. Web browser troubleshooting (TCP/IP) 1 If you can not connect to the print server using connect to your ISP or proxy server every time you wish to look at the printer server. 2 Make sure that you are using the proper web browser, we - Ricoh 406117 | Setup Guide - Page 350
print server remote console to see a list of available services): Enter HELP at the command prompt for a list of supported commands. Service (Example) BINARY_P1 TEXT_P1 BRN_xxxxxx_P1 Definition TCP/IP binary, NetBIOS service TCP/IP text service (adds carriage return after each line feed) TCP/IP - Ricoh 406117 | Setup Guide - Page 351
sure that BOOTP is installed and running on your host computer (it should appear in the /etc/services file on your host as a real service; type man A the print server will load its IP address from the BOOTP server when the printer is powered on. Using RARP to configure the IP address The print server - Ricoh 406117 | Setup Guide - Page 352
printer is powered on. Using APIPA to configure the IP address The print server supports the available on Windows® systems that have TCP/IP installed as well as UNIX® systems. To use arp ethernetaddress Where ethernetaddress is the Ethernet address (MAC address) of the print server and ipaddress - Ricoh 406117 | Setup Guide - Page 353
Appendix A UNIX®/Linux systems Typically, UNIX® and Linux systems require the colon ":" character between each digit of the Ethernet address. arp -s 192.168.1.2 00:80:77:31:01:07 A Note You must be on the same Ethernet segment (that is, there cannot be a router between the print server and - Ricoh 406117 | Setup Guide - Page 354
Appendix A Local> SET IP SUBNET 255.255.255.0 If you do not have any subnets, use one of the following default subnet masks: 255.0.0.0 for class A networks A 255.255.0.0 for class B networks 255.255.255.0 for class C networks The leftmost group of digits in your IP address can identify the type of - Ricoh 406117 | Setup Guide - Page 355
to the Quick Setup Guide. 2 Select the model name and your language (if necessary), and then click Install Optional Applications. 3 Click Printer Driver (Only). 4 Click Next in response to the Welcome message. Follow the on-screen instructions. 5 Select Standard Installation and click Next. 6 Select - Ricoh 406117 | Setup Guide - Page 356
® 2000/XP Protocol support TCP/IP ARP, RARP, BOOTP, DHCP, APIPA (Auto IP), NetBIOS Name Resolution, WINS, DNS Resolver, LPR/LPD, Custom Raw A Port/Port9100, SMTP Client, POP3, IPP, FTP Server, mDNS, TELNET, SNMP, HTTP Network type Network printing Computer requirements (for drivers, BRAdmin - Ricoh 406117 | Setup Guide - Page 357
Appendix A Function Table and Default Factory Settings LEVEL LEVEL ONE TWO LEVEL THREE OPTIONS OPTIONS FACTORY SETTING 6.LAN 1.Setup 1.BOOT Method TCP/IP 2.IP Address Auto/ Static/ RARP/ BOOTP/ DHCP [000-255].[000-255].[000-255].[000-255] Auto A [169].[254].[001-254]. [000-255] *1 3. - Ricoh 406117 | Setup Guide - Page 358
Appendix A 7.Scan to 1.B/W File Type E-mail TIFF/PDF TIFF 2.ColorFile Type PDF/JPEG JPEG 0.Factory - Reset A *1: The factory setting for IP Address and Subnet Mask may be changed by the APIPA setting. A - 9 - Ricoh 406117 | Setup Guide - Page 359
-Peer 1-3 Ping 8-2, 8-3 POP3 5-2 Port9100 1-5 Protocol 1-5 R RARP 1-5, 3-2, A-2 Restoring the network settings 3-15 RFC 1001 A-1 S Service A-1 Simple Mail Transport Protocol 5-1 SMTP 5-1, 5-5 SMTP Client 1-6 SNMP 1-6 Specifications A-7 Subnet Mask 2-2, 3-4 T TCP/IP 1-5, 3-1 TCP - Ricoh 406117 | Setup Guide - Page 360
Index Windows® 2000 4-1, 5-1, 5-7, 8-4 Windows® 2000/XP Printing 4-1 Windows® 98/Me 8-3 Windows® 98/Me Printing 4-6 Windows® XP 4-1, 5-1, 5-7, 8-4 WINS Config 3-5 I WINS Server 3-5 Copylight © 2005 I - 2 - Ricoh 406117 | Setup Guide - Page 361
Network User's Guide EN USA G157-3302
-
 1
1 -
 2
2 -
 3
3 -
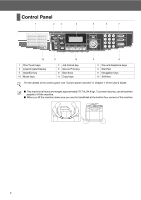 4
4 -
 5
5 -
 6
6 -
 7
7 -
8
-
9
-
10
-
11
-
12
-
13
-
14
-
15
-
16
-
17
-
18
-
19
-
20
-
21
-
22
-
23
-
24
-
25
-
26
-
27
-
28
-
29
-
30
-
31
-
32
-
33
-
34
-
35
-
36
-
37
-
38
-
39
-
40
-
41
-
42
-
43
-
44
-
45
-
46
-
47
-
48
-
49
-
50
-
51
-
52
-
53
-
54
-
55
-
56
-
57
-
58
-
59
-
60
-
61
-
62
-
63
-
64
-
65
-
66
-
67
-
68
-
69
-
70
-
71
-
72
-
73
-
74
-
75
-
76
-
77
-
78
-
79
-
80
-
81
-
82
-
83
-
84
-
85
-
86
-
87
-
88
-
89
-
90
-
91
-
92
-
93
-
94
-
95
-
96
-
97
-
98
-
99
-
100
-
101
-
102
-
103
-
104
-
105
-
106
-
107
-
108
-
109
-
110
-
111
-
112
-
113
-
114
-
115
-
116
-
117
-
118
-
119
-
120
-
121
-
122
-
123
-
124
-
125
-
126
-
127
-
128
-
129
-
130
-
131
-
132
-
133
-
134
-
135
-
136
-
137
-
138
-
139
-
140
-
141
-
142
-
143
-
144
-
145
-
146
-
147
-
148
-
149
-
150
-
151
-
152
-
153
-
154
-
155
-
156
-
157
-
158
-
159
-
160
-
161
-
162
-
163
-
164
-
165
-
166
-
167
-
168
-
169
-
170
-
171
-
172
-
173
-
174
-
175
-
176
-
177
-
178
-
179
-
180
-
181
-
182
-
183
-
184
-
185
-
186
-
187
-
188
-
189
-
190
-
191
-
192
-
193
-
194
-
195
-
196
-
197
-
198
-
199
-
200
-
201
-
202
-
203
-
204
-
205
-
206
-
207
-
208
-
209
-
210
-
211
-
212
-
213
-
214
-
215
-
216
-
217
-
218
-
219
-
220
-
221
-
222
-
223
-
224
-
225
-
226
-
227
-
228
-
229
-
230
-
231
-
232
-
233
-
234
-
235
-
236
-
237
-
238
-
239
-
240
-
241
-
242
-
243
-
244
-
245
-
246
-
247
-
248
-
249
-
250
-
251
-
252
-
253
-
254
-
255
-
256
-
257
-
258
-
259
-
260
-
261
-
262
-
263
-
264
-
265
-
266
-
267
-
268
-
269
-
270
-
271
-
272
-
273
-
274
-
275
-
276
-
277
-
278
-
279
-
280
-
281
-
282
-
283
-
284
-
285
-
286
-
287
-
288
-
289
-
290
-
291
-
292
-
293
-
294
-
295
-
296
-
297
-
298
-
299
-
300
-
301
-
302
-
303
-
304
-
305
-
306
-
307
-
308
-
309
-
310
-
311
-
312
-
313
-
314
-
315
-
316
-
317
-
318
-
319
-
320
-
321
-
322
-
323
-
324
-
325
-
326
-
327
-
328
-
329
-
330
-
331
-
332
-
333
-
334
-
335
-
336
-
337
-
338
-
339
-
340
-
341
-
342
-
343
-
344
-
345
-
346
-
347
-
348
-
349
-
350
-
351
-
352
-
353
-
354
-
355
-
356
-
357
-
358
-
359
-
360
-
361
 |
 |

Before you can use the machine, you must set up the hardware and install the software.
Please read this “Quick Setup Guide” for the correct setup procedure and installation
instructions.
Keep this “Quick Setup Guide”, User’s Guide and supplied CD-ROM in a convenient place for
quick and easy reference at all times.
Read this manual carefully before you use this product and keep it handy for future reference. For
safe and correct use, please be sure to read the Important Information in “User’s Guide” before
using the machine.
Step 1
Setting Up the machine
Step 2
Installing the Drivers & Software
Setup is Complete!
Installing the Drivers & Software
Setting Up
the machine
Windows
®
USB
Windows
®
Parallel
Windows
NT
®
4.0
Parallel
For
Network Users
Windows
®
Network
SP C210SF
Quick Setup Guide