Ricoh P 311 Setup Guide - Page 9
Connecting the Machine via Wireless (Wi-Fi), Easy Setup Using the Wi-Fi Setup Wizard
 |
View all Ricoh P 311 manuals
Add to My Manuals
Save this manual to your list of manuals |
Page 9 highlights
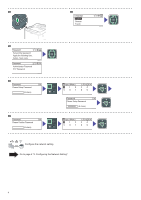
Connecting the Machine via Wireless (Wi-Fi) Easy Setup Using the Wi-Fi Setup Wizard From the control panel of this machine, you can also configure the Wireless (Wi-Fi) settings for the machine. The following item is necessary to set up a Wireless (Wi-Fi) connection. ● Router (access point) Checking the SSID and Encryption key The SSID and Encryption key for the router (access point) may be printed on a label affixed to the router (access point). For details about the SSID and Encryption key, refer to the router (access point) manual. SSID :XXXXXXXXXXXXX Encryption key :XXXXXXXXXXXXX DSG099 Confirm the SSID and Encryption key, and write them down on the blank space as shown below. SSID: Encryption key: DYG049 Configuring Settings Using the Control Panel ● Make sure the Ethernet cable is not connected to the machine. 1. Check that the router (access point) is working correctly. 2. Make sure the wireless LAN option is attached to the machine and the wireless (Wi-Fi) connection is enabled. For details, see page 5 "Attaching the wireless LAN option". 3. Press the [ ] or [ ] key to select [Network Setup], and then the [OK] key. Other Setup 12 Network Setup Quit Setup M0ESIC0010 4. Press the [ ] or [ ] key to select [Wireless (Wi-Fi)], and then the [OK] key. Network Wizard 12 Wired (Ethernet) Wireless (Wi-Fi) DYG071 5. Press the [ ] or [ ] key to select SSID of the router (access point) from the searched SSID list, and then press the [OK] key. Wi-Fi Setup Wizard 1 13 Network 1 Network 2 Network 3 ECB241 The next steps differ depending on the authentication method that you have selected. Proceed to Step 6 of the appropriate section. • If the authentication method is set to [WPA2-PSK] or [Mixed Mode WPA2/WPA] • If the authentication method is set to [Open system] or [Shared Key] • If the authentication method has not been configured, proceed to Step 7. 7
-
 1
1 -
2
-
3
-
 4
4 -
 5
5 -
 6
6 -
 7
7 -
 8
8 -
 9
9 -
 10
10 -
 11
11 -
 12
12 -
 13
13 -
 14
14 -
15
-
16
-
17
-
18
 |
 |
