Rocketfish RF-BTCMBO User Manual (English)
Rocketfish RF-BTCMBO Manual
 |
View all Rocketfish RF-BTCMBO manuals
Add to My Manuals
Save this manual to your list of manuals |
Rocketfish RF-BTCMBO manual content summary:
- Rocketfish RF-BTCMBO | User Manual (English) - Page 1
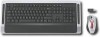
Bluetooth Keyboard and Mouse Combo Ensemble clavier et souris Bluetooth Combo de Teclado y Ratón Bluetooth RF-BTCMBO User Guide Guide de l'utilisateur Guía del Usuario - Rocketfish RF-BTCMBO | User Manual (English) - Page 2
the keyboard and mouse 9 Troubleshooting 23 Legal notices 24 Warranty 27 Français 29 Español 57 Introduction Congratulations on your purchase of a Rocketfish Bluetooth keyboard and mouse. This guide explains how to correctly operate and get the best performance from your wireless keyboard and - Rocketfish RF-BTCMBO | User Manual (English) - Page 3
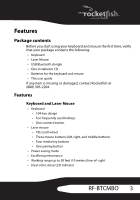
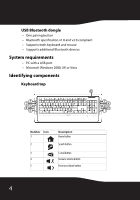
package contains the following: • Keyboard • Laser Mouse • USB Bluetooth dongle • One installation CD • Batteries for the keyboard and mouse • This user guide If any item is missing or damaged, contact Rocketfish at (800) 305-2204. Features Keyboard and Laser Mouse • Keyboard • 104-key design • Ten - Rocketfish RF-BTCMBO | User Manual (English) - Page 4
dongle • One pairing button • Bluetooth specification v1.0 and v2.0 compliant • Supports both keyboard and mouse • Supports additional Bluetooth devices System requirements • PC with a USB port • Microsoft Windows 2000, XP, or Vista Identifying components Keyboard top 6 1 7 2 8 43 9 10 5 11 - Rocketfish RF-BTCMBO | User Manual (English) - Page 5
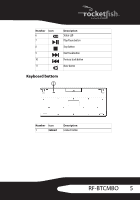
Number Icon 6 7 8 9 10 11 Description Status LED Play/Pause button Stop button Next track button Previous track button Mute button Keyboard bottom 1 Number Icon 1 Connect Description Connect button RF-BTCMBO 5 - Rocketfish RF-BTCMBO | User Manual (English) - Page 6
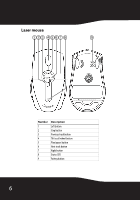
Laser mouse 1 23 4567 8 9 Number 1 2 3 4 5 6 7 8 9 Description Left button Stop button Previous track button Tilt/scroll wheel button Play/pause button Next track button Right button Status LED Pairing button 6 - Rocketfish RF-BTCMBO | User Manual (English) - Page 7
on, battery level normal. Low battery Mouse/keyboard pairing Battery status You can view more detailed information on the keyboard and mouse battery status. To view more detailed information on the keyboard battery status: • Click Start, Control Panel, Keyboard, then click Bluetooth. RF-BTCMBO 7 - Rocketfish RF-BTCMBO | User Manual (English) - Page 8
To view more detailed information on the mouse battery status: • Click Start, Control Panel, Mouse, then click Bluetooth. To change the settings for the low battery alarm: 1 In the Keyboard Status dialog box or the Mouse Status dialog box, click the Low Battery Alarm button to open the following - Rocketfish RF-BTCMBO | User Manual (English) - Page 9
Using the keyboard and mouse Installing the batteries The keyboard and mouse both need two AA alkaline batteries. Complete the following steps to install the batteries. Keyboard To install the keyboard batteries: 1 Remove the battery cover as shown. RF-BTCMBO 9 - Rocketfish RF-BTCMBO | User Manual (English) - Page 10
2 Install two AA batteries according to the polarity (+ and -) marks indicated inside the compartment. 3 Replace the battery cover. 10 - Rocketfish RF-BTCMBO | User Manual (English) - Page 11
Laser mouse To install the laser mouse batteries: 1 Press the tab to release the battery cover, then remove it. 2 Install two AA batteries according to the polarity (+ and -) indicated inside the compartment. RF-BTCMBO 11 - Rocketfish RF-BTCMBO | User Manual (English) - Page 12
the WIDCOMM Bluetooth Software wizard. Note: If the "Bluetooth device not found" message appears, plug the USB Bluetooth dongle into keyboard and mouse pair automatically. 5 Click Finish to exit the installation. 6 In Windows 2000, a prompt requires you to restart the computer so that the Bluetooth - Rocketfish RF-BTCMBO | User Manual (English) - Page 13
click Add/Remove Programs. 3 Click WIDCOMM Bluetooth Software from the program list, then click Uninstall (Windows Vista) or Remove (Windows 2000 or Windows XP). A confirmation message appears. 4 No to restart later. Setting up the keyboard and laser mouse Automatic pairing in Boot mode RF-BTCMBO 13 - Rocketfish RF-BTCMBO | User Manual (English) - Page 14
setup. Note: See "Troubleshooting" on page 23 for additional troubleshooting information. To enable the keyboard and mouse in BIOS: 1 Make sure the Bluetooth connection has been established before turning on your computer. 2 Turn on your computer, then follow the on-screen instructions to enter the - Rocketfish RF-BTCMBO | User Manual (English) - Page 15
properly and fully charged. • The USB Bluetooth dongle is plugged into a USB port on your computer. • The mouse is turned on. Note: To start the Bluetooth stack for the first time, see "Using the stack for the first time in Windows 2000 or Windows XP" on page 20 for more information. RF-BTCMBO 15 - Rocketfish RF-BTCMBO | User Manual (English) - Page 16
Press the Connect button on the mouse and keyboard to start pairing. 2 Press the USB Bluetooth dongle button until the Human Interface Device (HID) screen appears. Your computer starts to search for all Bluetooth devices. When the connection to the mouse is established, this message appears: 3 Click - Rocketfish RF-BTCMBO | User Manual (English) - Page 17
Plug the USB Bluetooth dongle into an available USB port on your computer. 3 Insert the provided installation CD in the CD or DVD drive. The software starts automatically. Note: If the software does not load automatically, double-click Setup.exe in the bin folder of the installation CD. RF-BTCMBO 17 - Rocketfish RF-BTCMBO | User Manual (English) - Page 18
4 Complete the Bluetooth Mouse Setup wizard to install the Bluetooth mouse software. 5 Restart your computer before using the Bluetooth mouse software. Uninstalling the Bluetooth mouse software To uninstall the Bluetooth mouse software: 1 Remove the USB Bluetooth dongle. 2 In Windows Vista, click - Rocketfish RF-BTCMBO | User Manual (English) - Page 19
down arrows. Scroll one screen per notch Select to scroll the entire window when the scroll wheel is moved one notch (page up/page down). 3 To set the horizontal scroll speed, move the slider toward Slow or Fast or click Use Default to restore the factory settings, then click OK. RF-BTCMBO 19 - Rocketfish RF-BTCMBO | User Manual (English) - Page 20
Using the WIDCOMM Bluetooth stack Using the stack for the first time in Windows 2000 or Windows XP To start using the Bluetooth stack: 1 Double-click the Bluetooth icon in the system tray. The Initial Bluetooth Configuration Wizard opens. 2 Follow the on-screen instructions to complete the - Rocketfish RF-BTCMBO | User Manual (English) - Page 21
connect with, then follow the on-screen instructions to enable the selected device. Interpreting the Bluetooth icon The Bluetooth icon acts as an indicator for dongle other devices in Windows 2000 and Windows XP The Bluetooth stack allows you to connect to other Bluetooth devices. RF-BTCMBO 21 - Rocketfish RF-BTCMBO | User Manual (English) - Page 22
will recognize and connect to them. 3 Press the USB Bluetooth dongle button until the following screen appears. 4 Select the type of devices to search for from the drop-down menu. The detected devices are displayed. 5 Click on a device, then the stack instructs you to enable the connection. 22 - Rocketfish RF-BTCMBO | User Manual (English) - Page 23
the Bluetooth stack (see "Installing the WIDCOMM Bluetooth stack" on page 12) has been installed in your computer, you can check the battery status of keyboard and mouse by clicking Start, Control Panel, Keyboard, then Bluetooth or clicking Start, Control Panel, Mouse, then Bluetooth. RF-BTCMBO 23 - Rocketfish RF-BTCMBO | User Manual (English) - Page 24
14. • If your PC system's BIOS setup has options for the keyboard or mouse, make sure they are set to default settings. If you are not familiar with the BIOS, refer to your PC's manual for more information. • Only use the mouse on a clean, flat surface in order to ensure smooth and accurate cursor - Rocketfish RF-BTCMBO | User Manual (English) - Page 25
the Rocketfish logo are trademarks of Best Buy Enterprise Services, Inc. Other brands and product names are trademarks or registered trademarks of their respective holders. Specifications and features are subject to change without notice or obligation. For service and support call (800) 305-2204. RF - Rocketfish RF-BTCMBO | User Manual (English) - Page 26
26 - Rocketfish RF-BTCMBO | User Manual (English) - Page 27
limited warranty Rocketfish Products ("Rocketfish") warrants to you, the original purchaser of this new RF-BTCMBO ("Product"), replaced under this warranty become the property of Rocketfish and are not returned to you. If service of Products and parts are required after the instruction RF-BTCMBO 27 - Rocketfish RF-BTCMBO | User Manual (English) - Page 28
STATE TO STATE OR PROVINCE TO PROVINCE. Contact Rocketfish: For customer service please call 1-800-620-2790 www.rocketfishproducts.com ROCKETFISH™ is a trademark of Best Buy Enterprise Services, Inc. Distributed by Best Buy Purchasing, LLC. Rocketfish, 7601 Penn Avenue South, Richfield, Minnesota - Rocketfish RF-BTCMBO | User Manual (English) - Page 29
Rocketfish RF-BTCMBO Ensemble clavier et souris Bluetooth Table des matières Introduction 29 Fonctionnalités 30 Identification des composants 31 Utilisation du clavier et de la souris 36 Problèmes et solutions 51 - Rocketfish RF-BTCMBO | User Manual (English) - Page 30
contient les éléments suivants : • Clavier • Souris laser • Clé USB Bluetooth • Un CD d'installation • Piles pour le clavier et la souris • Ce guide de l'utilisateur Si un article manque ou est endommagé, contacter Rocketfish au (800) 305-2204. Fonctionnalités Clavier et souris laser • Clavier - Rocketfish RF-BTCMBO | User Manual (English) - Page 31
• PC avec un port USB • Microsoft Windows 2000, XP ou Vista Identification des composants Dessus du clavier 6 1 7 2 8 43 9 10 5 11 Numéro Icône 1 2 3 4 5 Description Touche Accueil Touche Recherche Touche Courriel Touche Augmentation du volume Touche Diminution du volume RF-BTCMBO 31 - Rocketfish RF-BTCMBO | User Manual (English) - Page 32
Numéro Icône 6 7 8 9 10 11 Description DEL d'état Touche Lecture/Pause Touche Arrêt Touche Piste suivante Touche Piste précédente Touche Sourdine Dessous du clavier 1 Numéro Icône Description 1 Connexion Touche Connexion 32 - Rocketfish RF-BTCMBO | User Manual (English) - Page 33
Souris laser 1 23 4567 8 9 Numéro 1 2 3 4 5 6 7 8 9 Description Bouton gauche Touche Arrêt Touche Piste précédente Touche de la roulette de défilement/multidirectionnelle Touche Lecture/Pause Touche Piste suivante Bouton droit DEL d'état Bouton de couplage RF-BTCMBO 33 - Rocketfish RF-BTCMBO | User Manual (English) - Page 34
défilement horizontal, il faut installer sur l'ordinateur le logiciel pour souris Bluetooth. Voir « Installing the Bluetooth mouse software », à la page 17, pour de plus amples informations. DEL Start (Démarrer), Control Panel (Panneau de configuration), Keyboard (Clavier), puis sur Bluetooth. 34 - Rocketfish RF-BTCMBO | User Manual (English) - Page 35
te de dialogue Keyboard Status (État du clavier) ou dans la boîte de dialogue Mouse Status (État de la souris), cliquer sur le bouton Low Battery Alarm (Témoin d'alerte des piles) pour ouvrir la boîte de dialogue suivante. 2 Changer les réglages en fonction des préférences personnelles. RF-BTCMBO 35 - Rocketfish RF-BTCMBO | User Manual (English) - Page 36
Utilisation du clavier et de la souris Installation des piles Le clavier et la souris ont chacun besoin de deux piles alcalines de type AA. Suivre les étapes ci-dessous pour installer les piles. Clavier Pour installer les piles dans le clavier : 1 Retirer le couvercle du compartiment des piles comme - Rocketfish RF-BTCMBO | User Manual (English) - Page 37
2 Installer deux piles de type AA en respectant les repères de polarité (+ et -) figurant à l'intérieur du compartiment. 3 Remettre le couvercle du compartiment des piles. RF-BTCMBO 37 - Rocketfish RF-BTCMBO | User Manual (English) - Page 38
Souris laser Pour installer les piles dans la souris laser : 1 Appuyer sur l'onglet pour ouvrir le couvercle du compartiment des piles, puis le retirer. 2 Installer deux piles de type AA en respectant la polarité (+ et -) indiquée à l'intérieur du compartiment. 38 - Rocketfish RF-BTCMBO | User Manual (English) - Page 39
riel (Found New Hardware Wizard) commence à installer les composants de la clé USB Bluetooth. 4 Une fois que l'assistant a terminé, retirer la clé USB, puis la reconnecter. Le clavier et la souris se couplent automatiquement. 5 Cliquer sur Finish (Terminer) pour terminer l'installation. RF-BTCMBO 39 - Rocketfish RF-BTCMBO | User Manual (English) - Page 40
Programs (Ajout/Suppression de programmes). 3 Cliquer sur WIDCOMM Bluetooth Software (Logiciel Bluetooth WIDCOMM) dans la liste de programmes, puis cliquer sur Uninstall (Désinstaller) (Windows Vista) ou Remove (Supprimer) (Windows 2000 ou Windows XP). Un message de confirmation apparaît. 4 Cliquer - Rocketfish RF-BTCMBO | User Manual (English) - Page 41
Bluetooth a commencé à rechercher un périphérique pour le couplage. La connexion Bluetooth est établie. 4 Mettre l'ordinateur sous tension et utiliser le clavier pour accéder à la configuration du BIOS. 5 Utiliser le clavier et la souris pour afficher le menu et configurer les paramètres. RF-BTCMBO - Rocketfish RF-BTCMBO | User Manual (English) - Page 42
configuration du BIOS. Remarque : Voir « Troubleshooting » à la page 23 pour de plus Bluetooth a été établie avant la mise sous tension de l'ordinateur. 2 Mettre l'ordinateur sous tension, puis suivre les instructions DOS. Couplage rapide sous Windows Le clavier et la souris Bluetooth sont préréglés - Rocketfish RF-BTCMBO | User Manual (English) - Page 43
• La clé USB Bluetooth est connectée à un port USB de l'ordinateur. • La souris est sous tension. Remarque : Pour démarrer la pile Bluetooth pour la première fois, voir « Using the stack for the first time in Windows 2000 or Windows XP », à la page 20, pour de plus amples informations. RF-BTCMBO 43 - Rocketfish RF-BTCMBO | User Manual (English) - Page 44
du clavier pour commencer le couplage. 2 Appuyer sur la clé USB Bluetooth jusqu'à l'affichage de la fenêtre HID (Périphérique d'interface utilisateur). L'ordinateur commence à rechercher tous les périphériques Bluetooth. Lorsque la connexion avec la souris est établie, le message suivant s'affiche - Rocketfish RF-BTCMBO | User Manual (English) - Page 45
cran, puis appuyer sur Enter (Entrée). Le clavier est connecté. Remarque : Le code de sécurité de Bluetooth change chaque fois que le clavier est connecté. Remarque : Le clavier et la souris se mettent en mode , double-cliquer sur Setup.exe dans le dossier bin du CD d'installation. RF-BTCMBO 45 - Rocketfish RF-BTCMBO | User Manual (English) - Page 46
Add/Remove Programs (Ajout/Suppression de programmes). 3 Sélectionner Bluetooth Mouse (Souris Bluetooth) dans la liste de programmes, puis cliquer sur Uninstall (Désinstaller) (Windows Vista) ou Remove (Supprimer) (Windows 2000 ou Windows XP). Un message de confirmation apparaît. 4 Cliquer sur Yes - Rocketfish RF-BTCMBO | User Manual (English) - Page 47
me, puis cliquer sur Adjust Property (Régler les propriétés). La boîte de dialogue Bluetooth Mouse Property (Propriétés de souris Bluetooth) s'ouvre. 2 Pour définir la vitesse de défilement vertical, sélectionner une ) pour rétablir les valeurs fixées en usine, puis cliquer sur OK. RF-BTCMBO 47 - Rocketfish RF-BTCMBO | User Manual (English) - Page 48
de la pile pour la première fois sous Windows 2000 ou Windows XP Pour commencer à utiliser la pile Bluetooth : 1 Double-cliquer sur l'icône Bluetooth dans la barre d'état système. L'Assistant de configuration initial Bluetooth s'affiche. 2 Suivre les instructions à l'écran afin de procéder à la - Rocketfish RF-BTCMBO | User Manual (English) - Page 49
Bluetooth. 3 Cliquer sur le périphérique HID souhaité, puis suivre les instructions affichées à l'écran pour l'activer. Interprétation de l'icône Bluetooth L'icône Bluetooth Windows 2000 et Windows XP La pile Bluetooth permet d'établir une connexion avec d'autres périphériques Bluetooth. RF-BTCMBO - Rocketfish RF-BTCMBO | User Manual (English) - Page 50
du menu déroulant. Les périphériques détectés sont affichés. 5 Cliquer sur un périphérique : la pile demande d'activer la connexion. Utilisation de la pile sous Windows Vista Pour utiliser la pile Bluetooth : 1 Double-cliquer sur l'icône Bluetooth dans la barre d'état système. 50 - Rocketfish RF-BTCMBO | User Manual (English) - Page 51
de configuration. Problèmes et solutions En cas de problèmes avec le clavier ou la souris Bluetooth, vérifier ce qui suit : • Vérifier que le système est compatible avec la concernant les paramètres, voir « Enabling the USB keyboard and mouse function in BIOS » à la page 14. RF-BTCMBO 51 - Rocketfish RF-BTCMBO | User Manual (English) - Page 52
de familiarité avec le BIOS, se référer au guide de l'utilisateur du PC pour de plus amples informations Pour toute assistance complémentaire ou questions, contacter Rocketfish au (800) 305-2204 pour l'assistance technique installé et utilisé conformément aux instructions dont il fait l'objet, il peut - Rocketfish RF-BTCMBO | User Manual (English) - Page 53
permettant des communications parfaites. Droits d'auteurs © 2007 Rocketfish. Rocketfish et le logo de Rocketfish sont des marques de commerce de Best Buy Enterprise Services, Inc. Les autres noms de marques et de Pour toute réparation ou assistance technique, appeler le (800) 305-2204. RF-BTCMBO 53 - Rocketfish RF-BTCMBO | User Manual (English) - Page 54
54 - Rocketfish RF-BTCMBO | User Manual (English) - Page 55
Garantie limitée d'un an Rocketfish Products (« Rocketfish ») garantit au premier acheteur de ce RF-BTCMBO neuf (« Produit »), qu' d'origine est détecté sur le Produit par un service de réparation agréé par Rocketfish ou le personnel du magasin, Rocketfish (à sa seule discrétion) : (1) réparera le - Rocketfish RF-BTCMBO | User Manual (English) - Page 56
OU D'UNE PROVINCE À L'AUTRE. Contacter Rocketfish : Pour le service à la clientèle, appeler le 1-800-620-2790 www.rocketfishproducts.com ROCKETFISHMC est une marque de commerce de Best Buy Enterprise Services, Inc. Distribué par Best Buy Purchasing, LLC Rocketfish, 7601 Penn Avenue South, Richfield - Rocketfish RF-BTCMBO | User Manual (English) - Page 57
Rocketfish RF-BTCMBO Combo de Teclado y Ratón Bluetooth Contenido Introducción 57 Características 58 Identificación de componentes 59 Uso del teclado y del ratón 64 Localización y corrección de fallas 79 Avisos legales 80 Garantía - Rocketfish RF-BTCMBO | User Manual (English) - Page 58
su paquete contiene lo siguiente: • Teclado • Ratón láser • Adaptador USB para Bluetooth • Un CD de instalación • Pilas para el teclado y el ratón • del usuario Si algún artículo falta o está dañado, comuníquese con Rocketfish al (800) 305-2204. Características Teclado y ratón láser • Teclado • Dise - Rocketfish RF-BTCMBO | User Manual (English) - Page 59
USB • Microsoft Windows 2000, XP o Vista Identificación de componentes Parte superior del teclado 6 1 7 2 8 43 9 10 5 11 Número Icono 1 2 3 4 5 Descripción Botón de inicio Botón de búsqueda Botón de correo electrónico Botón para subir el volumen Botón para bajar el volumen RF-BTCMBO 59 - Rocketfish RF-BTCMBO | User Manual (English) - Page 60
Número Icono 6 7 8 9 10 11 Descripción Indicador LED de estado Botón Reproducir/Pausar Botón Detener Botón de siguiente pista Botón de pista anterior Botón de silenciamiento Parte inferior del teclado 1 Número Icono 1 Conectar Descripción Botón de conexión 60 - Rocketfish RF-BTCMBO | User Manual (English) - Page 61
Ratón láser 1 23 4567 8 9 Número 1 2 3 4 5 6 7 8 9 Descripción Botón izquierdo Botón Detener Botón de pista anterior Botón rueda de desplazamiento/inclinación Botón Reproducir/Pausar Botón de siguiente pista Botón derecho Indicador LED de estado Botón de emparejamiento RF-BTCMBO 61 - Rocketfish RF-BTCMBO | User Manual (English) - Page 62
habilitar el desplazamiento horizontal, necesita instalar el software del ratón Bluetooth en su computadora. Refiérase a "Installing the Bluetooth mouse software" en la página 17 para obtener más clic en Start (Inicio), Control Panel (Panel de control), Keyboard (Teclado) y luego en Bluetooth. 62 - Rocketfish RF-BTCMBO | User Manual (English) - Page 63
baja: 1 En el cuadro de diálogo Keyboard Status (Estado del teclado) o en el cuadro de diálogo Mouse Status (Estado del ratón), haga clic en el botón Low Battery Alarm (Alarma de pila baja) para abrir el siguiente cuadro de diálogo. 2 Cambie los ajustes de acuerdo a sus preferencias. RF-BTCMBO 63 - Rocketfish RF-BTCMBO | User Manual (English) - Page 64
Uso del teclado y del ratón Instalación de las pilas El teclado y el ratón necesitan dos pilas alcalinas tipo AA. Siga los siguientes pasos para instalar las pilas. Teclado Para instalar las pilas del teclado: 1 Quite la cubierta de las pilas, según se muestra. 64 - Rocketfish RF-BTCMBO | User Manual (English) - Page 65
2 Instale dos pilas tipo AA de acuerdo a las marcas de polaridad (+ y -) que se encuentran dentro del compartimiento. 3 Vuelva a colocar la cubierta de las pilas. RF-BTCMBO 65 - Rocketfish RF-BTCMBO | User Manual (English) - Page 66
Ratón láser Para instalar las pilas del ratón láser: 1 Presione la lengüeta para liberar la cubierta de la pila y quítela. 2 Instale dos pilas tipo AA de acuerdo a la polaridad (+ y -) indicada dentro del compartimiento. 66 - Rocketfish RF-BTCMBO | User Manual (English) - Page 67
nuevo encontrado instalará los componentes para el adaptador USB para Bluetooth. 4 Después que el asistente termine, desconecte el adaptador y reconéctelo. Su teclado y ratón se emparejarán automáticamente. 5 Haga clic en Finish (Finalizar) para salir del asistente de instalación. RF-BTCMBO 67 - Rocketfish RF-BTCMBO | User Manual (English) - Page 68
luego en Add/Remove Hardware (Agregar o quitar hardware). 3 Haga clic en WIDCOMM Bluetooth Software en la lista de programas y luego en Uninstall [Desinstalar] (Windows Vista) o Remove [Quitar] (Windows 2000 o Windows XP). Aparece un mensaje de confirmación. 4 Haga clic en Yes (Sí) para desinstalar - Rocketfish RF-BTCMBO | User Manual (English) - Page 69
el adaptador Bluetooth ha empezado a buscar un dispositivo con el que se ha de emparejar. La conexión Bluetooth se ha establecido. 4 Encienda la computadora y use el teclado para ingresar a la configuración del BIOS. 5 Use el teclado y el ratón para ver el menú y configurar los ajustes. RF-BTCMBO 69 - Rocketfish RF-BTCMBO | User Manual (English) - Page 70
ratón está activada en la configuración del BIOS. Nota: Refiérase a "Troubleshooting" en la página 23 para obtener información adicional sobre localización y corrección de BIOS o DOS. Emparedamiento rápido en Windows El teclado y ratón Bluetooth han sido configurados con pre-emparejamiento como el - Rocketfish RF-BTCMBO | User Manual (English) - Page 71
USB para Bluetooth está conectado en un puerto USB de su computadora. • El ratón está activado. Nota: Para arrancar la pila Bluetooth por primera vez, refiérase a la sección "Using the stack for the first time in Windows 2000 or Windows XP" en la página 20 para obtener más información. RF-BTCMBO 71 - Rocketfish RF-BTCMBO | User Manual (English) - Page 72
teclado para comenzar el emparejamiento. 2 Presione el botón del adaptador Bluetooth para USB hasta que aparezca la pantalla del dispositivo de interfaz humana (HID). Su computadora comenzará a buscar todos los dispositivos Bluetooth. Cuando se establezca la conexión al ratón, aparecerá este mensaje - Rocketfish RF-BTCMBO | User Manual (English) - Page 73
software para el ratón Bluetooth: 1 Asegúrese de que la pila WIDCOMM se ha instalado en su computadora. 2 Conecte el adaptador USB para Bluetooth en un puerto USB de su computadora. 3 Inserte el CD de instalación suministrado en la unidad de CD o DVD. El software arrancará automáticamente. RF-BTCMBO - Rocketfish RF-BTCMBO | User Manual (English) - Page 74
. 5 Reinicie su computadora antes de usar el software del ratón Bluetooth. Desinstalación del software para el ratón Bluetooth Para desinstalar el software para el ratón Bluetooth: 1 Desconecte el adaptador USB para Bluetooth 2 En Windows Vista, haga clic en Start (Inicio), Control Panel (Panel - Rocketfish RF-BTCMBO | User Manual (English) - Page 75
Adjust Property (Ajustar propiedades). Se abrirá el cuadro de diálogo Bluetooth Mouse Property (Propiedades del ratón Bluetooth). 2 Para configurar la velocidad de desplazamiento vertical, seleccione uno de ) para restaurar la configuración de fábrica y haga clic en OK (Aceptar). RF-BTCMBO 75 - Rocketfish RF-BTCMBO | User Manual (English) - Page 76
Uso de la pila WIDCOMM para Bluetooth Uso de la pila por primera vez en Windows 2000 o Windows XP Para comenzar a usar la pila Bluetooth: 1 Haga doble clic en el icono Bluetooth en la bandeja del sistema. Se abre el Initial Bluetooth Configuration Wizard (Asistente de configuración inicial de - Rocketfish RF-BTCMBO | User Manual (English) - Page 77
el dispositivo seleccionado. Interpretación del icono de Bluetooth El icono Bluetooth actúa como un indicador del estado del adaptador. Color del icono Rojo Blanco Verde Indica El adaptador no está insertado El adaptador está conectado El adaptador ha detectado los dispositivos RF-BTCMBO 77 - Rocketfish RF-BTCMBO | User Manual (English) - Page 78
Conexión a otros dispositivos en Windows 2000 y Windows XP La pila Bluetooth le permite conectarse a otros dispositivos con tecnología Bluetooth. Para conectarse a otros dispositivos Bluetooth: 1 Compruebe que el adaptador Bluetooth para USB esté conectado en su computadora. 2 Configure los - Rocketfish RF-BTCMBO | User Manual (English) - Page 79
Uso de la pila en Windows Vista Para usar la pila de Bluetooth: 1 Haga doble clic en el icono Bluetooth en la bandeja del sistema. Se abre la pantalla de configuración de Bluetooth. 2 Haga clic en la color rojo, la pila tiene poca carga. Reemplácelas inmediatamente con pilas nuevas. RF-BTCMBO 79 - Rocketfish RF-BTCMBO | User Manual (English) - Page 80
de control), Keyboard (Teclado) y luego Bluetooth o haga clic en Start (Inicio), Control Panel (Panel de control), Mouse (Ratón) y luego Bluetooth. • Si con cualquier otra pregunta que pueda tener, póngase en contacto con Rocketfish al (800) 305-2204 para recibir asistencia técnica. Avisos legales - Rocketfish RF-BTCMBO | User Manual (English) - Page 81
de radiación del FDA 21 CFR, subcapítulo J. Declaración del ICES-003 de Canadá Este aparato digital de Clase B cumple con el ICES-003 canadiense. RF-BTCMBO 81 - Rocketfish RF-BTCMBO | User Manual (English) - Page 82
(EIRP) no sea más que la permitida para una comunicación exitosa. Derechos de reproducción © 2007 Rocketfish. Rocketfish y el logotipo de Rocketfish son marcas comerciales de Best Buy Enterprise Services, Inc. Otras marcas y nombres de productos son marcas comerciales o marcas registradas de sus - Rocketfish RF-BTCMBO | User Manual (English) - Page 83
Garantía Garantía limitada de un año Rocketfish Products ("Rocketfish") le garantiza a usted, el comprador original de este nuevo RF-BTCMBO ("Producto"), que éste se encontrará libre de defectos de material o de mano de obra en su fabricación original por un periodo de un (1) año a partir de - Rocketfish RF-BTCMBO | User Manual (English) - Page 84
, O DE PROVINCIA A PROVINCIA. Comuníquese con Rocketfish: Para servicio al cliente favor llamar al 1-800-620-2790 www.rocketfishproducts.com ROCKETFISH™ es una marca comercial de Best Buy Enterprise Services, Inc. Distribuido por Best Buy Purchasing, LLC Rocketfish, 7601 Penn Avenue South, Richfield - Rocketfish RF-BTCMBO | User Manual (English) - Page 85
RF-BTCMBO 85 - Rocketfish RF-BTCMBO | User Manual (English) - Page 86
-
 1
1 -
 2
2 -
 3
3 -
 4
4 -
 5
5 -
 6
6 -
 7
7 -
8
-
9
-
10
-
11
-
12
-
13
-
14
-
15
-
16
-
17
-
18
-
19
-
20
-
21
-
22
-
23
-
24
-
25
-
26
-
27
-
28
-
29
-
30
-
31
-
32
-
33
-
34
-
35
-
36
-
37
-
38
-
39
-
40
-
41
-
42
-
43
-
44
-
45
-
46
-
47
-
48
-
49
-
50
-
51
-
52
-
53
-
54
-
55
-
56
-
57
-
58
-
59
-
60
-
61
-
62
-
63
-
64
-
65
-
66
-
67
-
68
-
69
-
70
-
71
-
72
-
73
-
74
-
75
-
76
-
77
-
78
-
79
-
80
-
81
-
82
-
83
-
84
-
85
-
86
 |
 |

Bluetooth Keyboard and Mouse
Combo
Ensemble clavier et souris Bluetooth
Combo de Teclado y Ratón Bluetooth
RF-BTCMBO
User Guide
Guide de l’utilisateur
Guía del Usuario