Rocketfish RF-BTCMBO User Manual (English) - Page 14
Enabling the USB keyboard and mouse function in BIOS, Quick pairing in Windows
 |
View all Rocketfish RF-BTCMBO manuals
Add to My Manuals
Save this manual to your list of manuals |
Page 14 highlights
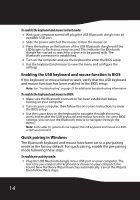
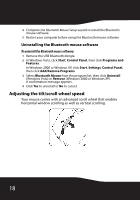
To enable the keyboard and mouse in boot mode: 1 With your computer turned off, plug the USB Bluetooth dongle into an available USB port. 2 Slide the power switch of the mouse to turn the mouse on. 3 Press the button on the bottom of the USB Bluetooth dongle until the LED begins to flash once every second. This indicates the Bluetooth dongle has started to search for a device to be paired with. The Bluetooth connection is established. 4 Turn on the computer and use the keyboard to enter the BIOS setup. 5 Use the keyboard and mouse to view the menu and configure the settings. Enabling the USB keyboard and mouse function in BIOS If the keyboard or mouse failed to work, verify that the USB keyboard and mouse function has been enabled in the BIOS setup. Note: See "Troubleshooting" on page 23 for additional troubleshooting information. To enable the keyboard and mouse in BIOS: 1 Make sure the Bluetooth connection has been established before turning on your computer. 2 Turn on your computer, then follow the on-screen instructions to enter the BIOS setup. 3 Use the cursor keys on the keyboard to navigate through the menu items and enable the USB keyboard and mouse function. (In some BIOS settings, you can use the Bluetooth mouse to navigate through the items.) Note: Some older PC systems do not support the USB keyboard and mouse in a BIOS or DOS environment. Quick pairing in Windows The Bluetooth keyboard and mouse have been set to a pre-pairing mode as the factory default. For quick pairing, enable the pre-pairing mode following these steps. To enable pre-pairing mode: 1 Plug the USB Bluetooth dongle into a USB port on your computer. The first time you connect the keyboard or mouse to your computer, the Found New Hardware Wizard launches automatically. Cancel the Wizard, then follow these steps. 14
-
 1
1 -
2
-
3
-
4
-
5
-
6
-
7
-
8
-
 9
9 -
 10
10 -
 11
11 -
 12
12 -
 13
13 -
 14
14 -
 15
15 -
 16
16 -
 17
17 -
 18
18 -
 19
19 -
20
-
21
-
22
-
23
-
24
-
25
-
26
-
27
-
28
-
29
-
30
-
31
-
32
-
33
-
34
-
35
-
36
-
37
-
38
-
39
-
40
-
41
-
42
-
43
-
44
-
45
-
46
-
47
-
48
-
49
-
50
-
51
-
52
-
53
-
54
-
55
-
56
-
57
-
58
-
59
-
60
-
61
-
62
-
63
-
64
-
65
-
66
-
67
-
68
-
69
-
70
-
71
-
72
-
73
-
74
-
75
-
76
-
77
-
78
-
79
-
80
-
81
-
82
-
83
-
84
-
85
-
86
 |
 |
