Ryobi BE319 Manual 1 - Page 7
Operation - belt sander
 |
View all Ryobi BE319 manuals
Add to My Manuals
Save this manual to your list of manuals |
Page 7 highlights
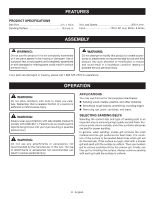
OPERATION INSTALLING/CHANGING SANDING BELTS See Figures 1 - 3, page 11. Unplug the sander. Position the sander on its side with the cord on the left. WARNING: Keep hands and fingers clear of both rollers and spring mechanism at all times. Failure to do so could result in fingers getting pinched, causing serious injury. Raise the tension release lever. NOTE: If you are changing sanding belts, remove the old sanding belt at this time. Install the sanding belt. CAUTION: If the sanding belt is not a bidirectional belt, ensure that the arrow inside the belt is pointing in the direction of the rotation (clockwise when looking into the open side of the sander). Installing unidirectional sanding belts backwards can create a hazardous condition. Align the sanding belt to its correct position. Lower the tension release lever to secure the sanding belt. ADJUSTING SANDING BELT TRACKING See Figures 4 - 5, page 11. Belt life is greatly increased if you regularly adjust the sanding belt tracking. When correctly adjusted, the outer edge of the sanding belt should be even with the outer edge of the base of the sander. When you install a new sanding belt, you may need to adjust the sanding belt tracking several times until the belt becomes conditioned. Follow these steps to adjust sanding belt tracking. WARNING: Before connecting the sander to a power supply, always make sure it is not in the "locked-on" position. Failure to do so could result in accidental starting of the sander resulting in possible serious injury. Connect the sander to a power supply. Position the sander upside down with the cord on the left. NOTE: This position is for adjustments only. The sanding belt should not contact a workpiece or any foreign object when you are making belt tracking adjustments. Depress the switch trigger and release immediately. Choose one of these options: Sanding belt runs inward: Turn the tracking knob slowly counterclockwise. Sanding belt runs outward: Turn the tracking knob slowly clockwise. NOTE: Turn the tracking knob until you are sure the sanding belt is secure, i.e., it will not come off the sander or contact internal parts. NOTICE: If the sanding belt wears excessively on the inner edge it is probably adjusted too far inward and is rubbing against internal parts. If this is the case, readjust the tracking knob. Start the sander and fine adjust the tracking knob until the belt stabilizes. WARNING: Keep hands and fingers away from a moving sanding belt. Any part of the body coming in contact with a moving sanding belt could result in serious injury. Do not wear loose clothing or jewelry when operating the sander. They could get caught in moving parts and foreign objects could get thrown away from the sander causing injury. USING THE DUST COLLECTION BAG The dust collection bag provides a dust collection system for the sander. WARNING: Do not use the dust collection bag when sanding metal. Using the dust collection bag when sanding metal creates a fire hazard, which could damage the tool and lead to serious personal injury. ATTACHING THE DUST COLLECTION BAG See Figure 6, page 12. Unplug the sander. Slide the dust bag retainer over the blower exhaust hole on the sander. EMPTYING THE DUST COLLECTION BAG For more efficient operation, empty the dust collection bag when it is no more than half full. This action permits the air to flow through the bag better. Always empty and clean the dust collection bag thoroughly upon completion of a sanding operation and before placing the sander in storage. 7 - English
-
 1
1 -
 2
2 -
 3
3 -
 4
4 -
 5
5 -
 6
6 -
 7
7 -
 8
8 -
 9
9 -
 10
10 -
 11
11 -
 12
12 -
13
-
14
-
15
-
16
-
17
-
18
-
19
-
20
-
21
-
22
-
23
-
24
-
25
-
26
-
27
-
28
-
29
-
30
-
31
-
32
 |
 |
