Ryobi JM82K English Manual - Page 13
Fence Height, Setting The Fence Height, Fence Angle, Setting The Fence Angle
 |
View all Ryobi JM82K manuals
Add to My Manuals
Save this manual to your list of manuals |
Page 13 highlights
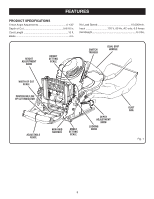
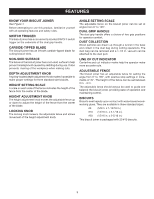
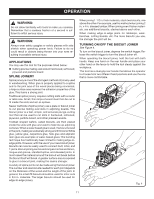
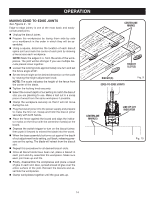
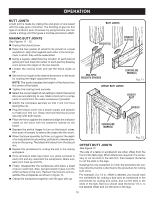
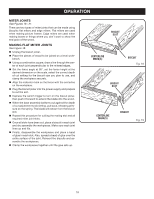
OPERATION FENCE HEIGHT The adjustable fence on the biscuit joiner can be moved up or down to adjust the position of the blade in relation to the top of the workpiece. A scale on each side of the fence indicates the height of the fence from the center of the blade. The fence can be positioned up to two inches from the center of the blade. However, the scale and indicator point can only be set up to 2 in. from the center of the blade. Scale marks are in increments of 1/16 in. SETTING THE FENCE HEIGHT See Figure 7. n Unplug the biscuit joiner. n Loosen the locking knob approximately one turn. n Move the fence up or down by rotating the height adjustment knob until the indicator point is aligned with the desired dimension on the scale. n Tighten the locking knob securely. FENCE ANGLE The adjustable fence on the biscuit joiner can be set at angles ranging from 0° to 135°, with accurate positive stops set in 45° increments. A scale is located on each side of the adjustable fence for identifying these positive stop angles. Each stop reached when rotating the adjustable fence from one angle setting to another equals a 45° positive stop angle change. SETTING THE FENCE ANGLE See Figure 8. n Unplug the biscuit joiner. n Loosen the locking knob approximately one turn. n Rotate the fence to the desired angle. n Tighten the locking knob securely. INDICATOR POINT HEIGHT SETTING SCALE HEIGHT ADJUSTMENT KNOB TO LOWER TO RAISE TO TIGHTEN TO LOOSEN ADJUSTABLE FENCE ANGLE SETTING SCALE LOCKING KNOB Fig. 7 ROTATE ADJUSTABLE FENCE TO DESIRED ANGLE SETTING TO TIGHTEN TO LOOSEN Fig. 8 13
-
 1
1 -
2
-
3
-
4
-
5
-
6
-
7
-
 8
8 -
 9
9 -
 10
10 -
 11
11 -
 12
12 -
 13
13 -
 14
14 -
 15
15 -
 16
16 -
 17
17 -
 18
18 -
19
-
20
-
21
-
22
-
23
-
24
-
25
-
26
 |
 |
