Samsung 150MB User Manual (user Manual) (ver.1.0) (English) - Page 13
ON-Screen DisplayOSD
 |
View all Samsung 150MB manuals
Add to My Manuals
Save this manual to your list of manuals |
Page 13 highlights
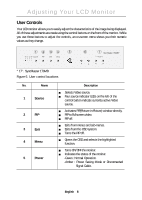
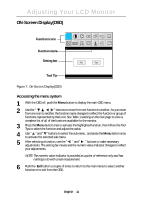
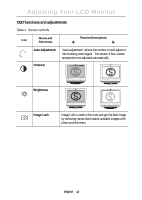
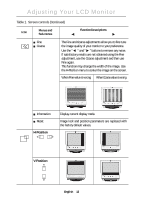
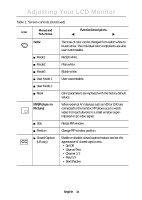
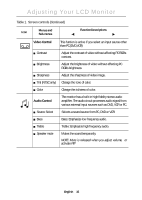
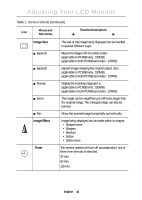
Adjusting Your LCD Monitor ON-Screen Display(OSD) Function icons Function name Setting bar AUTO CC AUTO ADJUSTMENT Tool Tip Auto Adjustment Press Menu Key Figure 7. On-Screen Display(OSD) Accessing the menu system 1 With the OSD off, push the Menu button to display the main OSD menu. 2 Use the " " buttons to move from one function to another. As you move from one icon to another, the function name changes to reflect the function or group of functions represented by that icon. See Table 1 starting on the next page to view a complete list of all of the functions available for the monitor. 3 Press the Menu button once to activate the highlighted function, then follow the Tool Tips to select the function and adjust the value. 4 Use " " and " " buttons to select the sub-menu, and press the Menu button once to activate the selected sub-menu. 5 After selecting a function, use the " " and " " buttons to make necessary adjustments. The setting bar moves and the numeric value indicator changes to reflect your adjustments. NOTE: The numeric value indicator is provided as a point of reference only and has nothing to do with a real measurement. 6 Push the Exit button a couple of times to return to the main menu to select another function or to exit from the OSD. English 11
-
 1
1 -
2
-
3
-
4
-
5
-
6
-
7
-
 8
8 -
 9
9 -
 10
10 -
 11
11 -
 12
12 -
 13
13 -
 14
14 -
 15
15 -
 16
16 -
 17
17 -
 18
18 -
19
-
20
-
21
-
22
-
23
-
24
-
25
-
26
-
27
-
28
-
29
-
30
-
31
-
32
-
33
-
34
 |
 |
