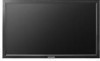
Samsung 320MP-2 User Manual (ENGLISH) - Page 19
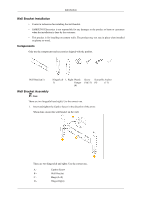
Wall Bracket Installation, Components, Wall Bracket Assembly, Hinge Right - wall mount
 |
UPC - 729507807997
View all Samsung 320MP-2 manuals
Add to My Manuals
Save this manual to your list of manuals |
Page 19 highlights
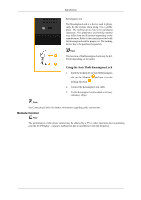
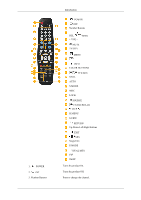
Introduction Wall Bracket Installation • Contact a technician for installing the wall bracket. • SAMSUNG Electronics is not responsible for any damages to the product or harm to customers when the installation is done by the customer. • This product is for installing on cement walls. The product may not stay in place when installed on plaster or wood. Components Only use the components and accessories shipped with the product. Wall Bracket(1) Hinge(Left 1, Right Plastic Screw Screw(B) Anchor 1) Hanger (A)(11) (4) (11) (4) Wall Bracket Assembly Note There are two hinges(left and right). Use the correct one. 1. Insert and tighten the Captive Screw in the direction of the arrow. When done, mount the wall bracket on the wall. There are two hinges(left and right). Use the correct one. A - Captive Screw B - Wall Bracket C - Hinge (Left) D - Hinge (Right)
-
 1
1 -
2
-
3
-
4
-
5
-
6
-
7
-
8
-
9
-
10
-
11
-
12
-
13
-
 14
14 -
 15
15 -
 16
16 -
 17
17 -
 18
18 -
 19
19 -
 20
20 -
 21
21 -
 22
22 -
 23
23 -
 24
24 -
25
-
26
-
27
-
28
-
29
-
30
-
31
-
32
-
33
-
34
-
35
-
36
-
37
-
38
-
39
-
40
-
41
-
42
-
43
-
44
-
45
-
46
-
47
-
48
-
49
-
50
-
51
-
52
-
53
-
54
-
55
-
56
-
57
-
58
-
59
-
60
-
61
-
62
-
63
-
64
-
65
-
66
-
67
-
68
-
69
-
70
-
71
-
72
-
73
-
74
-
75
-
76
-
77
-
78
-
79
-
80
-
81
-
82
-
83
-
84
-
85
-
86
-
87
-
88
-
89
-
90
-
91
-
92
-
93
-
94
-
95
-
96
-
97
-
98
-
99
-
100
-
101
-
102
 |
 |
