Samsung 520DXN Quick Guide (ENGLISH)
Samsung 520DXN - SyncMaster - 52" LCD Flat Panel Display Manual
 |
UPC - 729507806402
View all Samsung 520DXN manuals
Add to My Manuals
Save this manual to your list of manuals |
Samsung 520DXN manual content summary:
- Samsung 520DXN | Quick Guide (ENGLISH) - Page 1
LCD MONITOR quick start guide 520DX , 520DXn ii - Samsung 520DXN | Quick Guide (ENGLISH) - Page 2
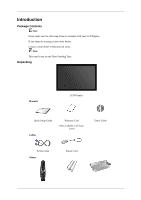
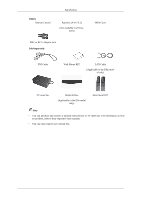
with your LCD Display. If any items are missing, contact your dealer. Contact a local dealer to buy optional items. Note This stand is not for the Floor Standing Type. Unpacking Manuals LCD Display Quick Setup Guide Cables Warranty Card (Not available in all locations) User's Guide D-Sub Cable - Samsung 520DXN | Quick Guide (ENGLISH) - Page 3
in all loca- tions) BNC to RCA Adaptor Jack Sold separately HDD Cover DVI Cable Wall Mount KIT LAN Cable (Applicable to the DXn model only) TV tuner box NetWork Box (Applicable to the DX model only) Semi Stand KIT Note • You can purchase and connect a separate network box or TV tuner box - Samsung 520DXN | Quick Guide (ENGLISH) - Page 4
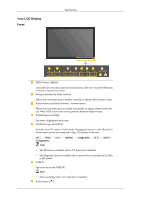
Video mode. Changing the source is only allowed for external devices that are connected to the LCD Display at the time. [PC] [DVI] [Component] Note [AV] [HDMI] [MagicInfo] box is installed in the DXn or MP model. D.MENU Opens the on-screen D.MENU. Note • This is available when a TV tuner box - Samsung 520DXN | Quick Guide (ENGLISH) - Page 5
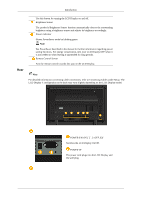
concerning cable connections, refer to Connecting Cables under Setup. The LCD Display 's configuration at the back may vary slightly depending on the LCD Display model. POWER S/W ON [ ] / OFF [O] Switches the LCD Display On/Off. POWER IN The power cord plugs into the LCD Display and the wall plug. - Samsung 520DXN | Quick Guide (ENGLISH) - Page 6
IN [VIDEO] (VIDEO Connection Terminal) Connect the [ VIDEO ] terminal of your monitor to the video output terminal of the external device using a VIDEO cable. AV AUDIO IN [L-AUDIO-R](LCD Display Audio Connection Terminal (Input)) AUDIO OUT [L-AUDIO-R] (LCD Display Audio Connection Terminal (Output)) - Samsung 520DXN | Quick Guide (ENGLISH) - Page 7
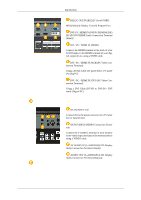
only) USB(USB Connection Terminal) Keyboard / Mouse, Mass Storage Device Compatible. (Applicable to the DXn model only) Note The number of LCD Displays that can be connected to loopout may differ depending on the cables, signal source etc. With cables where there is no degradation or signal source - Samsung 520DXN | Quick Guide (ENGLISH) - Page 8
illustration depending on the manufacturer. Refer to the manual provided with the Kensington Lock for proper use. its model. Using the Anti-Theft Kensington Lock 1. Insert the locking device into the Kensington slot on the Monitor and LCD Display , causing a malfunction due to interference - Samsung 520DXN | Quick Guide (ENGLISH) - Page 9
Number Buttons DEL button + VOL - MUTE TV/DTV MENU INFO COLOR BUTTONS TTX/MIX STILL AUTO S.MODE MDC LOCK SOURCE ENTER/PRE-CH CH/P D.MENU GUIDE RETURN Up-Down Left-Right buttons EXIT SRS MagicInfo P.MODE DUAL/MTS PIP SWAP Turns the product On. Turns the product Off. Press to change - Samsung 520DXN | Quick Guide (ENGLISH) - Page 10
. CH/P 21.D.MENU 22.GUIDE 23. RETURN Introduction The "-" written information services via teletext. LCD Display except for the Power and LOCK buttons. Press the button to change the input signal SOURCE. Changing the SOURCE is only allowed for external devices that are connected to the monitor - Samsung 520DXN | Quick Guide (ENGLISH) - Page 11
MTS/S_Mode Mono Mono ↔ Stereo Mono ↔ SAP Default Manual Change Mono Every time you press the button, a PIP screen appears. - This fuction does not work for this LCD Display. Swaps the contents of the PIP and main image. The image in the PIP window will appear on the main screen, and the main - Samsung 520DXN | Quick Guide (ENGLISH) - Page 12
Introduction - Samsung 520DXN | Quick Guide (ENGLISH) - Page 13
D-sub (Analog) connector on the video card. • Connect the D-sub to the 15-pin, RGB port on the back of your LCD Display and the 15 pin D-sub Port on the computer. Using the DVI (Digital) connector on the video card. • Connect the DVI Cable to the DVI port on the back of - Samsung 520DXN | Quick Guide (ENGLISH) - Page 14
pin D-sub Port on the computer. Connect the audio cable for your LCD Display to the audio port on the back of your computer. Note • Turn on both your computer and the LCD Display. • The DVI cable is optional. • Contact a local SAMSUNG Electronics Service Center to buy optional items. Connecting to - Samsung 520DXN | Quick Guide (ENGLISH) - Page 15
has AV connection terminals to connect AV input devices like DVDs, VCRs or Camcorders. You may enjoy AV signals as long as the LCD Display is turned on. Connecting to a Camcorder 1. Locate the AV output jacks on the camcorder. They are usually found on the side or back of the - Samsung 520DXN | Quick Guide (ENGLISH) - Page 16
. For an explanation of Component video, consult your DVD manual. Connecting a DTV Set Top Box Note • The connections for a typical Set Top Box are shown below. 1. Connect a Component cable between the BNC / COMPONENT IN - PR, Y, PB port on the LCD Display and the PR, Y, PB jacks on the Set Top - Samsung 520DXN | Quick Guide (ENGLISH) - Page 17
the HDMI terminal. Connecting Using a DVI to HDMI Cable Note • Connect the DVI output terminal of a digital output device to the HDMI terminal of the LCD Display using a DVI to HDMI cable. • Connect the red and white jacks of an RCA to stereo (for PC) cable to the same colored audio output - Samsung 520DXN | Quick Guide (ENGLISH) - Page 18
VCRs or camcorders as well as your computer can be connected to the LCD Display. For detailed information on connecting AV input devices, refer to the contents under Adjusting Your LCD Display. Note Connect the LAN cable. (Applicable to the DXn model only) Connecting a USB device Using a Power cord - Samsung 520DXN | Quick Guide (ENGLISH) - Page 19
Connections Note You can connect USB devices such as a mouse or keyboard. (Applicable to the DXn model only) - Samsung 520DXN | Quick Guide (ENGLISH) - Page 20
Troubleshooting Self-Test Feature Check Note Check the following items yourself before calling for assistance. Contact a Service Center for problems that you cannot solve by yourself. Self-Test Feature Check 1. Turn off both your computer and the LCD Display. 2. Unplug the video cable from the back - Samsung 520DXN | Quick Guide (ENGLISH) - Page 21
from the computer. Therefore, if there is a problem with the computer or the video card, this can cause the LCD Display to become blank, have poor coloring, become noisy, and video mode not supported, etc. In this case, first check the source of the problem, and then contact a Service Center or - Samsung 520DXN | Quick Guide (ENGLISH) - Page 22
Troubleshooting A: Check if the signal cable between the computer and the LCD Display is securely connected. (Refer to Connecting a Computer) Problems related to the Screen Note Problems related to the LCD Display screen and their solutions are listed. Q: The screen is blank and the power indicator - Samsung 520DXN | Quick Guide (ENGLISH) - Page 23
Troubleshooting A: Adjust color using Custom under OSD Color Adjustment menu. Q: button, check the cable connection between the LCD Display and the computer to ensure that the connector is properly connected. Problems related to Audio Note Problems related to audio signals and their solutions are - Samsung 520DXN | Quick Guide (ENGLISH) - Page 24
, depending on the version of the driver used. (Refer to the computer or the video card manual for details.) Q: How can I Adjusts the resolution? A: Windows XP: Set the resolution in the Control Panel Appearance and Themes Display Settings. A: Windows ME/2000: Set the resolution in the Control Panel - Samsung 520DXN | Quick Guide (ENGLISH) - Page 25
Troubleshooting Set the resolution at the Control Panel Display Screen Saver. Set the function in the BIOS-SETUP of the computer. (Refer to the Windows / Computer Manual). Q: How can I clean the outer case/LCD Panel? A: Disconnect the power cord and then clean the LCD Display with a soft cloth,
-
 1
1 -
 2
2 -
 3
3 -
 4
4 -
 5
5 -
 6
6 -
 7
7 -
8
-
9
-
10
-
11
-
12
-
13
-
14
-
15
-
16
-
17
-
18
-
19
-
20
-
21
-
22
-
23
-
24
-
25
 |
 |
±±
LCD MONITOR
quick start guide
520DX , 520DXn