Samsung DV484ETHAWR/A1 User Manual Ver.1.0 (English, French, Spanish) - Page 23
Door Reversal
 |
View all Samsung DV484ETHAWR/A1 manuals
Add to My Manuals
Save this manual to your list of manuals |
Page 23 highlights
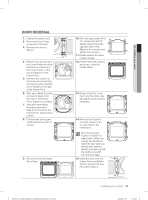
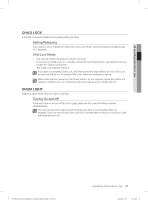
DOOR REVERSAL 1. Unplug the power cord. 2. Remove the four hinge screws from the door. 3. Remove the door by lifting it. 4. Remove two Screws from the Lever-Holder and then remove two screws and the Cover-Fronts on the top and bottom of the Frame-Front. 5. Remove two screws on the Frame-Front and then remove the screw and the Cover-Holder on the right of the Frame-Front. 6. After assembling the parts removed in Step 4 into the right of the FrameFront, tighten four screws. 7. Also after assembling the parts removed in Step 5 into the left of the Frame-Front, tighten three screws. 8. Put the back of the parts visible and remove the 15 screws. 9. Remove the Holder-Glass like a figure. DVDV476_484_03022E-01_EN_20120710.indd Sec3:23 01 installing your dryer 10. First, the upper part of the "A" component and "B" please replace the parts A B opposite each other. (Remove two screws and tighten two screws.) A B 11. Please replace the lower regions equally. 12. If there have been placed as shown, cover the Holder-Glass. 13. Please install the LeverDoor onto the other side and tighten all the screws remaining. 14. Remove the CushionCover(F). Failure to do so may result in the malfunction. Store the removed Cushion-Cover(F) in a safe location. When you change the direction in which the door opens so that the door opens to the left, you have to install the Cushion-Cover(F) onto the door again. 15. Install the door onto the Frame-Front and tighten the four screws that you removed in Step 2. installing your dryer _23 2012-07-10 5:27:23
-
 1
1 -
2
-
3
-
4
-
5
-
6
-
7
-
8
-
9
-
10
-
11
-
12
-
13
-
14
-
15
-
16
-
17
-
 18
18 -
 19
19 -
 20
20 -
 21
21 -
 22
22 -
 23
23 -
 24
24 -
 25
25 -
 26
26 -
 27
27 -
 28
28 -
29
-
30
-
31
-
32
-
33
-
34
-
35
-
36
-
37
-
38
-
39
-
40
-
41
-
42
-
43
-
44
-
45
-
46
-
47
-
48
-
49
-
50
-
51
-
52
-
53
-
54
-
55
-
56
-
57
-
58
-
59
-
60
-
61
-
62
-
63
-
64
-
65
-
66
-
67
-
68
-
69
-
70
-
71
-
72
-
73
-
74
-
75
-
76
-
77
-
78
-
79
-
80
-
81
-
82
-
83
-
84
-
85
-
86
-
87
-
88
-
89
-
90
-
91
-
92
-
93
-
94
-
95
-
96
-
97
-
98
-
99
-
100
-
101
-
102
-
103
-
104
-
105
-
106
-
107
-
108
-
109
-
110
-
111
-
112
-
113
-
114
-
115
-
116
-
117
-
118
-
119
-
120
-
121
-
122
-
123
-
124
-
125
-
126
-
127
-
128
-
129
-
130
-
131
-
132
 |
 |
