Samsung DVD-HD931 User Manual (ENGLISH) - Page 22
Setting Up the Display Options, Setting Up the Audio Options
 |
UPC - 036725609310
View all Samsung DVD-HD931 manuals
Add to My Manuals
Save this manual to your list of manuals |
Page 22 highlights
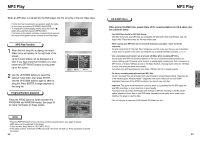
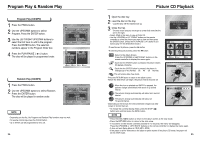
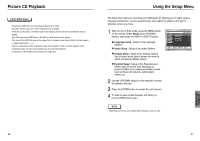
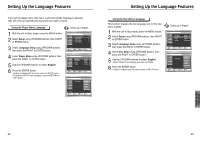
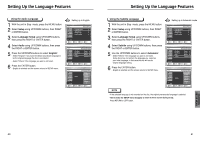
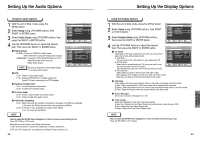
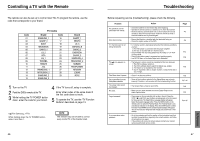
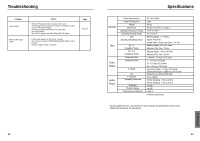
Setting Up the Audio Options Using the Audio Options 1 With the unit in Stop mode, press the MENU button. 2 Select Setup using UP/DOWN buttons, then RIGHT or ENTER button. 3 Select Audio Setup using UP/DOWN buttons, then press the RIGHT or ENTER button. 4 Use the UP/DOWN buttons to select the desired item. Then press the RIGHT or ENTER button. Digital Output 1. PCM : Converts to PCM(2CH) 48kHz audio. Select PCM when using the Analog Audio Outputs. 2. Bitstream : Converts to Dolby Digital Bitstream (5.1CH). Select Bitstream when using the Digital Audio Output. NOTE : Be sure to select the correct Digital Output or no audio will be heard. DTS 1. Off : Doesn't output digital signal. 2. On : Outputs DTS Bitstream via digital output only. Select DTS when connecting to a DTS Decoder. Dynamic Compression 1. On : To select dynamic compression. 2. Off : To select the standard range. 2x Scan Audio 1. Off : Doesn't output Double Scan Audio sound. 2. On : Output Double Scan Audio sound. PCM Down Sampling 1. On : Select this when the amplifier connected to the player is not 96KHz compatible. In this case, the 96KHz signals will be down converted to 48KHz. 2. Off : If the disc is copy protected, the output will be 48KHz. If not, the output will be 96KHz. NOTE • How to make the SETUP menu disappear or return to menu screen during set up; Press RETURN or LEFT button. • Manufactured under license from Dolby Laboratories. "Dolby" and the double-D symbol are trademarks of Dolby Laboratories. • "DTS" and "DTS Digital Out" are trademarks of Digital Theater Systems, Inc. 42 Setting Up the Display Options Using the Display Options 1 With the unit in Stop mode, press the MENU button. 2 Select Setup using UP/DOWN buttons, then RIGHT or ENTER button. 3 Select Display Setup using UP/DOWN buttons, then press the RIGHT or ENTER button. 4 Use the UP/DOWN buttons to select the desired item. Then press the RIGHT or ENTER button. TV Aspect Depending on the type of television you have, you may want to adjust the screen setting (aspect ratio). 1. 16:9 Wide : You can view the full 16:9 picture on your widescreen TV. 2. 4:3 Pan Scan : Select this for conventional size TVs when you want to see the central portion of the 16:9 screen. (Extreme left and right side of movie picture will be cut off.) 3. 4:3 Letter Box : Select when you want to see the total 16:9 ratio screen DVD supplies, even though you have a TV with a 4:3 ratio screen. Black bars will appear at the top and bottom of the screen. Still Mode These options will help prevent picture shake in still mode and display small text clearer. 1. Auto : When selecting Auto, Field/Frame mode will be automatically converted. 2. Frame : Select this feature when you want to see small letters more clearly in the Auto mode. 3. Field : Select this feature when the screen shakes in the Auto mode. Screen Messages Use to turn on-screen messages On or Off. Front Display Adjust the brightness of the unit's front panel display. 1. Auto Dim : Makes the Front Panel Display dim automatically when playing a DVD. 2. Dim : Makes the Front Panel Display dim. 3. Bright : Makes the Front Panel Display bright. NOTE • How to make the SETUP menu disappear or return to menu screen during set up; Press the RETURN or LEFT button. 43 CHANGING SETUP MENU
-
 1
1 -
2
-
3
-
4
-
5
-
6
-
7
-
8
-
9
-
10
-
11
-
12
-
13
-
14
-
15
-
16
-
 17
17 -
 18
18 -
 19
19 -
 20
20 -
 21
21 -
 22
22 -
 23
23 -
 24
24 -
 25
25 -
 26
26
 |
 |
