Samsung GT-P7310/M16 User Manual (user Manual) (ver.f4) (English(north America - Page 12
Setting Up Your Device, Set date and time - 3 2 + united states
 |
View all Samsung GT-P7310/M16 manuals
Add to My Manuals
Save this manual to your list of manuals |
Page 12 highlights
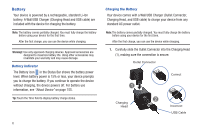
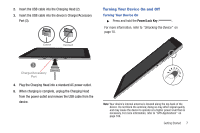
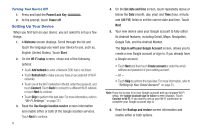
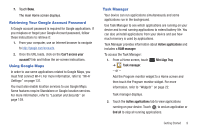
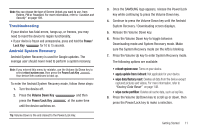
Turning Your Device Off 1. Press and hold the Power/Lock Key . 2. At the prompt, touch Power off. Setting Up Your Device When you first turn on your device, you are asked to set up a few things. 1. A Welcome screen displays. Scroll through the list and touch the language you want your device to use, such as, English (United States). Touch Start. 2. On the Wi-Fi setup screen, chose one of the following options: • Touch Add network to enter a Network SSID that is not listed. • Touch Refresh list to make sure you have an accurate list of Wi-Fi networks. • Touch one of the Wi-Fi networks in the list, enter the password, and touch Connect. Touch Back to connect to a different Wi-Fi network or touch Next to continue. • Touch Skip to perform this task later. For more information, refer to "Wi-Fi Settings" on page 131. 3. Read the Use Google location service screen information and enable either or both of the Google location services. Touch Next to continue. 8 4. On the Set date and time screen, touch repeatedly above or below the Date (month, day, year) and Time (hour, minute, and AM/PM) fields to set the correct date and time. Touch Next. 5. Your new device uses your Google account to fully utilize its Android features, including Gmail, Maps, Navigation, Google Talk, and the Android Market. The Sign in with your Google Account screen, allows you to create a new Google account or sign in, if you already have a Google account. • Touch Next and then touch Create account or enter the email address and password of your existing account. - or - • Touch Skip to perform this task later. For more information, refer to "Setting Up Your Gmail Account" on page 51. Note: If you try to sign in to your Google account and you skipped Wi-Fi setup, the Google Account sign-in failure screen displays. Touch Connect to Wi-Fi, if you want to set up your Wi-Fi connection to complete your Google account sign in. 6. Read the Backup and restore screen information and enable either or both options.
-
 1
1 -
2
-
3
-
4
-
5
-
6
-
 7
7 -
 8
8 -
 9
9 -
 10
10 -
 11
11 -
 12
12 -
 13
13 -
 14
14 -
 15
15 -
 16
16 -
 17
17 -
18
-
19
-
20
-
21
-
22
-
23
-
24
-
25
-
26
-
27
-
28
-
29
-
30
-
31
-
32
-
33
-
34
-
35
-
36
-
37
-
38
-
39
-
40
-
41
-
42
-
43
-
44
-
45
-
46
-
47
-
48
-
49
-
50
-
51
-
52
-
53
-
54
-
55
-
56
-
57
-
58
-
59
-
60
-
61
-
62
-
63
-
64
-
65
-
66
-
67
-
68
-
69
-
70
-
71
-
72
-
73
-
74
-
75
-
76
-
77
-
78
-
79
-
80
-
81
-
82
-
83
-
84
-
85
-
86
-
87
-
88
-
89
-
90
-
91
-
92
-
93
-
94
-
95
-
96
-
97
-
98
-
99
-
100
-
101
-
102
-
103
-
104
-
105
-
106
-
107
-
108
-
109
-
110
-
111
-
112
-
113
-
114
-
115
-
116
-
117
-
118
-
119
-
120
-
121
-
122
-
123
-
124
-
125
-
126
-
127
-
128
-
129
-
130
-
131
-
132
-
133
-
134
-
135
-
136
-
137
-
138
-
139
-
140
-
141
-
142
-
143
-
144
-
145
-
146
-
147
-
148
-
149
-
150
-
151
-
152
-
153
-
154
-
155
-
156
-
157
-
158
-
159
-
160
-
161
-
162
-
163
-
164
-
165
-
166
-
167
-
168
-
169
-
170
-
171
-
172
-
173
-
174
-
175
-
176
-
177
-
178
-
179
-
180
-
181
-
182
-
183
-
184
-
185
-
186
-
187
-
188
 |
 |