Samsung HC-P4252W Quick Guide (easy Manual) (ver.1.0) (English) - Page 3
Connecting a DVD Player
 |
View all Samsung HC-P4252W manuals
Add to My Manuals
Save this manual to your list of manuals |
Page 3 highlights
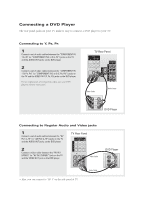
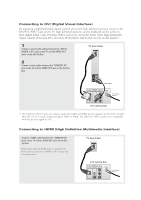
Connecting a DVD Player The rear panel jacks on your TV make it easy to connect a DVD player to your TV. Connecting to Y, PB, PR 1 Connect a set of audio cables between the "COMPONENT IN 1 (L, R)" (or "COMPONENT IN 2 or 3 (L, R)") jacks on the TV and the AUDIO OUT jacks on the DVD player. 2 Connect a set of video cables between the "COMPONENT IN 1 (Y, PB, PR)" (or "COMPONENT IN 2 or 3 (Y, PB, PR)") jacks on the TV and the VIDEO OUT (Y, PB, PR) jacks on the DVD player. For an explanation of Component video, see your DVD player's owner's instruction. Connecting to Regular Audio and Video jacks 1 Connect a set of audio cables between the "AV IN 1 (L, R)" (or "AV IN 2 (L, R)") jacks on the TV and the AUDIO OUT jacks on the DVD player. 2 Connect a video cable between the "AV IN 1 (VIDEO)" (or "AV IN 2 (VIDEO)") jack on the TV and the VIDEO OUT jack on the DVD player. • Also, you can connect to "AV 3" on the side panel of TV.
-
 1
1 -
 2
2 -
 3
3 -
 4
4 -
 5
5 -
 6
6
 |
 |
